> ## Documentation Index
> Fetch the complete documentation index at: https://help.hiredata.com/llms.txt
> Use this file to discover all available pages before exploring further.
# Connect HireData to your AI assistant
> Connect ChatGPT, Claude, or Gemini to HireData via the official MCP connector, sign in with your account, and work safely in your workspaces.
*HireData has an official MCP (Model Context Protocol) connection. Any AI assistant that supports MCP can connect to HireData with your own account. It sees only the workspaces you grant and works with the same permissions you have in the app. Every request is verified and recorded in the activity log. This guide shows you how to set up the connection in ChatGPT, Claude, and Gemini.*
## What you can do once connected
After connecting, your AI assistant can work directly with your HireData workspaces. For example, it can:
* **People** — find, view, create, and update candidates and contacts, including their contact details and labels.
* **Forms** — build and maintain complete forms: fields, answer options, validation, and branching logic.
* **Form responses** — look up submitted answers, including responses to older versions of a form.
* **Email templates** — create branded email templates, translate them, and send test emails.
* **Message templates & conversations** — manage WhatsApp and messaging templates, check their approval status, and view conversation history.
* **Team & invitations** — manage workspace users, roles, and invitations.
* **Statistics** — request usage and performance figures, such as credit usage over any period, email and messaging performance, and automation runs.
* **Knowledge base** — search and read HireData help articles directly from your assistant.
Your assistant can never do more than you can. During sign-in you'll see exactly which permissions apply (up to 14, depending on your role), and within each workspace your own access level applies. Some tools may therefore not be available to you.
## Before you begin
* You need a HireData account with access to at least one workspace.
* The connection URL for all assistants is:
```text theme={null}
https://api.hiredata.com/mcp
```
* Custom connectors require a specific plan on some assistants (see each section below).
## Connect from Claude
Custom connectors are available on all Claude plans (Free, Pro, Max, Team, and Enterprise); free accounts are limited to one custom connector.
### Step 1: Add the HireData connector
1. Open Claude and go to **Settings** > **Connectors** (in the desktop app you'll find Connectors under **Customize**).
2. Click **Add** > **Add custom connector**.
3. Enter the MCP server URL: `https://api.hiredata.com/mcp`
4. Click **Add**. HireData now appears in your connector list.
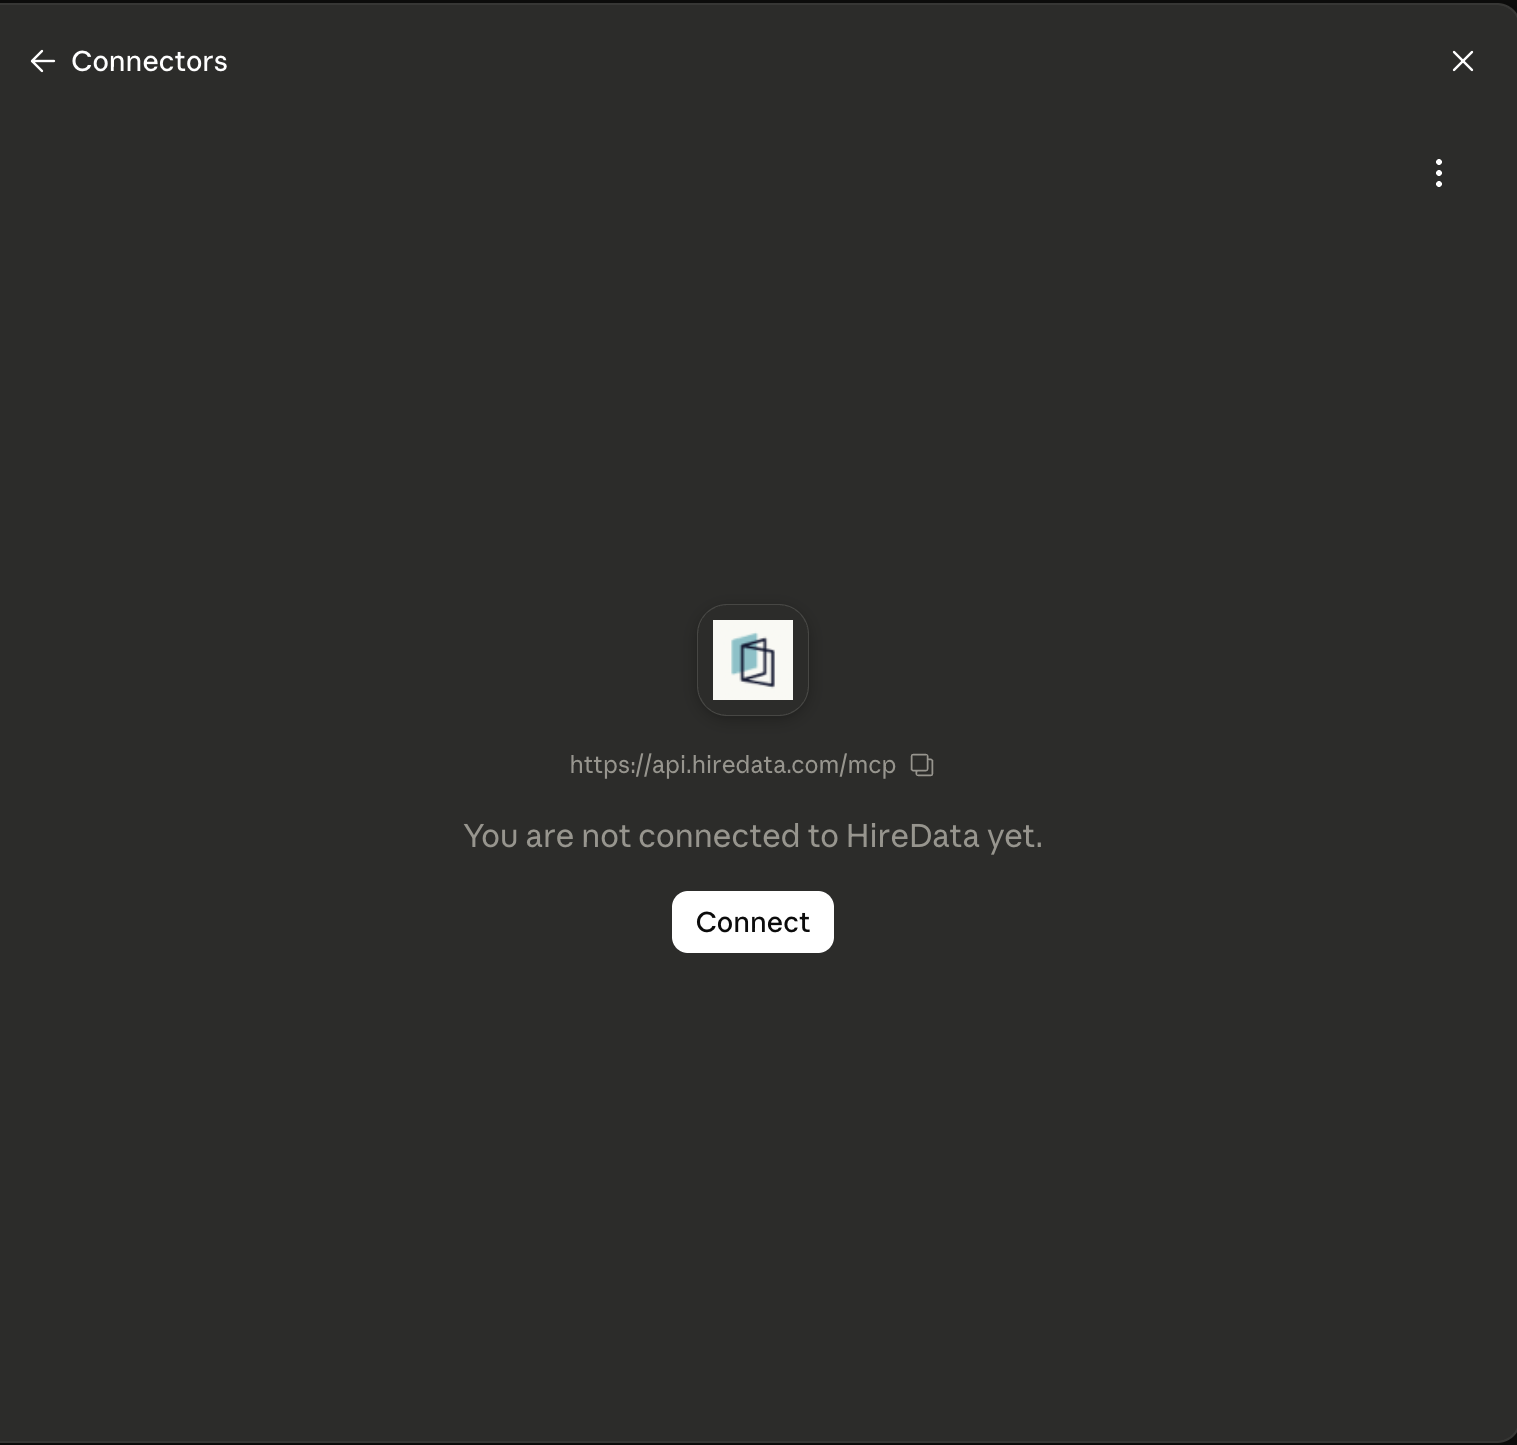 On Team and Enterprise plans, an organisation owner first adds the connector in **Organization settings** > **Connectors**. After that, each member connects it from their own **Settings** > **Connectors**.
### Step 2: Sign in and authorize
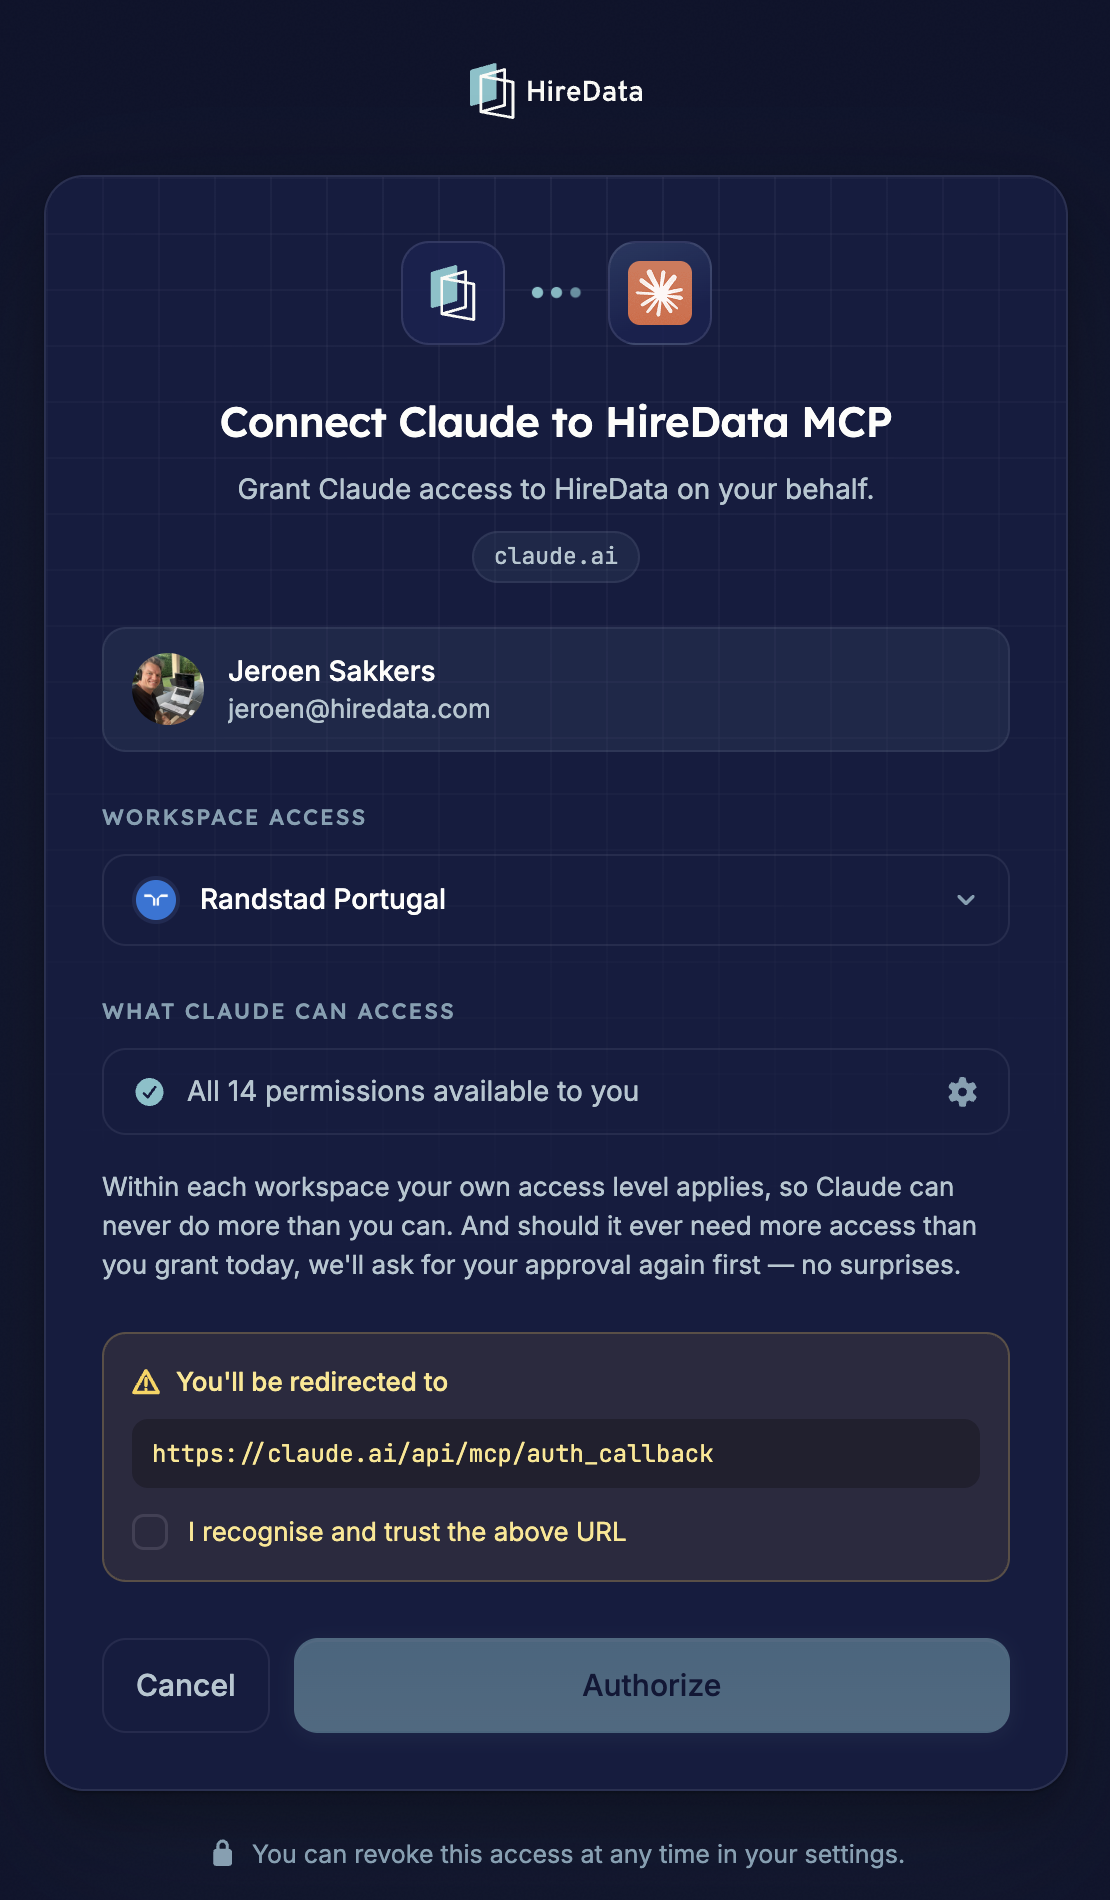
1. Click **\[Connect]**. Your browser opens HireData's consent screen: *"Connect Claude to HireData MCP"*.
2. Check that you're signed in with the right HireData account.
3. Under **Workspace access**, select the workspace(s) you want to grant access to.
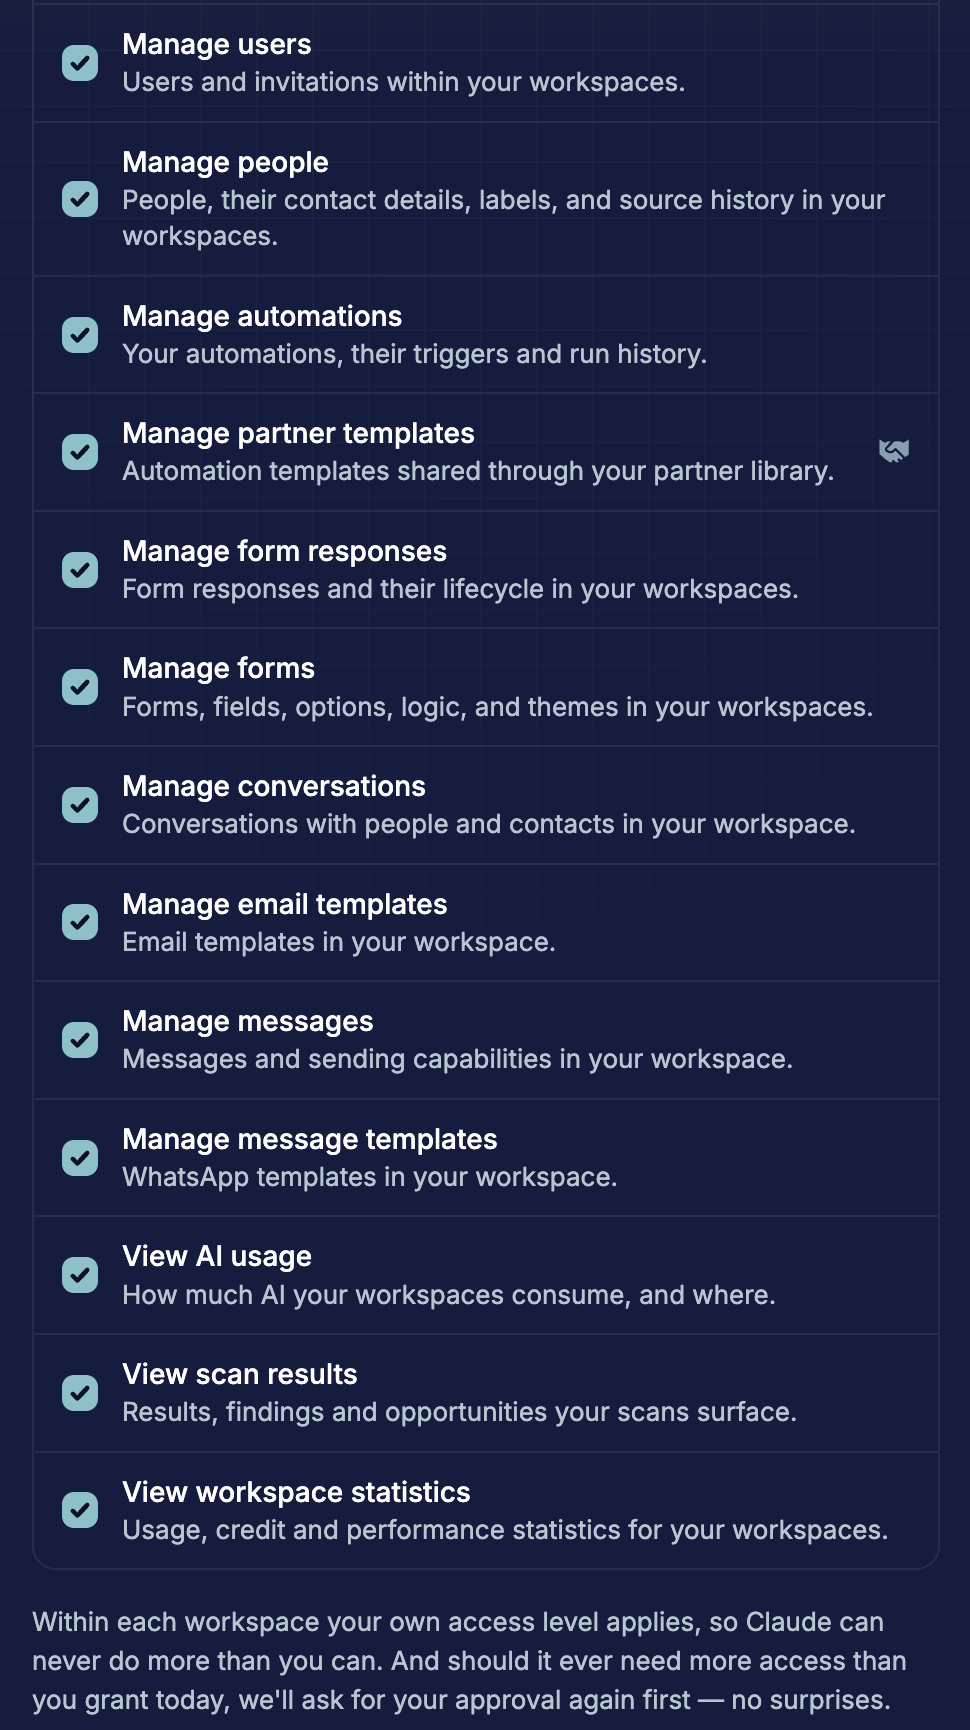
4. Under **What Claude can access**, review the permissions. By default all permissions available to you are selected — click the gear icon to narrow them down.
5. Tick **"I recognise and trust the above URL"** to confirm the redirect back to Claude, and click **\[Authorize]**.
On Team and Enterprise plans, an organisation owner first adds the connector in **Organization settings** > **Connectors**. After that, each member connects it from their own **Settings** > **Connectors**.
### Step 2: Sign in and authorize
1. Click **\[Connect]**. Your browser opens HireData's consent screen: *"Connect Claude to HireData MCP"*.
2. Check that you're signed in with the right HireData account.
3. Under **Workspace access**, select the workspace(s) you want to grant access to.
4. Under **What Claude can access**, review the permissions. By default all permissions available to you are selected — click the gear icon to narrow them down.
5. Tick **"I recognise and trust the above URL"** to confirm the redirect back to Claude, and click **\[Authorize]**.
 *Expand the permission list to see exactly what you're granting:*
 You can revoke this access at any time from your settings.
### Step 3: Choose when Claude needs your approval
Back in **Settings** > **Connectors**, click the HireData connector to open **Tool permissions**. Tools are grouped into **Read-only tools** and **Write/delete tools**, and both default to **Needs approval**.
You can revoke this access at any time from your settings.
### Step 3: Choose when Claude needs your approval
Back in **Settings** > **Connectors**, click the HireData connector to open **Tool permissions**. Tools are grouped into **Read-only tools** and **Write/delete tools**, and both default to **Needs approval**.
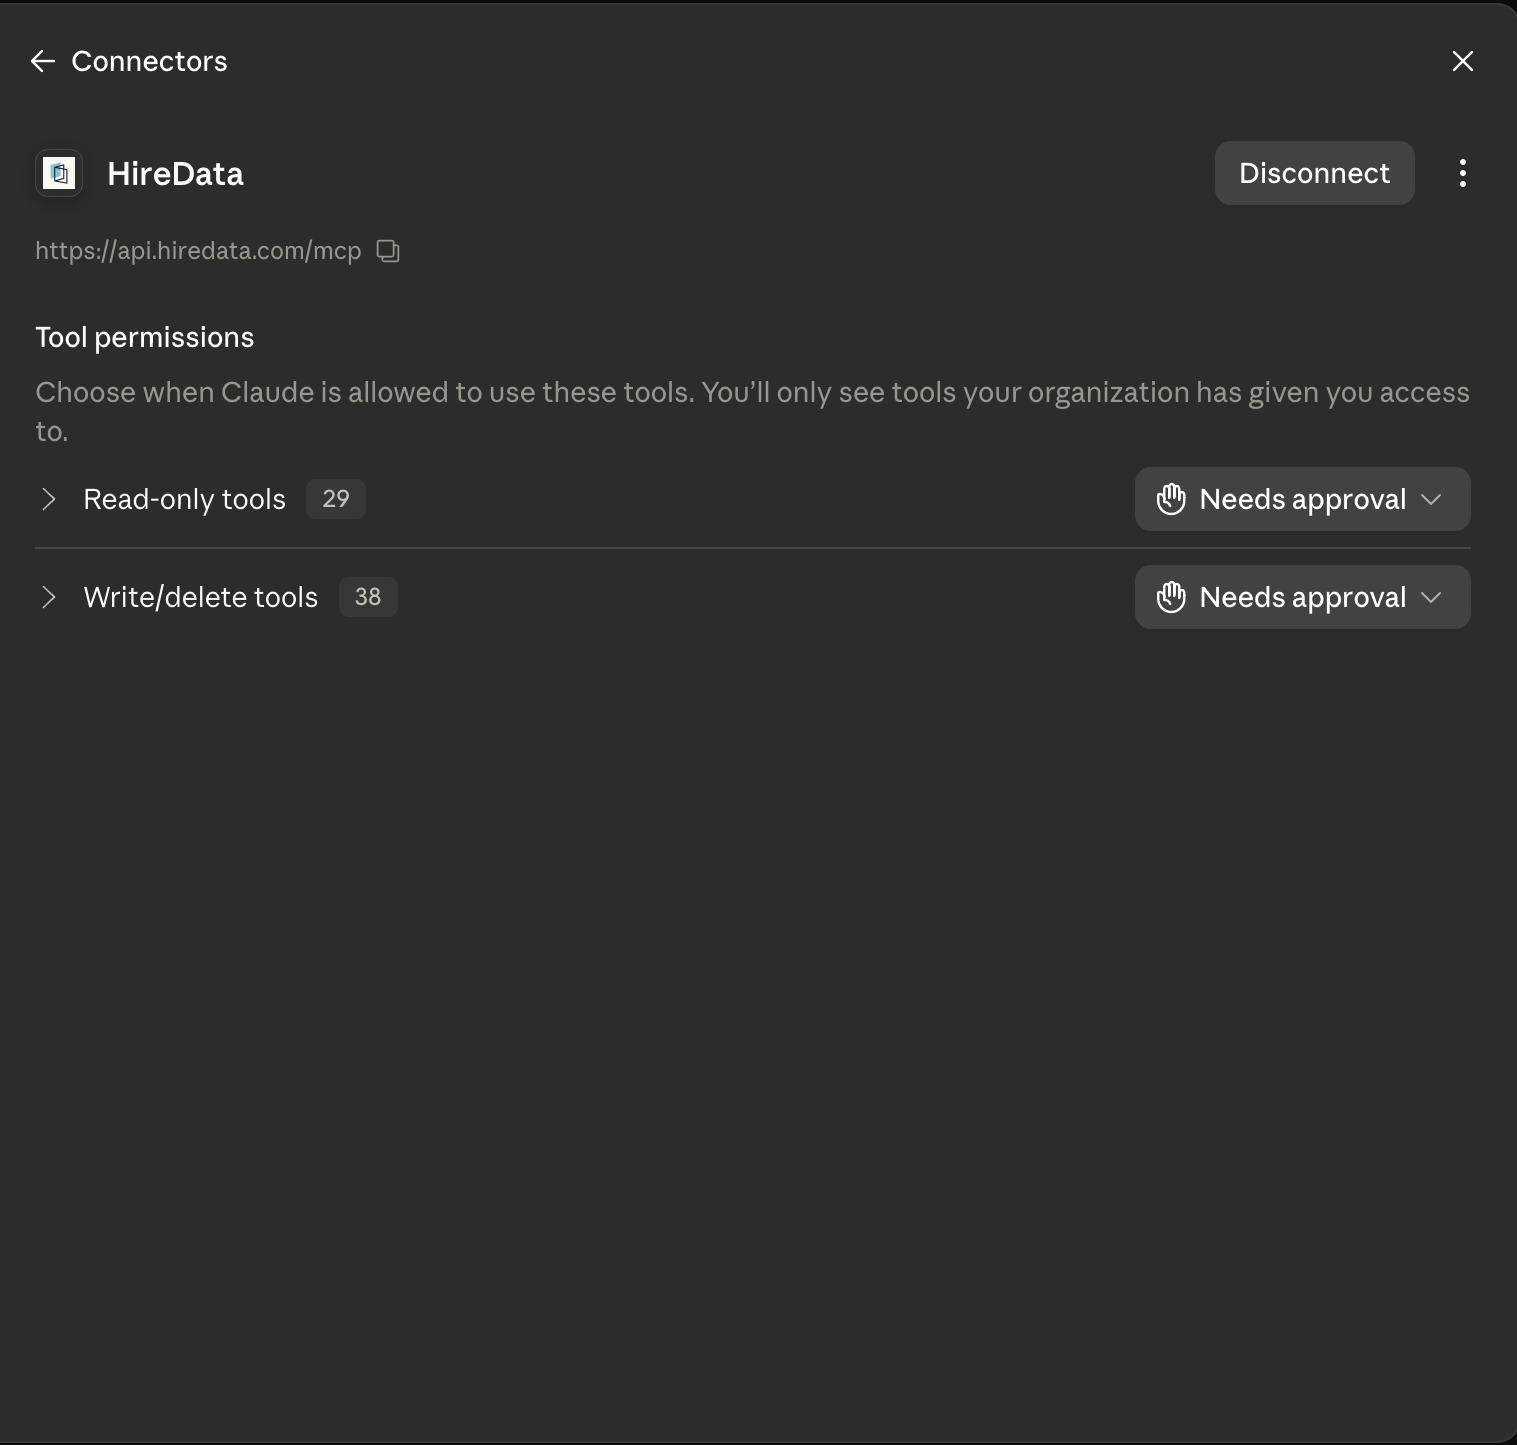 A common setup: set read-only tools to **Always allow** so Claude can look things up freely, and keep write/delete tools on **Needs approval** so nothing changes in HireData without your explicit OK. You can also set this per individual tool.
 ### Step 4: Use it in a chat
In a conversation, click the **+** button, choose **Connectors**, and make sure **HireData** is enabled. Then just ask — for example: *"Create a candidate NPS email template in our brand style and send me a test."*
## Connect from ChatGPT
Custom MCP connections are available on ChatGPT paid plans (Plus, Pro, Business, Enterprise, and Edu; not on the free plan).
### Step 1: Add the HireData MCP server
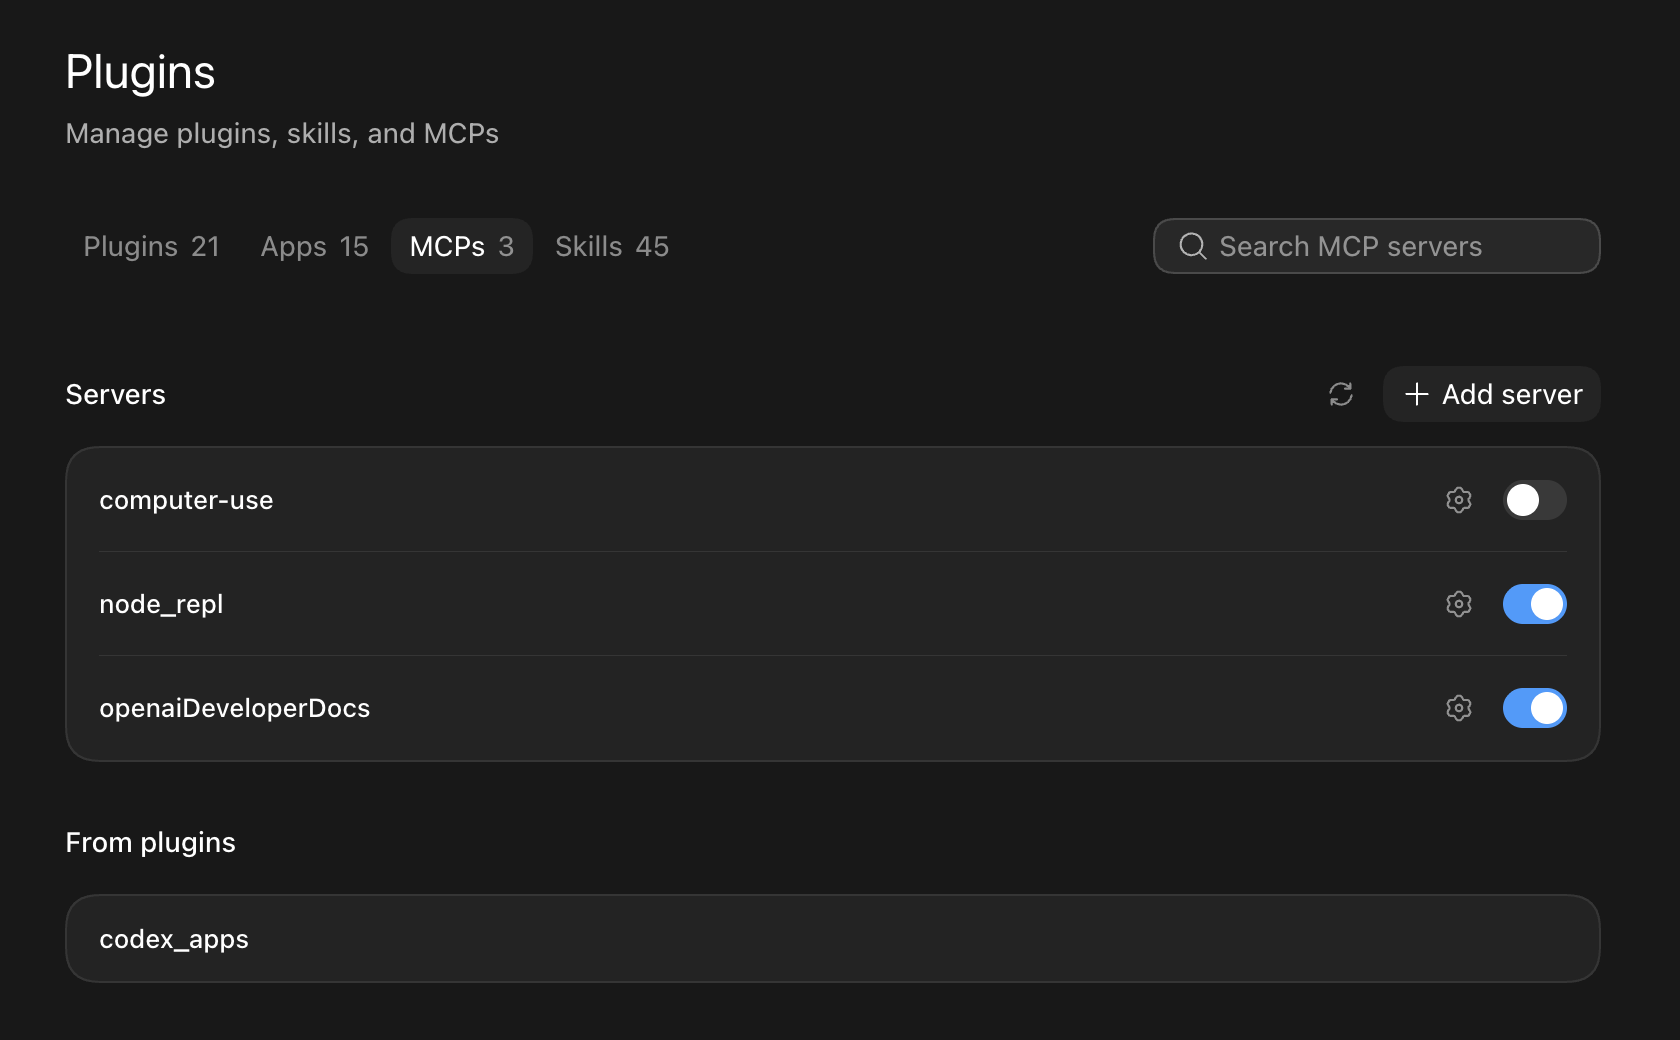
1. Open ChatGPT (desktop app) and go to **Settings** > **Plugins** (under *Integrations*).
2. Open the **MCPs** tab and click **\[+ Add server]**.
### Step 4: Use it in a chat
In a conversation, click the **+** button, choose **Connectors**, and make sure **HireData** is enabled. Then just ask — for example: *"Create a candidate NPS email template in our brand style and send me a test."*
## Connect from ChatGPT
Custom MCP connections are available on ChatGPT paid plans (Plus, Pro, Business, Enterprise, and Edu; not on the free plan).
### Step 1: Add the HireData MCP server
1. Open ChatGPT (desktop app) and go to **Settings** > **Plugins** (under *Integrations*).
2. Open the **MCPs** tab and click **\[+ Add server]**.
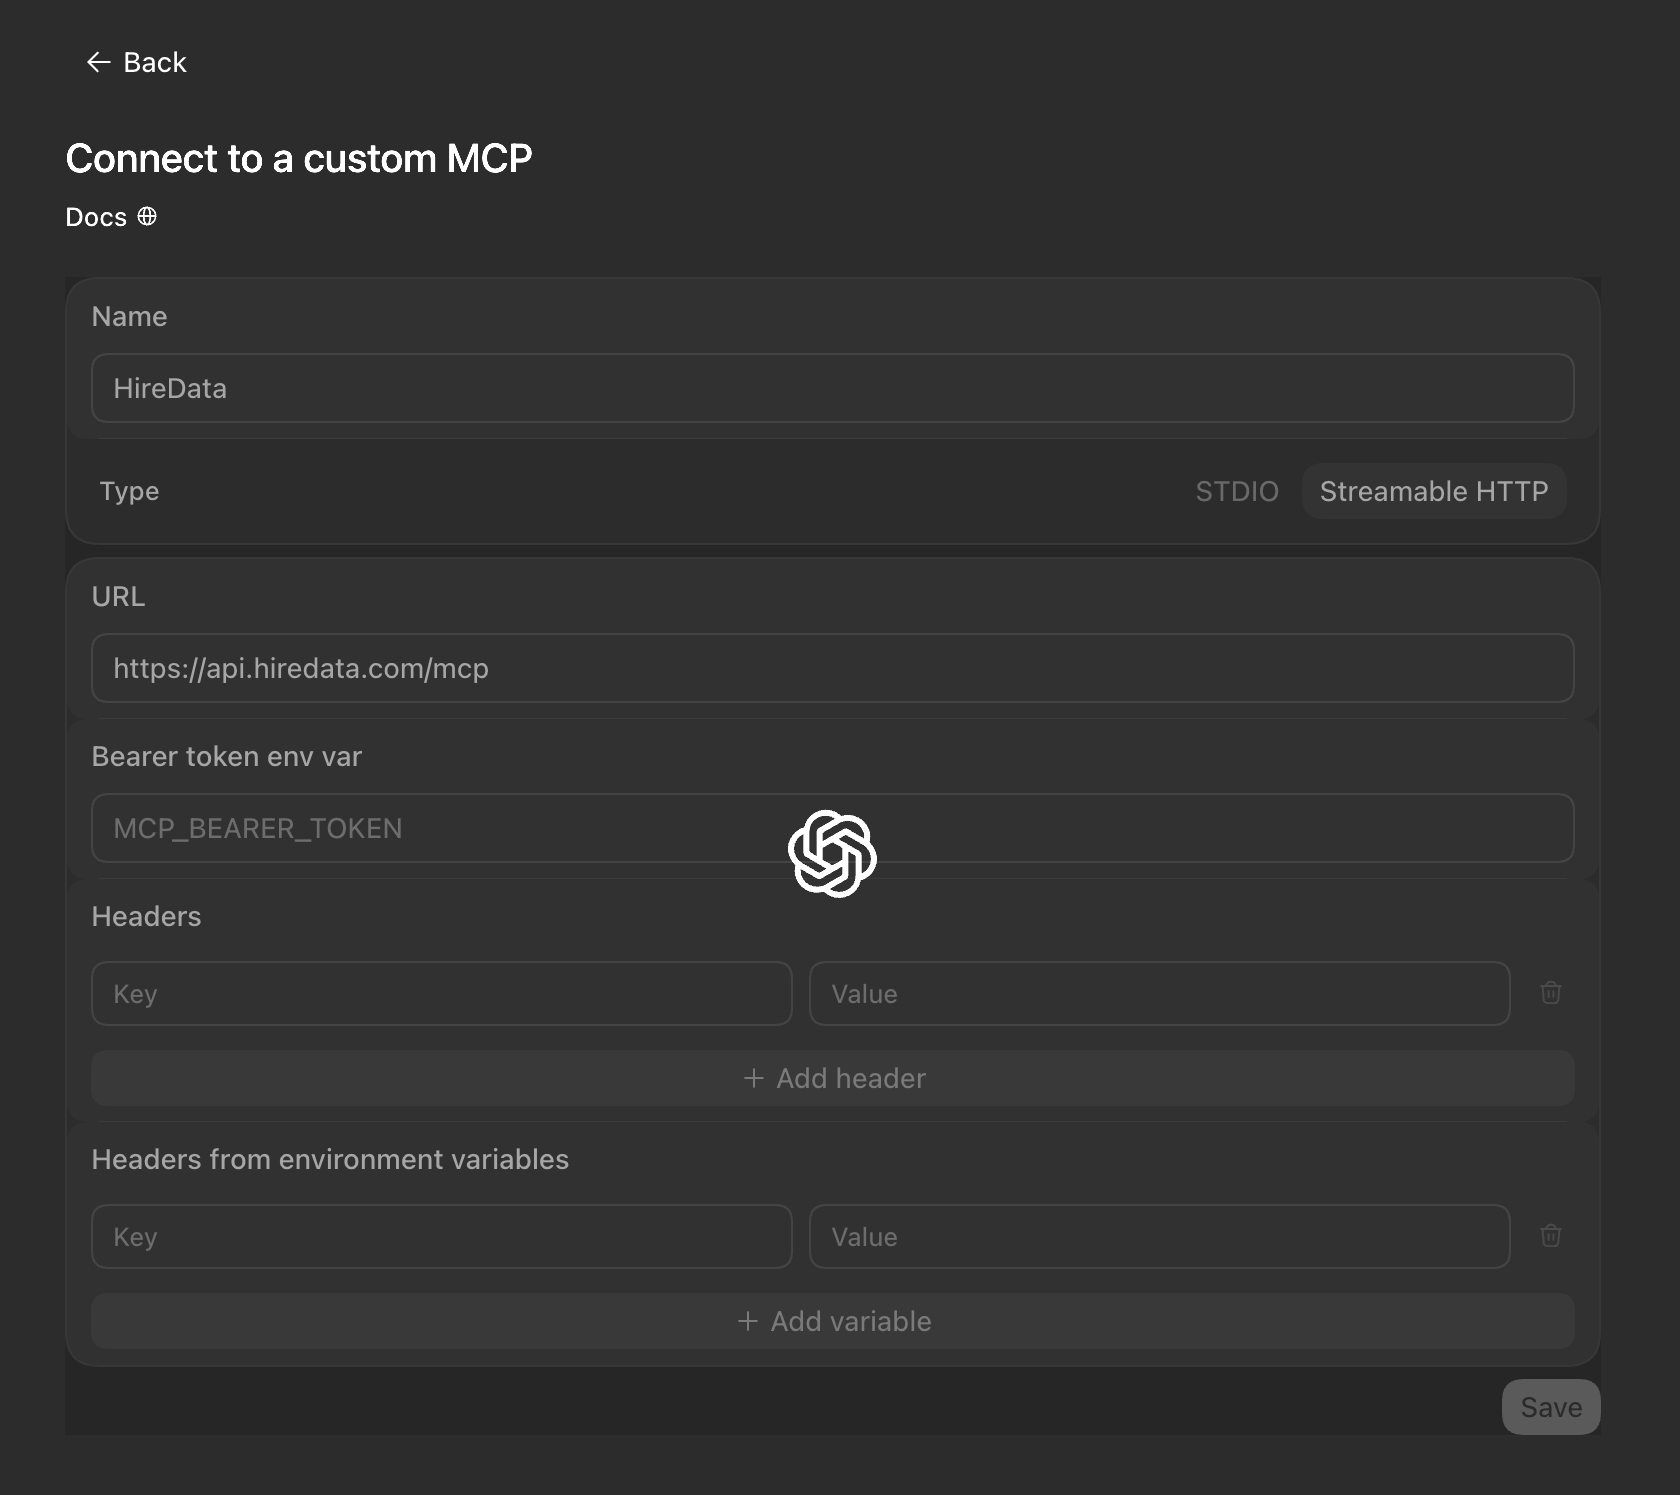
 3. In *Connect to a custom MCP*, fill in:
* **Name**: `HireData`
* **Type**: **Streamable HTTP**
* **URL**: `https://api.hiredata.com/mcp`
4. Leave the token and header fields empty — HireData uses OAuth sign-in — and click **\[Save]**.
3. In *Connect to a custom MCP*, fill in:
* **Name**: `HireData`
* **Type**: **Streamable HTTP**
* **URL**: `https://api.hiredata.com/mcp`
4. Leave the token and header fields empty — HireData uses OAuth sign-in — and click **\[Save]**.
 On ChatGPT web, the same feature lives under **Settings** > **Connectors**: click **Advanced**, enable **Developer mode**, and use **Add custom connector** with the URL above.
### Step 2: Sign in to HireData
The first time ChatGPT uses the server you'll be taken to HireData's sign-in and consent screen. Log in, select the workspace(s) you want to grant access to, review the permissions, confirm the redirect URL, and authorize. After that, toggle the HireData server on and its tools are available in your chats.
## Connect from Gemini
Google currently offers custom MCP connections in two places — the regular Gemini chat app does not support them yet:
* **Gemini Spark** (Google AI Ultra): open **Connected Apps** in Spark's settings, add a custom app, and enter the MCP server URL `https://api.hiredata.com/mcp`. You'll be asked to sign in to HireData the first time you use it.
* **Gemini Enterprise**: an administrator adds HireData as a custom MCP server connection in the Gemini Enterprise admin console using the same URL. After that, users sign in with their own HireData account.
Since Google's MCP support is evolving quickly, check Google's documentation for the latest availability on your plan.
## How access and security work
* **Your permissions, nothing more.** The assistant works with the same rights you have in HireData, and only in the workspaces you selected during sign-in. Every request is re-checked on HireData's side.
* **Audit trail.** Every action your assistant takes is recorded in the activity log, linked to the workspace it ran in.
* **New capabilities need your approval.** When HireData adds new MCP capabilities, your existing connection does not widen automatically — you'll be asked to re-authorize first. No surprises.
* **Safe changes.** Updates are partial (anything your assistant doesn't mention stays unchanged), your assistant can't silently overwrite newer work, and destructive or external-facing actions require explicit confirmation.
* **Disconnect anytime.** Remove the connector in your assistant's settings, or revoke the grant from your HireData settings.
## Troubleshooting
* **403 error during authorization** (*"The provided auth token for the request is different from the session auth token"*): close the authorization tab and click **Connect** in your assistant again to restart the flow. This can happen when an older HireData sign-in session is still open in your browser.
* **Tools don't appear in the chat**: check that the connector is enabled for that conversation (in Claude via the **+** menu > Connectors; in ChatGPT via the server toggle in Settings > Plugins > MCPs).
## Try it out
Some example prompts to get started:
* "Which email templates do we have in HireData, and which ones are missing a Dutch translation?"
* "Set up a GDPR consent form and show me a preview link."
* "Create a candidate NPS form with a 0–10 score question and a follow-up question for scores below 7."
* "How many credits did our workspace use in June and July?"
* "Invite [jane@example.com](mailto:jane@example.com) to our workspace as a user."
## Related topics
- [Your first week with HireData](/get-started/your-first-week.md)
- [Connect with WhatsApp: Embedded sign-up](/apps/messaging/whatsapp/connect-with-whatsapp-embedded-sign-up.md)
- [Why is my Carerix not syncing with HireData](/apps/carerix/why-is-my-carerix-not-syncing-with-hiredata.md)
- [Set up a trigger](/apps/custom-apps/set-up-a-trigger.md)
- [Setting a default language and AI tone of voice](/settings/setting-a-default-language-and-ai-tone-of-voice.md)
On ChatGPT web, the same feature lives under **Settings** > **Connectors**: click **Advanced**, enable **Developer mode**, and use **Add custom connector** with the URL above.
### Step 2: Sign in to HireData
The first time ChatGPT uses the server you'll be taken to HireData's sign-in and consent screen. Log in, select the workspace(s) you want to grant access to, review the permissions, confirm the redirect URL, and authorize. After that, toggle the HireData server on and its tools are available in your chats.
## Connect from Gemini
Google currently offers custom MCP connections in two places — the regular Gemini chat app does not support them yet:
* **Gemini Spark** (Google AI Ultra): open **Connected Apps** in Spark's settings, add a custom app, and enter the MCP server URL `https://api.hiredata.com/mcp`. You'll be asked to sign in to HireData the first time you use it.
* **Gemini Enterprise**: an administrator adds HireData as a custom MCP server connection in the Gemini Enterprise admin console using the same URL. After that, users sign in with their own HireData account.
Since Google's MCP support is evolving quickly, check Google's documentation for the latest availability on your plan.
## How access and security work
* **Your permissions, nothing more.** The assistant works with the same rights you have in HireData, and only in the workspaces you selected during sign-in. Every request is re-checked on HireData's side.
* **Audit trail.** Every action your assistant takes is recorded in the activity log, linked to the workspace it ran in.
* **New capabilities need your approval.** When HireData adds new MCP capabilities, your existing connection does not widen automatically — you'll be asked to re-authorize first. No surprises.
* **Safe changes.** Updates are partial (anything your assistant doesn't mention stays unchanged), your assistant can't silently overwrite newer work, and destructive or external-facing actions require explicit confirmation.
* **Disconnect anytime.** Remove the connector in your assistant's settings, or revoke the grant from your HireData settings.
## Troubleshooting
* **403 error during authorization** (*"The provided auth token for the request is different from the session auth token"*): close the authorization tab and click **Connect** in your assistant again to restart the flow. This can happen when an older HireData sign-in session is still open in your browser.
* **Tools don't appear in the chat**: check that the connector is enabled for that conversation (in Claude via the **+** menu > Connectors; in ChatGPT via the server toggle in Settings > Plugins > MCPs).
## Try it out
Some example prompts to get started:
* "Which email templates do we have in HireData, and which ones are missing a Dutch translation?"
* "Set up a GDPR consent form and show me a preview link."
* "Create a candidate NPS form with a 0–10 score question and a follow-up question for scores below 7."
* "How many credits did our workspace use in June and July?"
* "Invite [jane@example.com](mailto:jane@example.com) to our workspace as a user."
## Related topics
- [Your first week with HireData](/get-started/your-first-week.md)
- [Connect with WhatsApp: Embedded sign-up](/apps/messaging/whatsapp/connect-with-whatsapp-embedded-sign-up.md)
- [Why is my Carerix not syncing with HireData](/apps/carerix/why-is-my-carerix-not-syncing-with-hiredata.md)
- [Set up a trigger](/apps/custom-apps/set-up-a-trigger.md)
- [Setting a default language and AI tone of voice](/settings/setting-a-default-language-and-ai-tone-of-voice.md)