> ## Documentation Index
> Fetch the complete documentation index at: https://help.hiredata.com/llms.txt
> Use this file to discover all available pages before exploring further.
# HTTP Request task
> Send an HTTP request from a HireData automation. Import an OpenAPI spec or cURL command, authenticate, describe the response, test, and handle failures.
*Call an external API straight from an automation: import a specification or build the request by hand, authenticate it, describe what comes back, and use those values in later tasks.*
An automation can call an external API by itself. The **HTTP Request** task sends a request to an address you choose, with the authentication that endpoint expects, and makes the response available to the tasks that follow once you describe what it contains. You don't need a developer, and you don't need anything sitting in between.
If someone already handed you an API specification or a cURL command, you don't have to retype it. HireData can read it and fill the request in for you, which is where this page starts.
If you'd rather follow one complete example than look up fields one at a time, the cookbook walks a single request from trigger to response value: [Post an outcome to your own system](/knowledge-base/cookbook/post-an-outcome-to-your-own-system).
Looking for the other direction, where another tool sends data **into** HireData? That's a custom app trigger. See [Custom Apps](/apps/custom-apps/introduction).
## Where to find the task
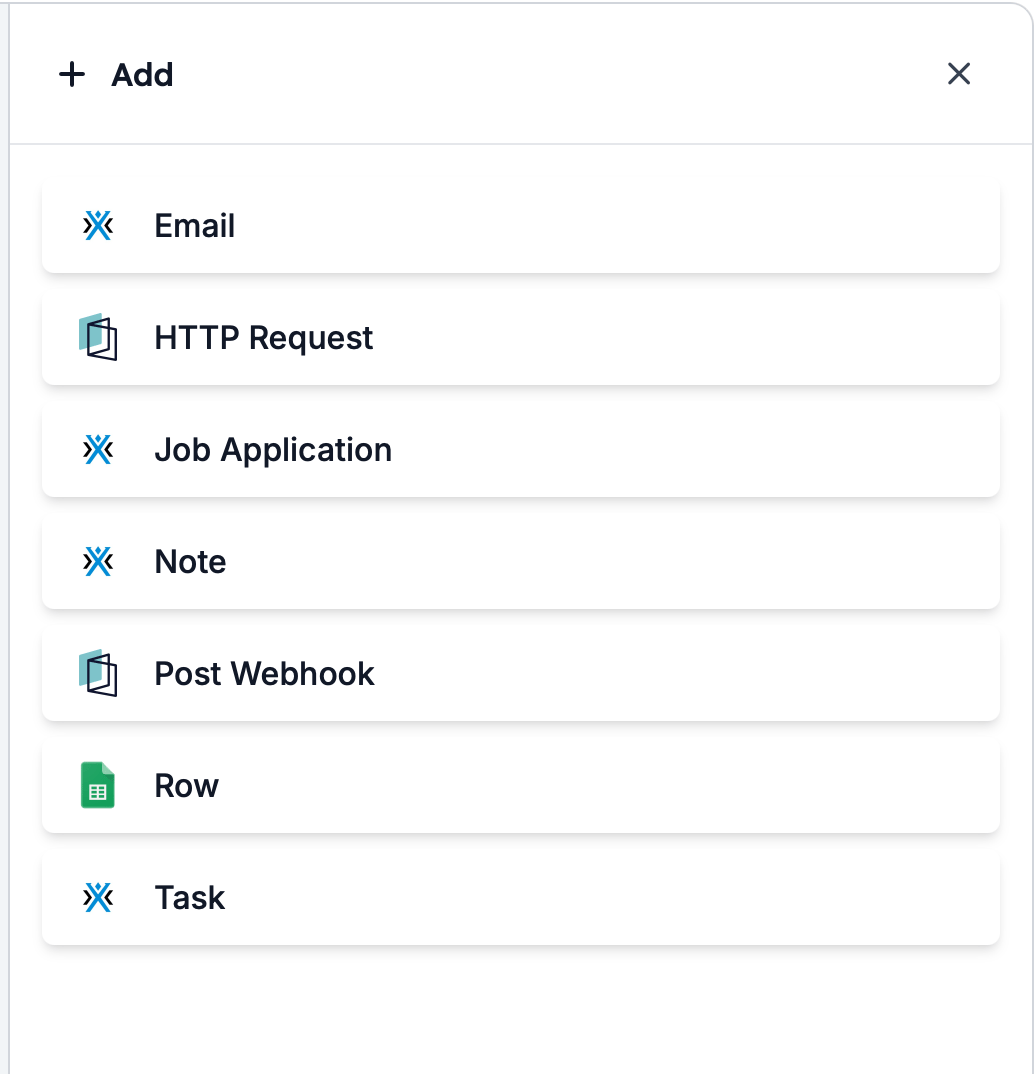
The task picker groups tasks by category, and **HTTP Request** is filed under two of them. Both routes open the same task:
* **Add → HTTP Request**
* **Message → HTTP Request**
If you think of an outbound call as sending something, look under **Message**. The task is there too, so a call that isn't under **Add** hasn't gone missing.
Under **Add**, you'll find both **HTTP Request** and **Post Webhook**.
 ## Inside the task drawer
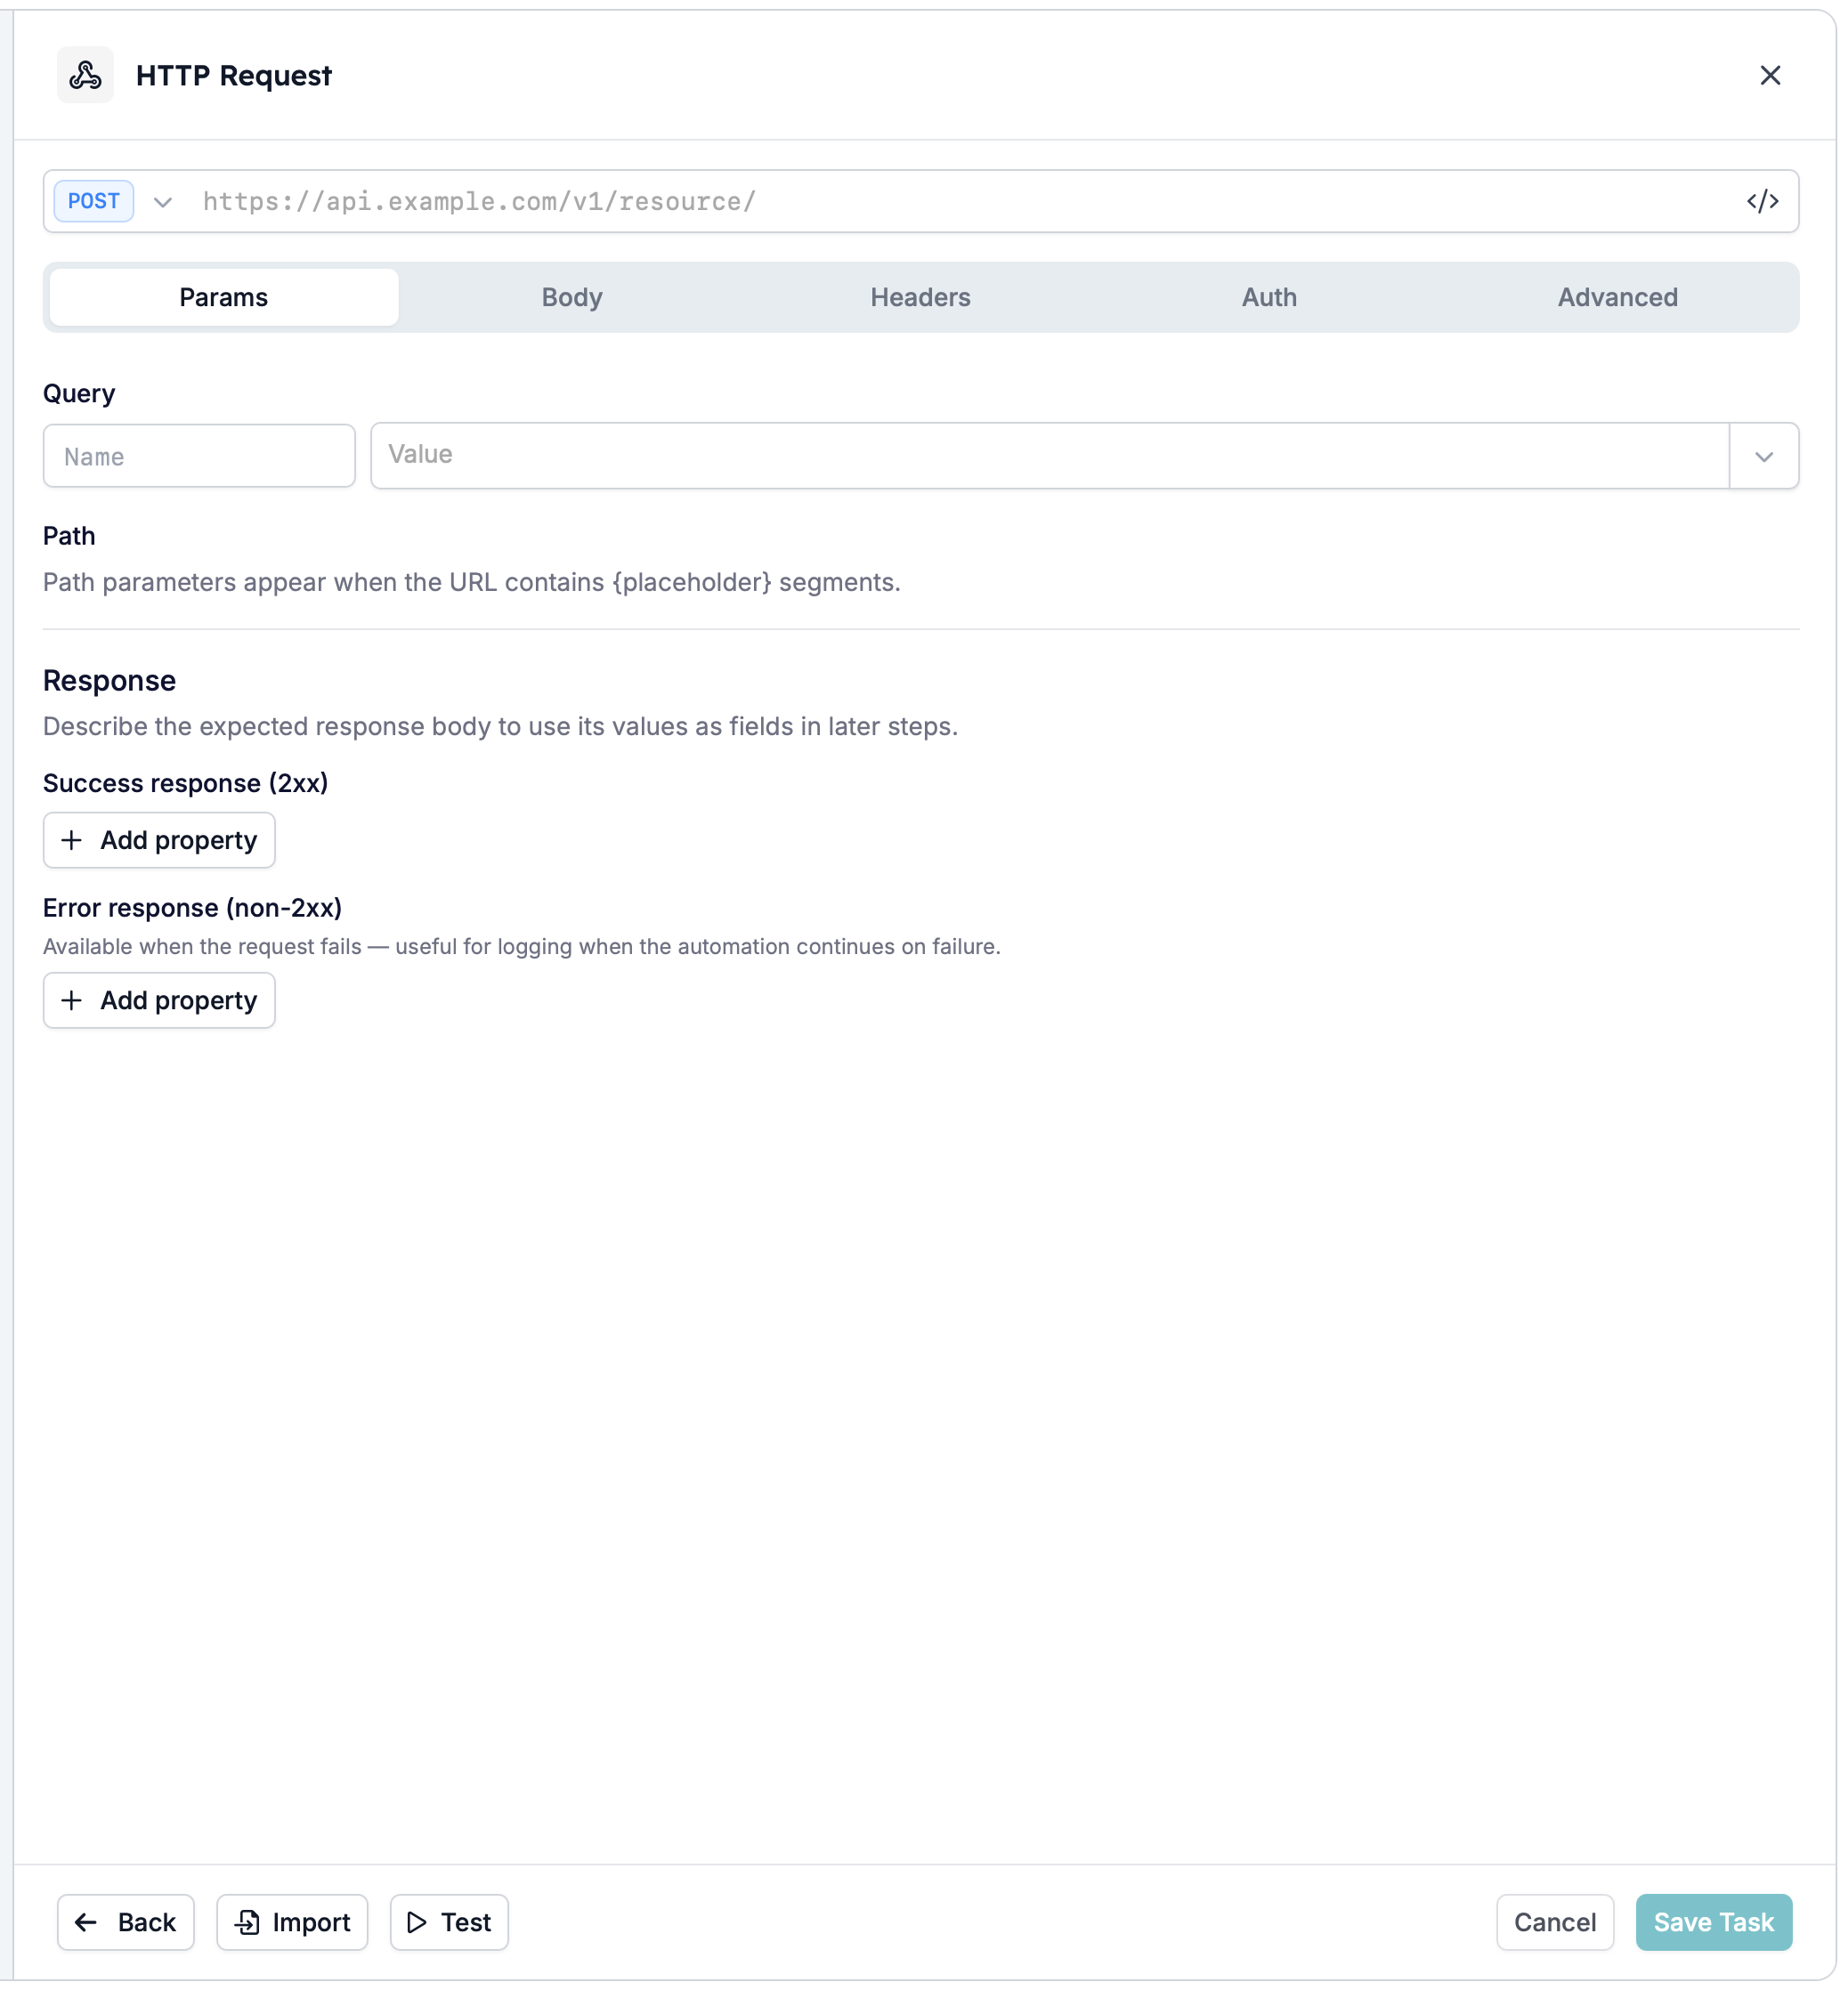
Adding the task opens a drawer that holds the whole request:
* The **header** carries the task's name and a control to edit it.
* Below the header, the **URL bar** with the method selector, offering `GET`, `POST`, `PUT`, `PATCH`, `DELETE`, and `HEAD`.
* Five tabs: **Params**, **Body**, **Headers**, **Auth**, and **Advanced**.
* **Response** is not one of the tabs. It's a separate section beneath the tabbed area and is always visible.
* The footer carries **Import**, **Test**, **Cancel**, and **Save Task**.
A new task is titled **HTTP Request**, with the method set to `POST` and an empty URL behind the placeholder `https://api.example.com/v1/resource/`.
## Inside the task drawer
Adding the task opens a drawer that holds the whole request:
* The **header** carries the task's name and a control to edit it.
* Below the header, the **URL bar** with the method selector, offering `GET`, `POST`, `PUT`, `PATCH`, `DELETE`, and `HEAD`.
* Five tabs: **Params**, **Body**, **Headers**, **Auth**, and **Advanced**.
* **Response** is not one of the tabs. It's a separate section beneath the tabbed area and is always visible.
* The footer carries **Import**, **Test**, **Cancel**, and **Save Task**.
A new task is titled **HTTP Request**, with the method set to `POST` and an empty URL behind the placeholder `https://api.example.com/v1/resource/`.
 ## Import a specification or a cURL command
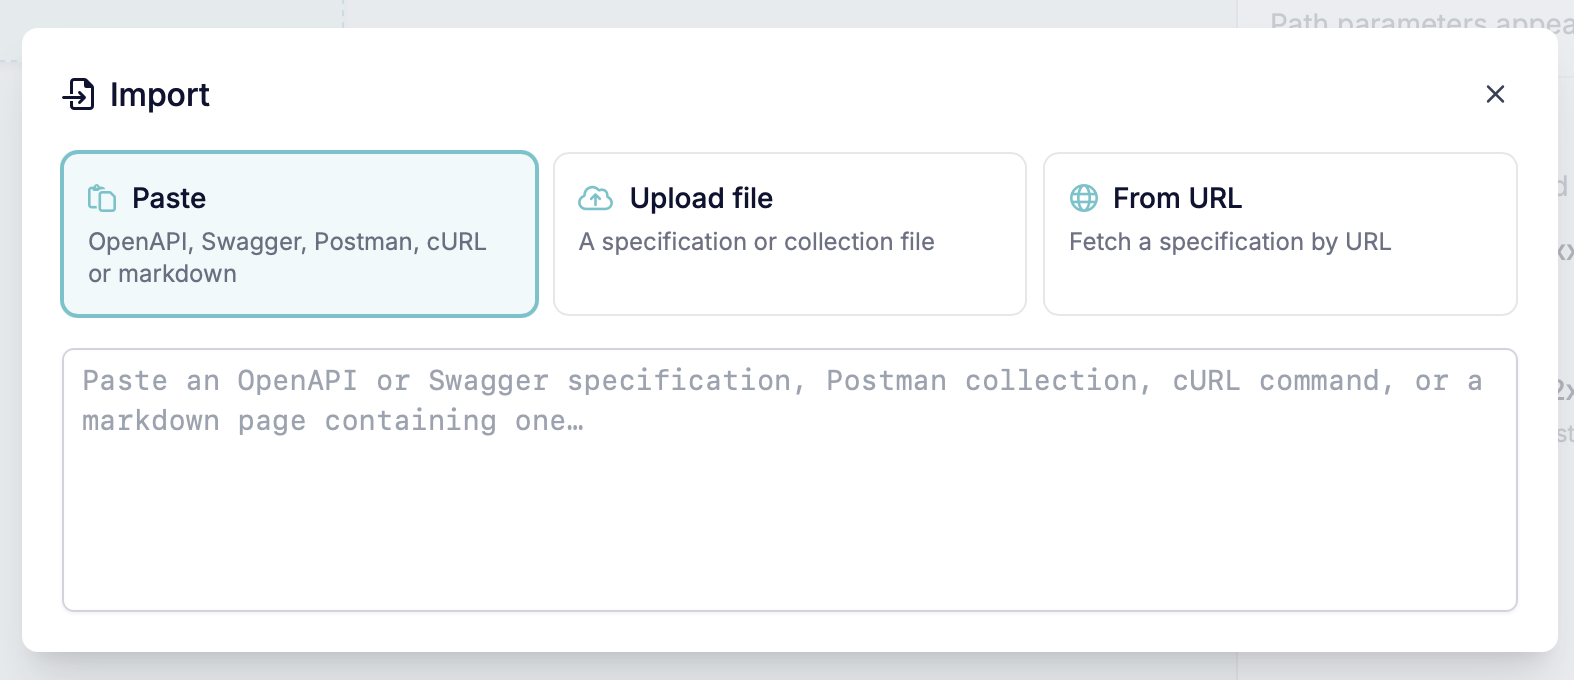
The fastest way to fill in a request is to let HireData read it from a document you already have. Click **Import** in the drawer's footer to open the **Import** dialog, which offers three routes:
Paste the document straight into the box. The route is labelled "OpenAPI, Swagger, Postman, cURL or markdown", so anything in one of those formats works.
Choose the document from your computer, for when what you were sent isn't text you can copy. The route is labelled "A specification or collection file".
Give HireData the address the specification is published at and it retrieves the document for you. The route is labelled "Fetch a specification by URL".
## Import a specification or a cURL command
The fastest way to fill in a request is to let HireData read it from a document you already have. Click **Import** in the drawer's footer to open the **Import** dialog, which offers three routes:
Paste the document straight into the box. The route is labelled "OpenAPI, Swagger, Postman, cURL or markdown", so anything in one of those formats works.
Choose the document from your computer, for when what you were sent isn't text you can copy. The route is labelled "A specification or collection file".
Give HireData the address the specification is published at and it retrieves the document for you. The route is labelled "Fetch a specification by URL".
 ### Formats HireData reads
Whichever route you use, the document has to be one HireData recognises:
* **OpenAPI 3.x** and **Swagger 2.0** specifications
* **Postman 2.1** collections
* A **cURL** command
* A **markdown** page that contains either a cURL command or a specification, which is often what a vendor's documentation page amounts to
Anything outside that list is refused rather than half-read, with "Only OpenAPI 3.x, Swagger 2.0 and Postman 2.1 documents are supported." An older Swagger or a Postman 1.0 export needs converting first. A specification that points at other files with external `$ref` references is also refused, so ask for a bundled single-file version.
### What an import fills in
Importing an API specification populates:
* The **method** and the **URL**, including the path segments the operation defines
* Any **query parameters** the operation takes, on the **Params** tab
* The **authentication type** on the **Auth** tab, taken from the specification's security scheme
* The **Description** on the [Advanced](#advanced-settings) tab
* Both trees in the [Response](#describe-the-response) section: the success response and the error response
Fill in your own key or token on the **Auth** tab afterwards, and treat the import as a starting point rather than a finished request.
### Importing a cURL command
A cURL command imports too, and it's often all a vendor's documentation gives you. It sets the method, the URL, the body, and the headers.
It also sets the credential, where the command carries one. An `Authorization: Bearer …` header becomes a **Bearer token** with the token filled in, and the header itself is dropped so it isn't sent twice. `-u user:password` — and a base64 `Authorization: Basic …` — becomes **Basic auth** with the username and password filled in.
So treat a cURL command you were sent as a credential, not just a snippet. If it came out of someone else's terminal, it may carry their key: check the **Auth** tab after importing and replace anything you shouldn't be holding.
The **Response** section stays empty afterwards. A cURL command describes only the request going out and carries no information about what comes back, so there's nothing for HireData to build the response trees from. If later tasks need values from the response, describe it yourself in the [Response](#describe-the-response) section.
### Documents with more than one operation
A specification usually describes a whole API rather than a single endpoint. When the document you import contains more than one operation, HireData shows you a list of the endpoints in it and asks which one this task should call, so handing over a complete specification is not a mistake.
This depends on the document, not on how you brought it in. The same list of endpoints appears whether you pasted the specification or fetched it **From URL**.
## Build the request by hand
An import needs a document to read. When all you have is an endpoint and the vendor's documentation, fill the request in yourself. These are the same tabs an import writes into, so this is also how you adjust an imported request. Credentials come last either way, under [Authentication](#authentication) — with one exception. Importing a *specification* sets the authentication type and leaves the secret blank, because a security scheme describes how an endpoint authenticates without carrying anyone's key. A *cURL command* is different: it holds real credentials, and they're imported with it.
### Query and path parameters
The **Params** tab has two sections, **Query** and **Path**. They look alike and work differently.
**Query** rows are yours to fill in. Each row has:
* **Enabled**: a checkbox that turns the parameter on or off without deleting the row
* **Name**: the parameter's name, typed in
* **Value**: what to send, with a field picker beside it
* **Remove**: deletes the row outright
The URL bar and the **Query** rows are two views of the same thing. Paste a URL with a query string on the end and it splits into rows; add or edit a row and the query string in the URL bar updates to match. So you can work in whichever of the two you were given — a full URL from a vendor's documentation, or a table of parameters — without transcribing it into the other.
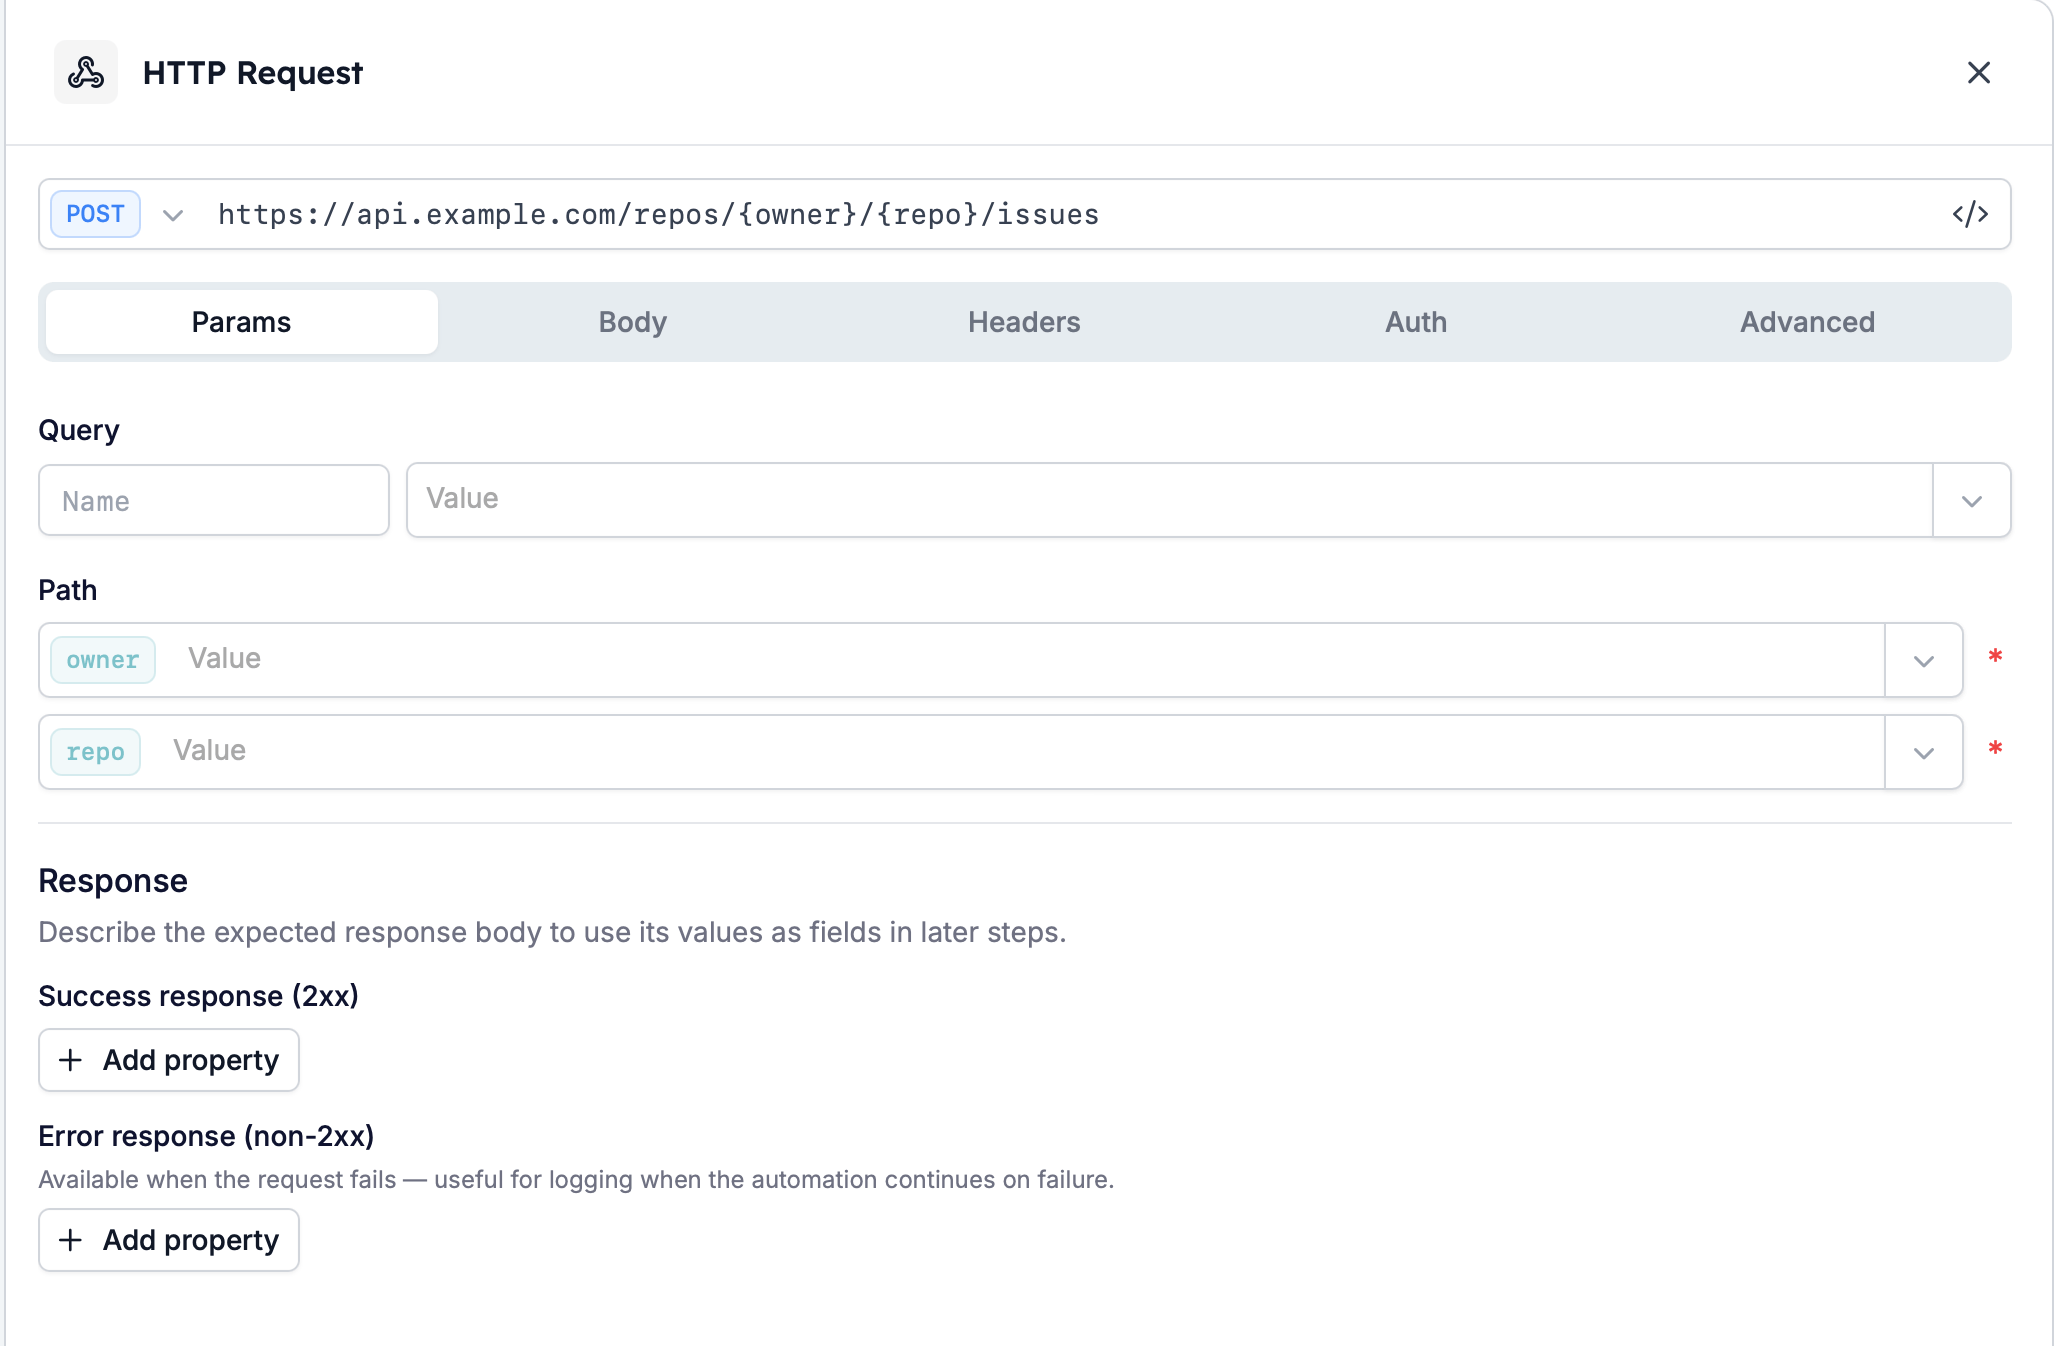
You don't name **Path** rows yourself. They come from the URL. Until the URL contains one, the section reads "Path parameters appear when the URL contains `{placeholder}` segments."
Wrap part of the path in curly braces and a row appears for it. Give the task this URL:
```text theme={null}
https://api.example.com/repos/{owner}/{repo}/issues
```
Two rows appear under **Path** straight away, `owner` and `repo`, each marked required with an asterisk. A URL ending in `/chats/{chat_id}/messages` gives you one row, `chat_id`.
So you express the endpoint's shape once, in the URL. Edit the URL and the rows follow it.
### Formats HireData reads
Whichever route you use, the document has to be one HireData recognises:
* **OpenAPI 3.x** and **Swagger 2.0** specifications
* **Postman 2.1** collections
* A **cURL** command
* A **markdown** page that contains either a cURL command or a specification, which is often what a vendor's documentation page amounts to
Anything outside that list is refused rather than half-read, with "Only OpenAPI 3.x, Swagger 2.0 and Postman 2.1 documents are supported." An older Swagger or a Postman 1.0 export needs converting first. A specification that points at other files with external `$ref` references is also refused, so ask for a bundled single-file version.
### What an import fills in
Importing an API specification populates:
* The **method** and the **URL**, including the path segments the operation defines
* Any **query parameters** the operation takes, on the **Params** tab
* The **authentication type** on the **Auth** tab, taken from the specification's security scheme
* The **Description** on the [Advanced](#advanced-settings) tab
* Both trees in the [Response](#describe-the-response) section: the success response and the error response
Fill in your own key or token on the **Auth** tab afterwards, and treat the import as a starting point rather than a finished request.
### Importing a cURL command
A cURL command imports too, and it's often all a vendor's documentation gives you. It sets the method, the URL, the body, and the headers.
It also sets the credential, where the command carries one. An `Authorization: Bearer …` header becomes a **Bearer token** with the token filled in, and the header itself is dropped so it isn't sent twice. `-u user:password` — and a base64 `Authorization: Basic …` — becomes **Basic auth** with the username and password filled in.
So treat a cURL command you were sent as a credential, not just a snippet. If it came out of someone else's terminal, it may carry their key: check the **Auth** tab after importing and replace anything you shouldn't be holding.
The **Response** section stays empty afterwards. A cURL command describes only the request going out and carries no information about what comes back, so there's nothing for HireData to build the response trees from. If later tasks need values from the response, describe it yourself in the [Response](#describe-the-response) section.
### Documents with more than one operation
A specification usually describes a whole API rather than a single endpoint. When the document you import contains more than one operation, HireData shows you a list of the endpoints in it and asks which one this task should call, so handing over a complete specification is not a mistake.
This depends on the document, not on how you brought it in. The same list of endpoints appears whether you pasted the specification or fetched it **From URL**.
## Build the request by hand
An import needs a document to read. When all you have is an endpoint and the vendor's documentation, fill the request in yourself. These are the same tabs an import writes into, so this is also how you adjust an imported request. Credentials come last either way, under [Authentication](#authentication) — with one exception. Importing a *specification* sets the authentication type and leaves the secret blank, because a security scheme describes how an endpoint authenticates without carrying anyone's key. A *cURL command* is different: it holds real credentials, and they're imported with it.
### Query and path parameters
The **Params** tab has two sections, **Query** and **Path**. They look alike and work differently.
**Query** rows are yours to fill in. Each row has:
* **Enabled**: a checkbox that turns the parameter on or off without deleting the row
* **Name**: the parameter's name, typed in
* **Value**: what to send, with a field picker beside it
* **Remove**: deletes the row outright
The URL bar and the **Query** rows are two views of the same thing. Paste a URL with a query string on the end and it splits into rows; add or edit a row and the query string in the URL bar updates to match. So you can work in whichever of the two you were given — a full URL from a vendor's documentation, or a table of parameters — without transcribing it into the other.
You don't name **Path** rows yourself. They come from the URL. Until the URL contains one, the section reads "Path parameters appear when the URL contains `{placeholder}` segments."
Wrap part of the path in curly braces and a row appears for it. Give the task this URL:
```text theme={null}
https://api.example.com/repos/{owner}/{repo}/issues
```
Two rows appear under **Path** straight away, `owner` and `repo`, each marked required with an asterisk. A URL ending in `/chats/{chat_id}/messages` gives you one row, `chat_id`.
So you express the endpoint's shape once, in the URL. Edit the URL and the rows follow it.
 ### Request body
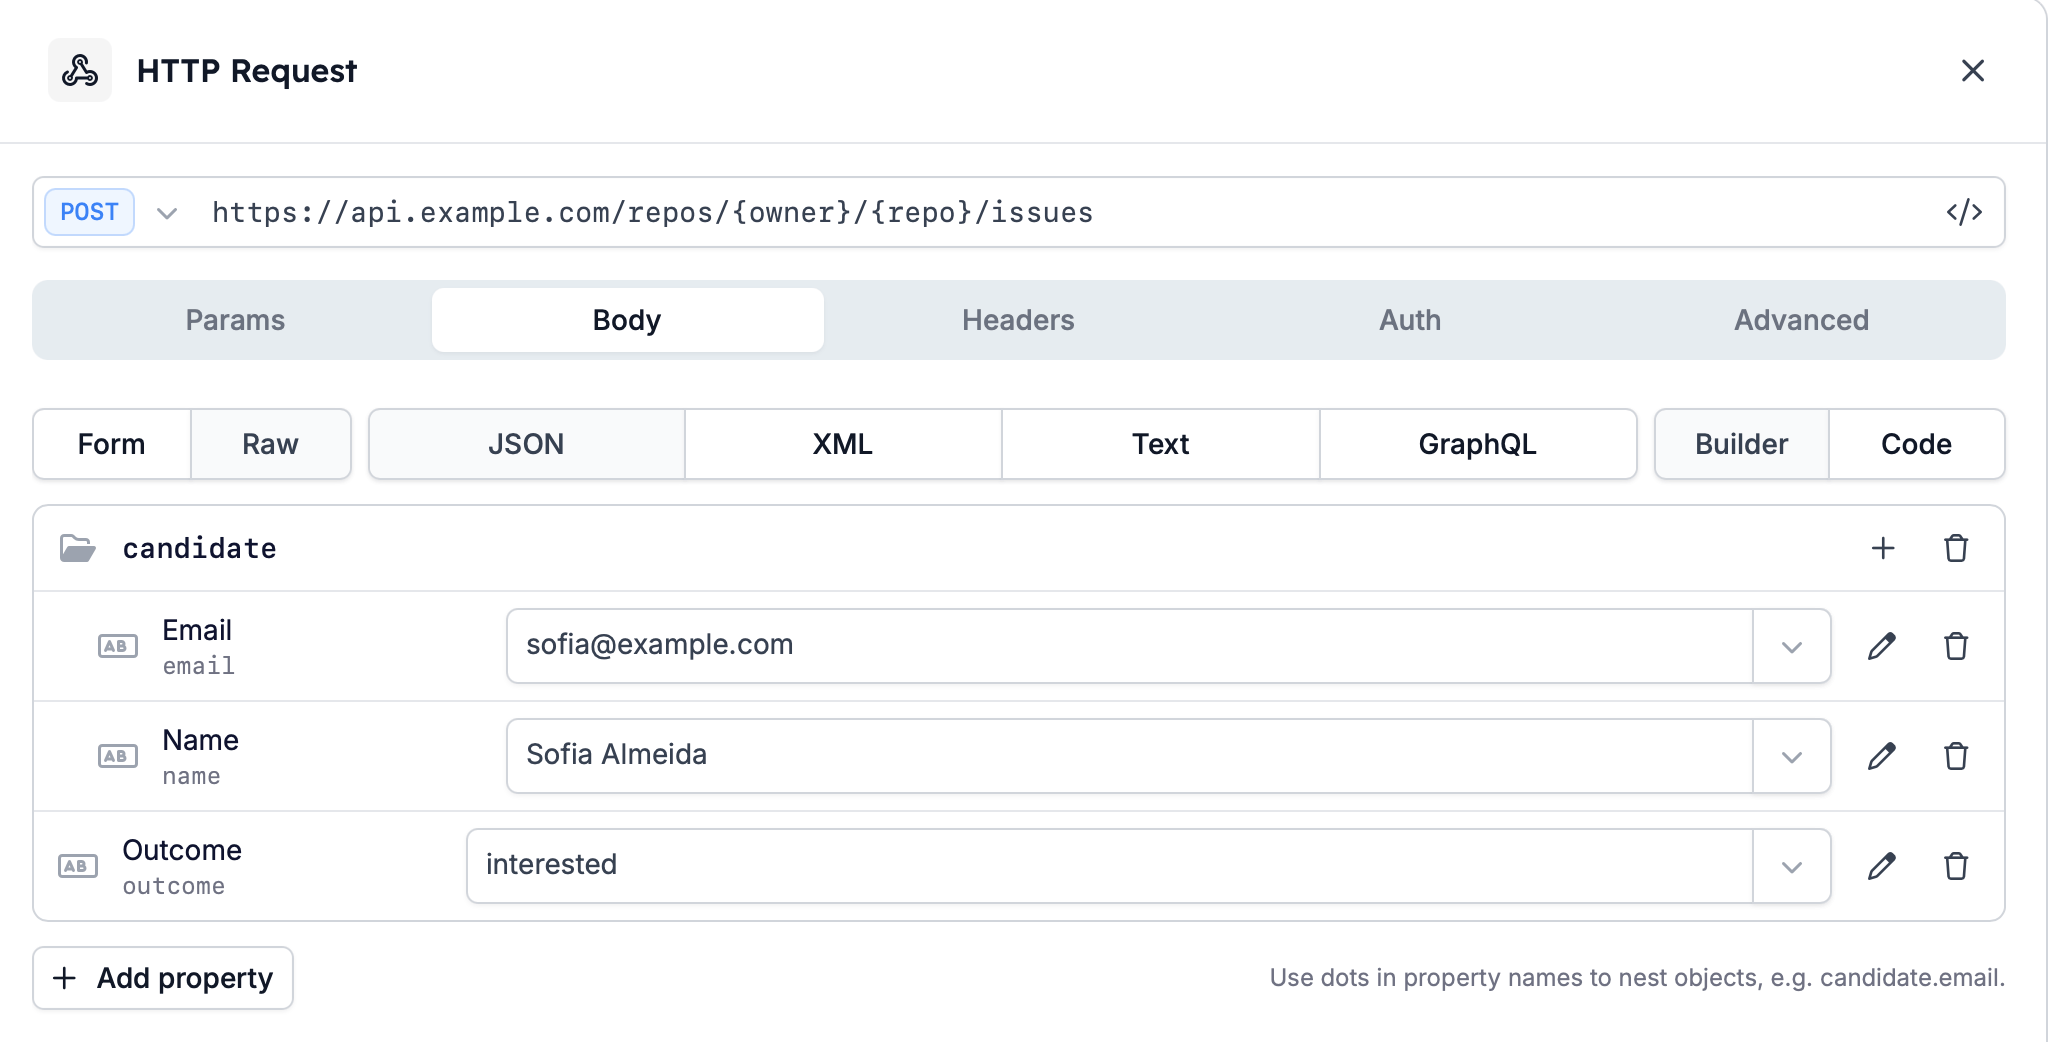
The **Body** tab opens with one choice, `Form` or `Raw`: whether the body goes out as form fields or as a raw payload. That choice decides which controls sit beside it, so make it first.
**`Form`** offers two encodings, `Multipart form` and `Form URL encoded`, and a table of name and value rows. An endpoint that takes a form usually documents one of the two and rejects the other, so check which before you pick.
**`Raw`** offers four formats — `JSON`, `XML`, `Text`, and `GraphQL` — for an endpoint that documents XML or a GraphQL query rather than JSON. It adds a third control, `Builder` or `Code`: whether you build the body from typed properties or write it out yourself. Use whichever suits you. With nothing in it yet, the tab reads "No body properties yet" and points at both: "Add typed properties to build the request body, or switch to the raw editor."
There are two ways to nest, and the quick one is in the name: "Use dots in property names to nest objects, e.g. candidate.email."
A property named `candidate.email` therefore sends the address inside a `candidate` object:
```json theme={null}
{
"candidate": {
"email": "sofia@example.com"
}
}
```
The other way is structural. Give a property the type **Collection** — "A repeating list of objects, e.g. line items or attendees" — or make it an object, and it becomes a group row with an **Add child property** button on it. Build the shape out that way when the endpoint wants an array of things rather than one, which dotted names can't express. Every property also has **Edit property** and **Remove**.
A `GET` request doesn't send a body. Select `GET` and the whole tab becomes one line: "This request method does not send a body."
### Request body
The **Body** tab opens with one choice, `Form` or `Raw`: whether the body goes out as form fields or as a raw payload. That choice decides which controls sit beside it, so make it first.
**`Form`** offers two encodings, `Multipart form` and `Form URL encoded`, and a table of name and value rows. An endpoint that takes a form usually documents one of the two and rejects the other, so check which before you pick.
**`Raw`** offers four formats — `JSON`, `XML`, `Text`, and `GraphQL` — for an endpoint that documents XML or a GraphQL query rather than JSON. It adds a third control, `Builder` or `Code`: whether you build the body from typed properties or write it out yourself. Use whichever suits you. With nothing in it yet, the tab reads "No body properties yet" and points at both: "Add typed properties to build the request body, or switch to the raw editor."
There are two ways to nest, and the quick one is in the name: "Use dots in property names to nest objects, e.g. candidate.email."
A property named `candidate.email` therefore sends the address inside a `candidate` object:
```json theme={null}
{
"candidate": {
"email": "sofia@example.com"
}
}
```
The other way is structural. Give a property the type **Collection** — "A repeating list of objects, e.g. line items or attendees" — or make it an object, and it becomes a group row with an **Add child property** button on it. Build the shape out that way when the endpoint wants an array of things rather than one, which dotted names can't express. Every property also has **Edit property** and **Remove**.
A `GET` request doesn't send a body. Select `GET` and the whole tab becomes one line: "This request method does not send a body."
 ### Headers
Header rows have a **Name** and a **Value**. **Name** suggests known header names as you type. You can still type any name the endpoint needs. **Value** takes the same field picker as a query parameter's value.
For a header that carries an API key or a bearer token, use [Authentication](#authentication) instead. It has fields for both.
### Using fields from the automation
A request built entirely from fixed values sends the same thing on every run, which is rarely the point. Fields from the automation are what make each run send its own data, including values an earlier task produced.
There are two ways to insert one:
* The **field picker** beside a **Value**, which lists what's available
* Typing `{{` in the input itself. The picker opens as soon as you type it, and what you type between the braces searches the list — quicker when you already know roughly what the field is called
Either way the field is stored as a `{{field_key}}` token, which is what you'll see if you look at a value you've already filled in.
Fields can go into the URL, the parameters, the headers, and the body. Any part of the request can change from run to run.
## Authentication
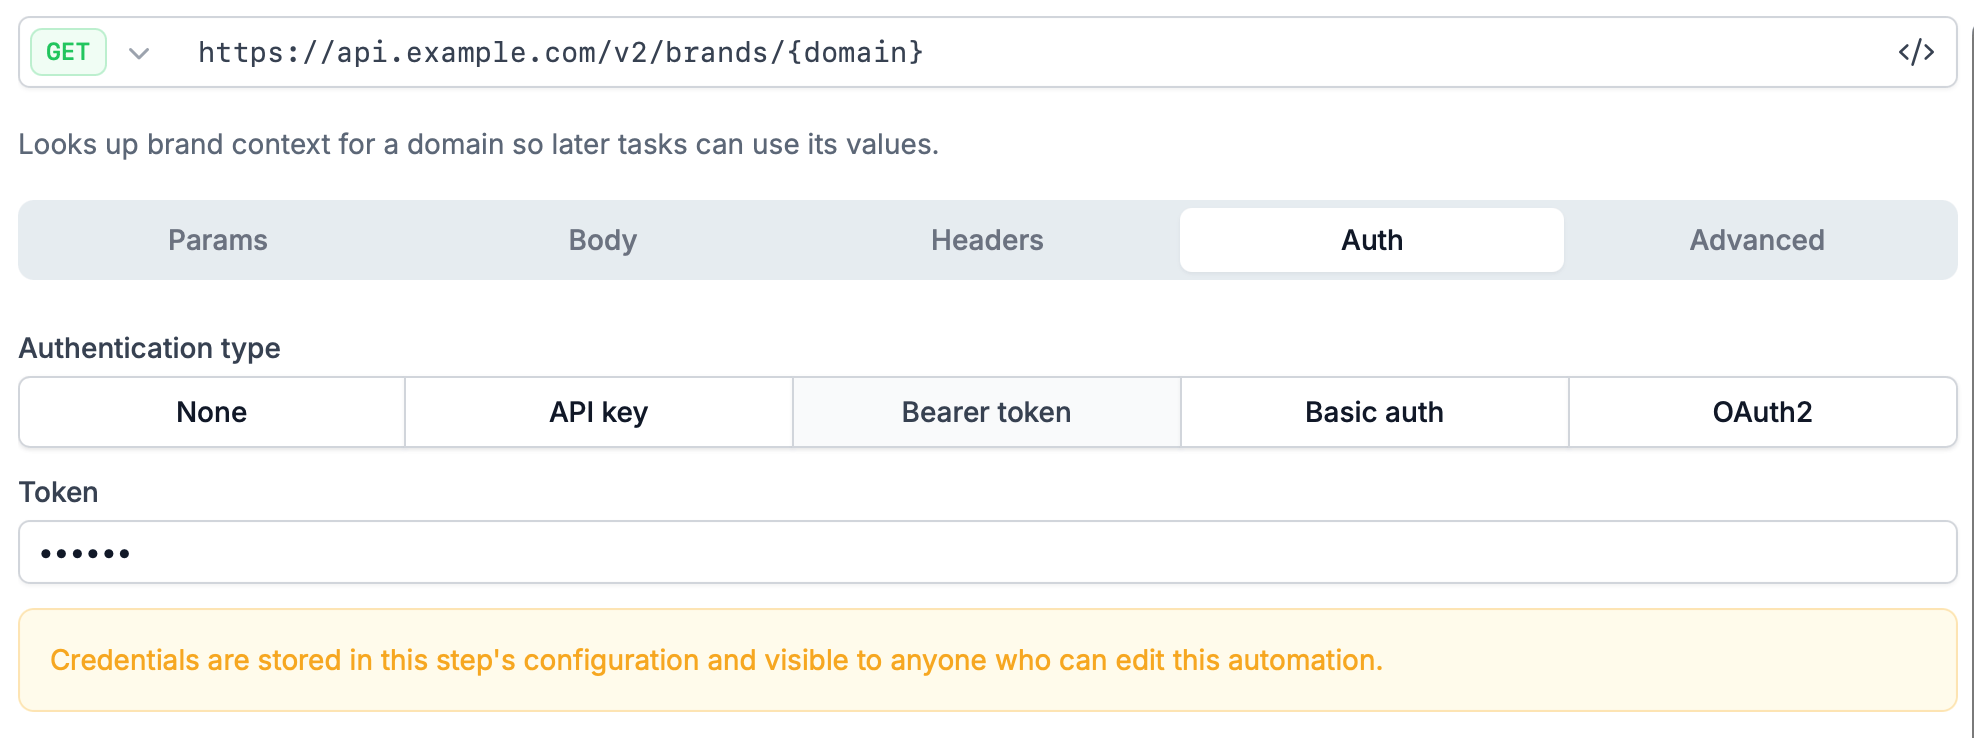
The **Auth** tab is a segmented control with five options: `None`, `API key`, `Bearer token`, `Basic auth`, and `OAuth2`. Choose the one the endpoint's owner told you to use and its fields appear.
| Type | Fields |
| -------------- | -------------------------------------------------------------------------------------------------- |
| `API key` | **Key name**, **Send in**, **Key value** |
| `Bearer token` | **Token** |
| `Basic auth` | **Username**, **Password** |
| `OAuth2` | **Token URL**, **Client ID**, **Client secret**, **Scopes**, **Audience**, **Send credentials as** |
### API key
**Send in** decides where the key travels: as a `Header`, which is the default, or as a `Query parameter`. **Key name** is then the name of that header or that parameter. **Key value** is the key itself. Check which of the two the endpoint's documentation asks for, because a key in the wrong place reads to the endpoint like no key at all.
### OAuth2
These are the fields of the client credentials grant. HireData trades the **Client ID** and **Client secret** for a token at the **Token URL**, then sends that token with the request. There's no redirect URL and no consent screen involved, so if you're looking for one, it isn't missing.
The token is fetched once and kept. HireData reuses it while it's still valid and fetches a new one when it expires, so an automation running many times an hour isn't asking the token endpoint for a fresh token on every run. There's nothing for you to schedule or refresh.
**Scopes** are "Separated by spaces". **Send credentials as** chooses how the client ID and secret reach the token endpoint: in the `Request body`, which is the default, or as a `Basic auth header`. The token endpoint's documentation says which it expects.
Every authentication type shows the same line, and it's worth reading before you paste in a customer's secret: "Credentials are stored in this step's configuration and visible to anyone who can edit this automation."
Anyone who can edit the automation can read the key or token you enter. If you're setting this up on someone else's behalf, use a credential you're allowed to hold, scoped to no more than this request needs.
### Headers
Header rows have a **Name** and a **Value**. **Name** suggests known header names as you type. You can still type any name the endpoint needs. **Value** takes the same field picker as a query parameter's value.
For a header that carries an API key or a bearer token, use [Authentication](#authentication) instead. It has fields for both.
### Using fields from the automation
A request built entirely from fixed values sends the same thing on every run, which is rarely the point. Fields from the automation are what make each run send its own data, including values an earlier task produced.
There are two ways to insert one:
* The **field picker** beside a **Value**, which lists what's available
* Typing `{{` in the input itself. The picker opens as soon as you type it, and what you type between the braces searches the list — quicker when you already know roughly what the field is called
Either way the field is stored as a `{{field_key}}` token, which is what you'll see if you look at a value you've already filled in.
Fields can go into the URL, the parameters, the headers, and the body. Any part of the request can change from run to run.
## Authentication
The **Auth** tab is a segmented control with five options: `None`, `API key`, `Bearer token`, `Basic auth`, and `OAuth2`. Choose the one the endpoint's owner told you to use and its fields appear.
| Type | Fields |
| -------------- | -------------------------------------------------------------------------------------------------- |
| `API key` | **Key name**, **Send in**, **Key value** |
| `Bearer token` | **Token** |
| `Basic auth` | **Username**, **Password** |
| `OAuth2` | **Token URL**, **Client ID**, **Client secret**, **Scopes**, **Audience**, **Send credentials as** |
### API key
**Send in** decides where the key travels: as a `Header`, which is the default, or as a `Query parameter`. **Key name** is then the name of that header or that parameter. **Key value** is the key itself. Check which of the two the endpoint's documentation asks for, because a key in the wrong place reads to the endpoint like no key at all.
### OAuth2
These are the fields of the client credentials grant. HireData trades the **Client ID** and **Client secret** for a token at the **Token URL**, then sends that token with the request. There's no redirect URL and no consent screen involved, so if you're looking for one, it isn't missing.
The token is fetched once and kept. HireData reuses it while it's still valid and fetches a new one when it expires, so an automation running many times an hour isn't asking the token endpoint for a fresh token on every run. There's nothing for you to schedule or refresh.
**Scopes** are "Separated by spaces". **Send credentials as** chooses how the client ID and secret reach the token endpoint: in the `Request body`, which is the default, or as a `Basic auth header`. The token endpoint's documentation says which it expects.
Every authentication type shows the same line, and it's worth reading before you paste in a customer's secret: "Credentials are stored in this step's configuration and visible to anyone who can edit this automation."
Anyone who can edit the automation can read the key or token you enter. If you're setting this up on someone else's behalf, use a credential you're allowed to hold, scoped to no more than this request needs.
 ## Describe the response
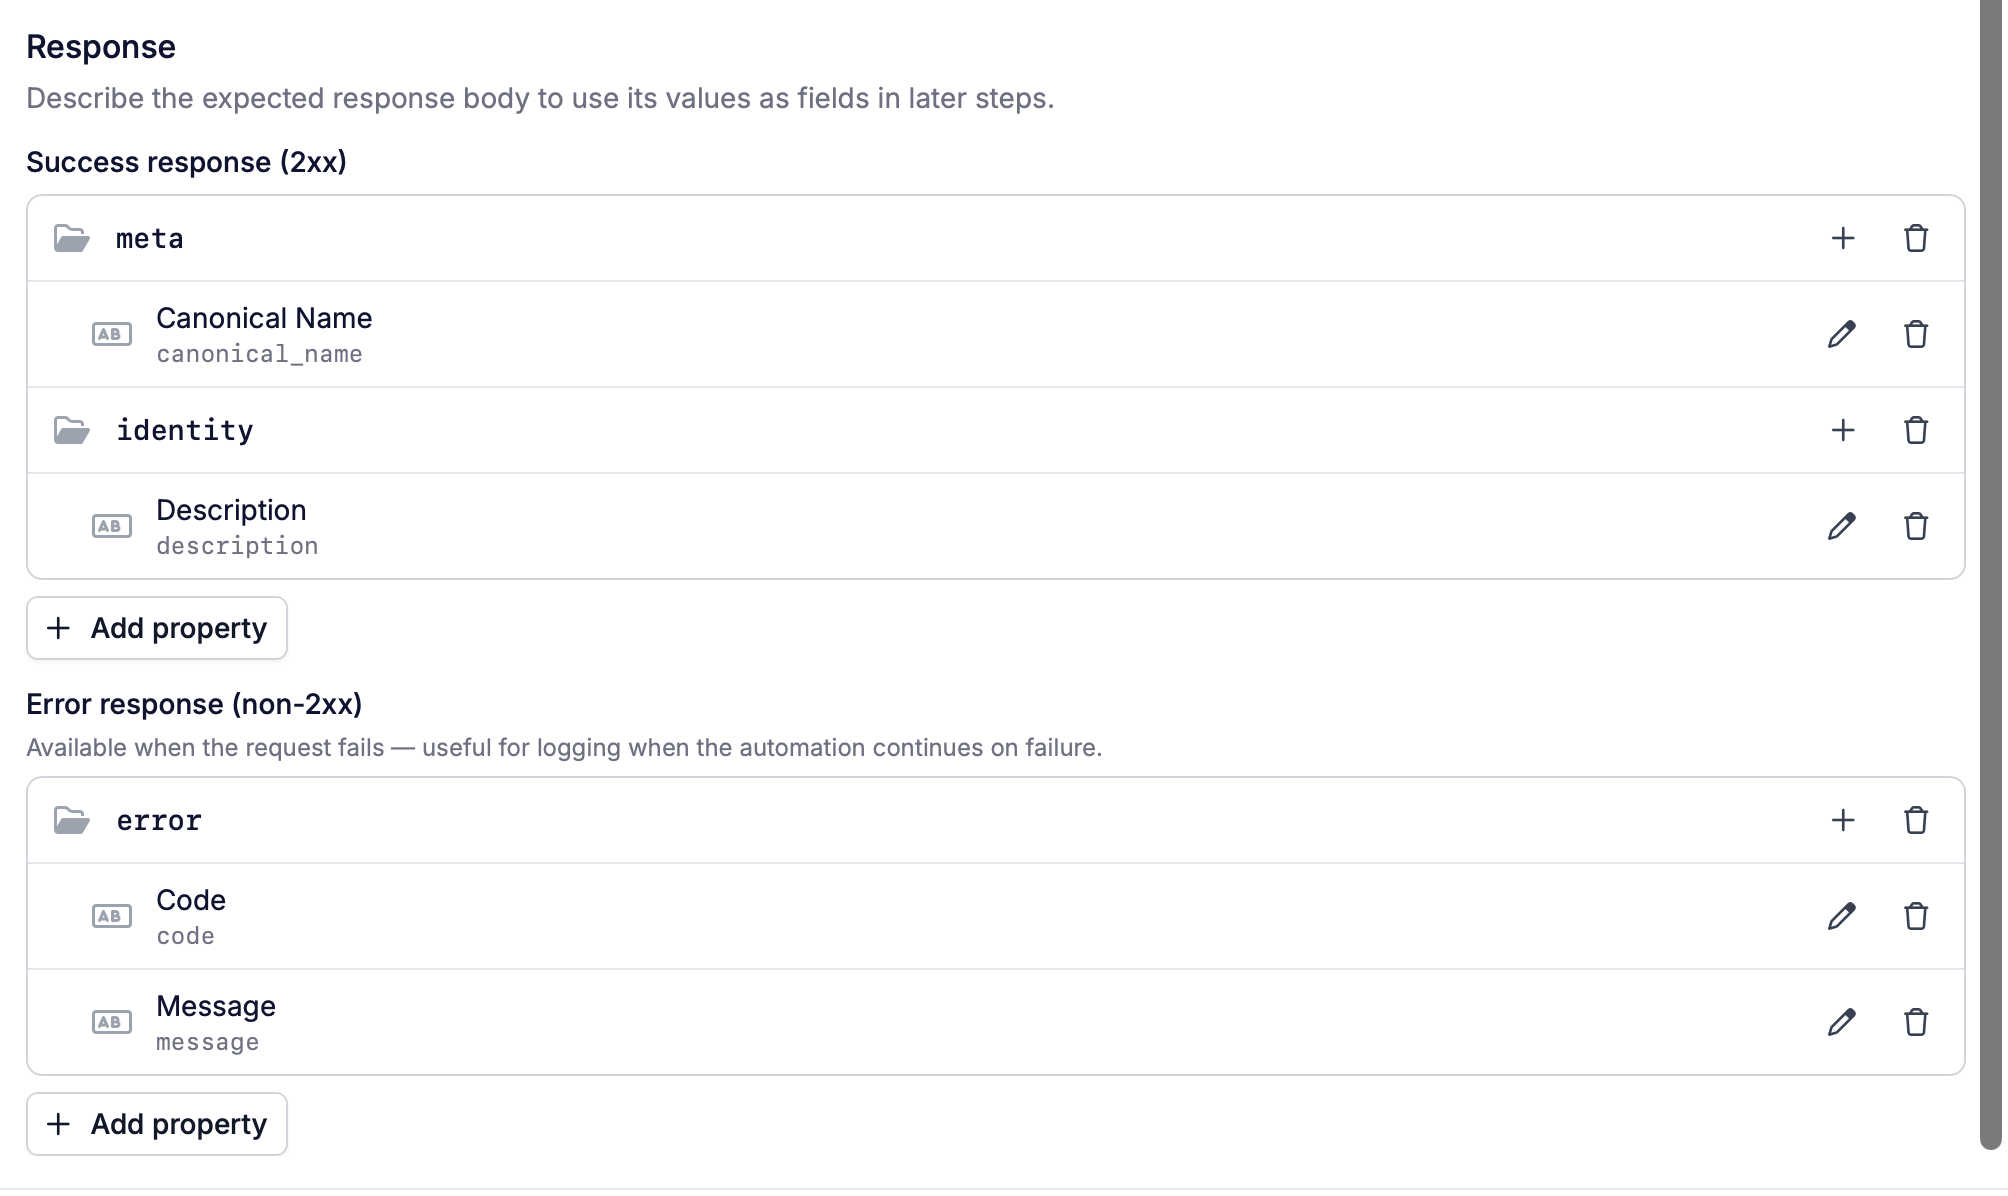
The **Response** section sits beneath the tabs, always visible, because it's what the rest of the automation depends on: "Describe the expected response body to use its values as fields in later steps."
Three fields arrive whether you describe anything or not — the status code, the response body, and whether the call succeeded. What describing the response adds is the values *inside* the body, each as a field of its own. Until a value is described here, no later task can pick that value out on its own.
There are two trees, and you describe them separately:
* **Success response (2xx)**: what the endpoint returns when the call works
* **Error response (non-2xx)**: what it returns when the call doesn't
Build either one with **Add property**. A leaf property carries a **Label** and a key. The **Label** is the readable name you'll see downstream; the key is the name in the response body — "Canonical Name" for `canonical_name`. A property holding an object becomes a collapsible group, so a nested response reads as a tree rather than a flat list. Each property has **Edit property** and **Remove**.
The error tree carries a note of its own: "Available when the request fails — useful for logging when the automation continues on failure."
That's what it's for. If you've set the run to carry on past a failed request, describe the error body too, and a later task can record what the endpoint actually said instead of only that something went wrong.
## Describe the response
The **Response** section sits beneath the tabs, always visible, because it's what the rest of the automation depends on: "Describe the expected response body to use its values as fields in later steps."
Three fields arrive whether you describe anything or not — the status code, the response body, and whether the call succeeded. What describing the response adds is the values *inside* the body, each as a field of its own. Until a value is described here, no later task can pick that value out on its own.
There are two trees, and you describe them separately:
* **Success response (2xx)**: what the endpoint returns when the call works
* **Error response (non-2xx)**: what it returns when the call doesn't
Build either one with **Add property**. A leaf property carries a **Label** and a key. The **Label** is the readable name you'll see downstream; the key is the name in the response body — "Canonical Name" for `canonical_name`. A property holding an object becomes a collapsible group, so a nested response reads as a tree rather than a flat list. Each property has **Edit property** and **Remove**.
The error tree carries a note of its own: "Available when the request fails — useful for logging when the automation continues on failure."
That's what it's for. If you've set the run to carry on past a failed request, describe the error body too, and a later task can record what the endpoint actually said instead of only that something went wrong.
 ### Fields you always get
Three fields exist on every HTTP Request task, described response or not:
| Field | What it holds |
| --------------------------------- | -------------------------------------------- |
| `: Response Status` | The HTTP status code, as a number |
| `: Response Body` | The response body, as text |
| `: Response Success` | Whether the call succeeded, as true or false |
Between them they answer "did it work, and what came back", which is enough for a later task that only needs to branch on success or log the raw reply. Describing the response is what saves a later task from reading that text and picking values out of it.
### Use a response value in a later task
A described property becomes a field on the tasks that follow, named after the request and the property's path:
`: `
The first half is the **Description** from the [Advanced](#advanced-settings) tab. The second is the property's position in the tree.
Take a request described as "Get brand context by domain". It returns `canonical_name` inside a `meta` object, and `description` inside an `identity` object. Later tasks get two fields to pick from:
* `Get brand context by domain: meta.canonical_name`
* `Get brand context by domain: identity.description`
Properties on the error tree carry an extra segment, so they can't collide with the success tree's:
`: Error: `
The description isn't cosmetic, then. It's the first half of every field name this task produces, so write a specific one before you describe the response — it's what you'll be reading in a field picker later.
## Test the request
**Test** in the drawer's footer sends the request now, so you find out it's wrong here rather than in a live run.
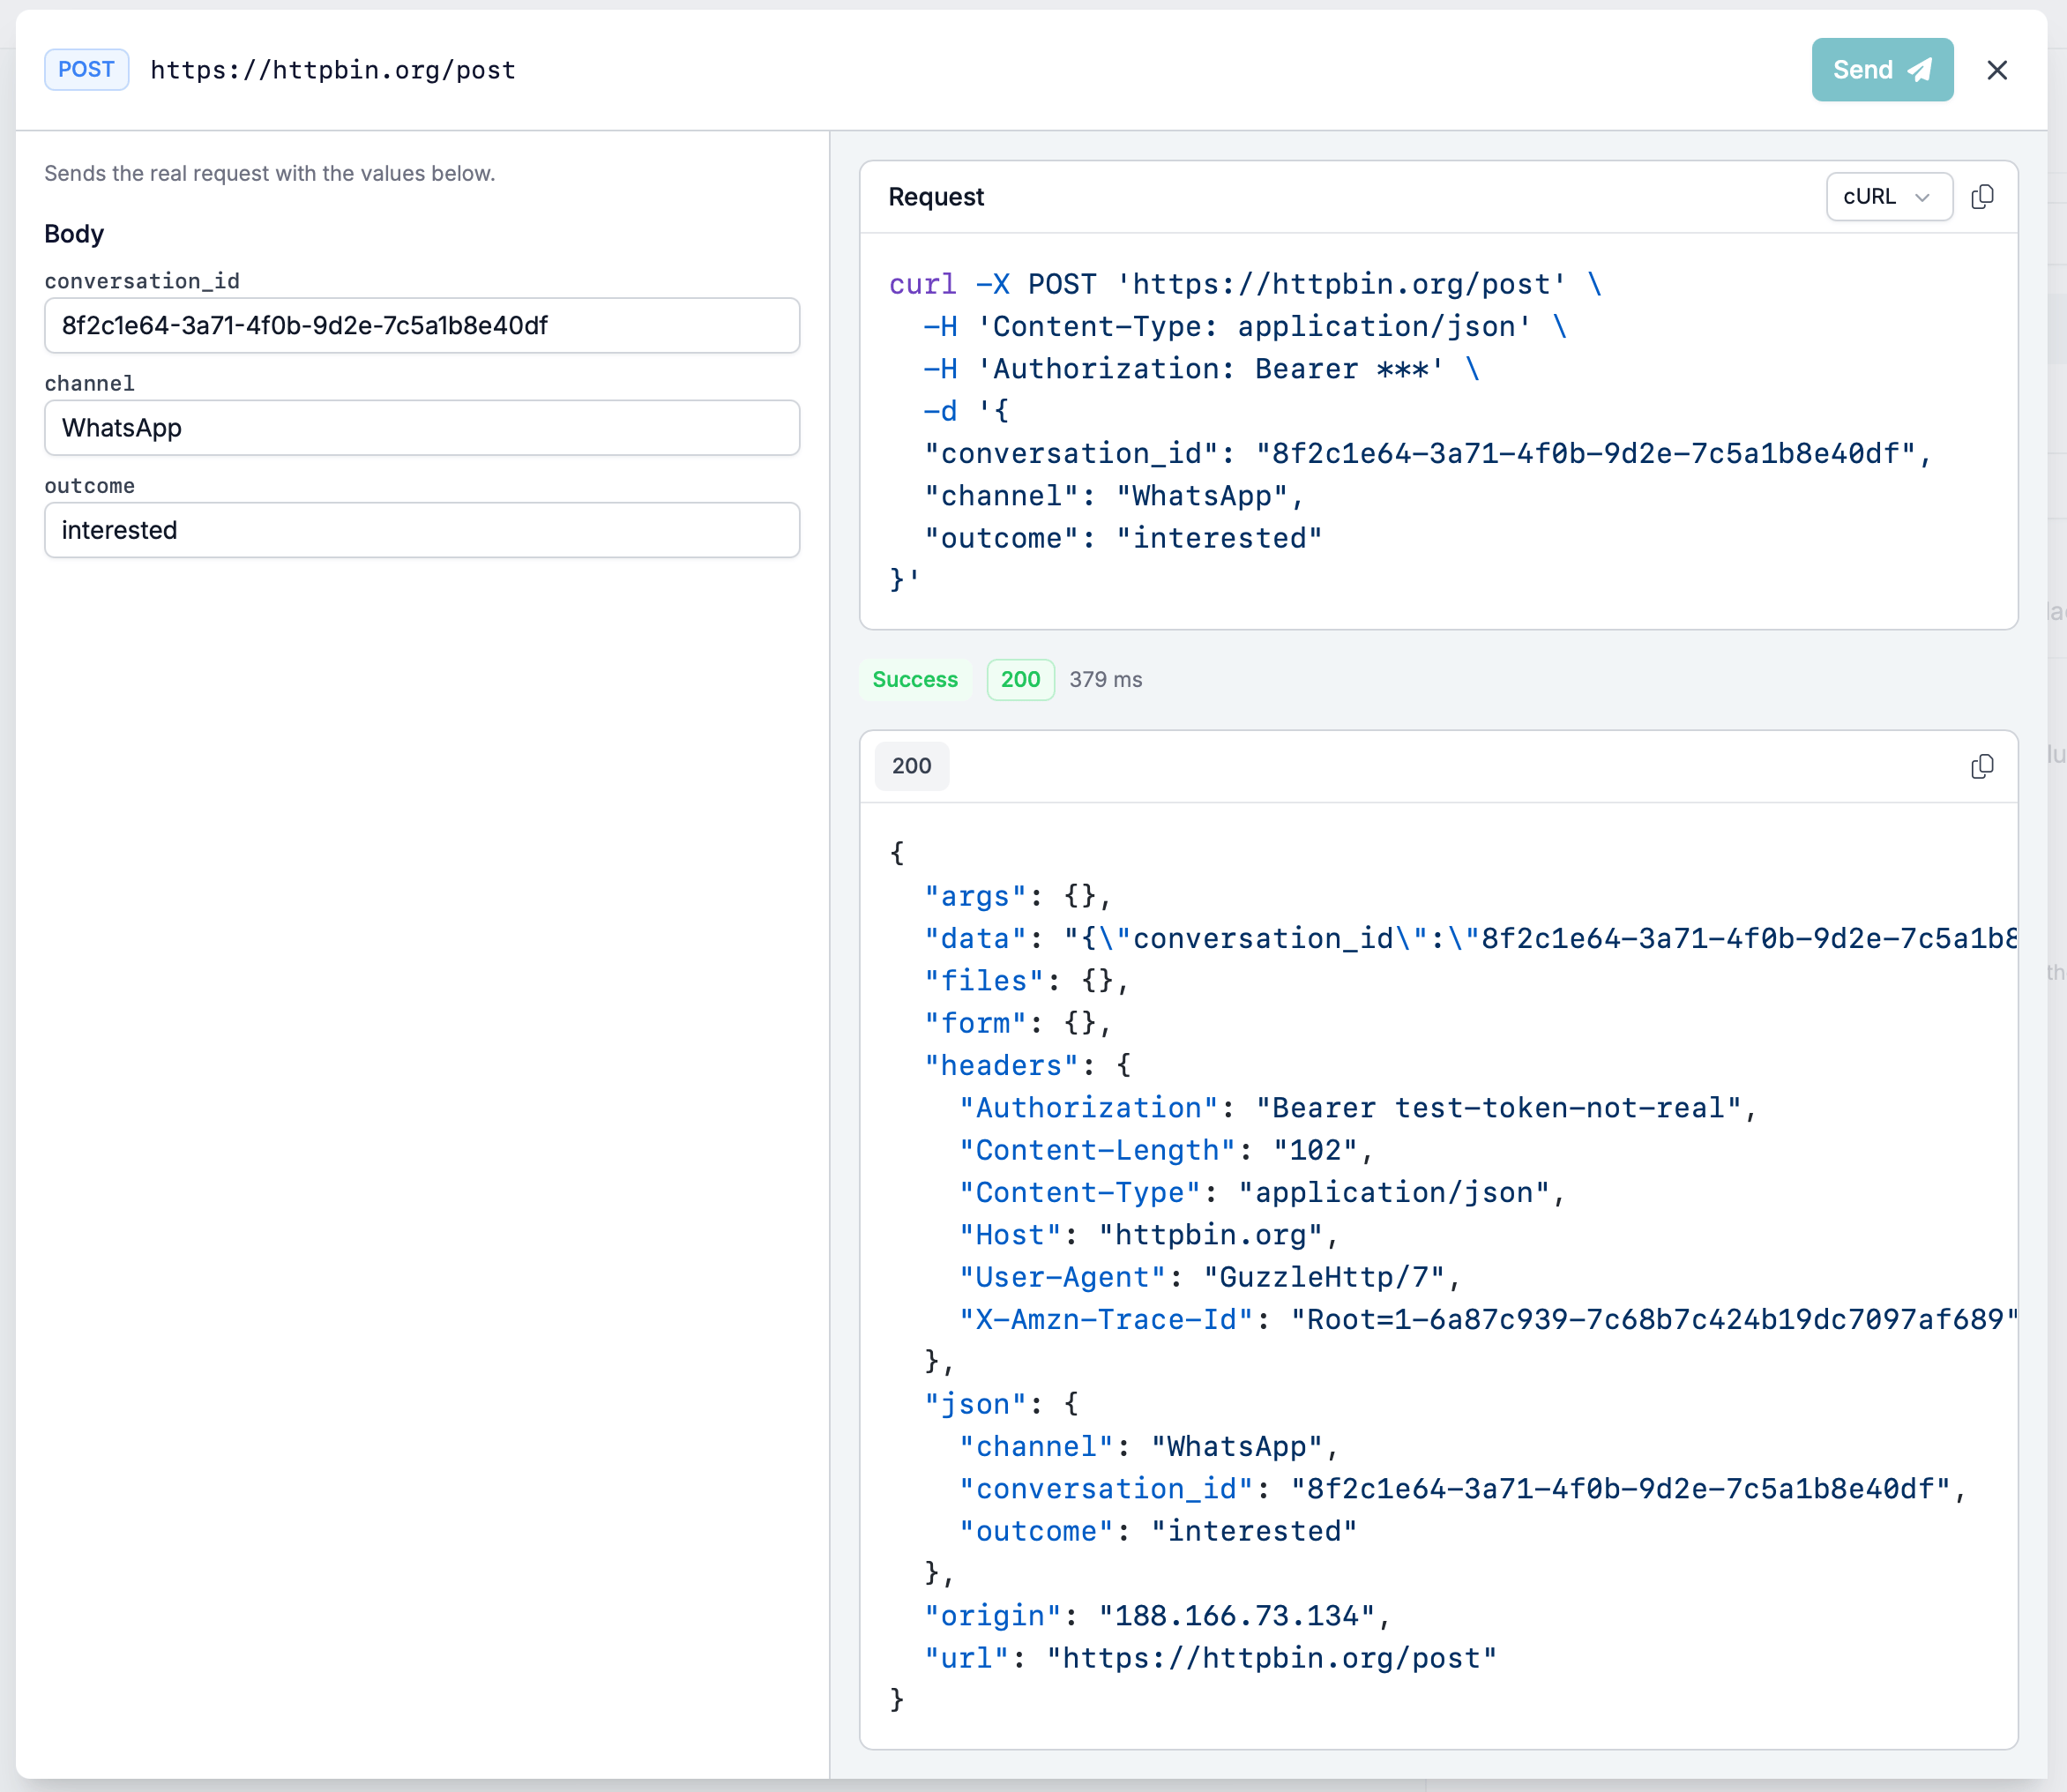
The dialog says what it does: "Sends the real request with the values below."
This is not a dry run. A `POST` you test is a `POST` the endpoint receives, and a `DELETE` deletes. Aim the test at a sandbox endpoint, or at values the endpoint's owner is happy for you to write, before you click **Send**.
The dialog opens on the method and the resolved URL, so you can read what it's about to call, with **Send** to fire it.
### Fill in the values
Below that, the dialog asks for one value per parameter, grouped into **Path**, **Query**, and **Body**. Only the groups your request actually has appear, so a request with no path or query parameters shows a **Body** group alone. Each input is labelled with the parameter's name, and each is editable on its own.
The inputs start from what the task is already configured to send. Anything you set to a fixed value arrives filled in, so a request built from literals can often be sent as it stands.
Two kinds of input come up blank:
* A parameter with no configured value. Path parameters are usually in this group, since they come from `{placeholder}` segments in the URL rather than from a row you typed a value into.
* A value bound to an automation field, unless that field happens to have a default value. The token is resolved against that default, and most fields carrying run data don't have one.
Type a literal into whatever's blank. The binding itself is unaffected — it still applies when the automation runs.
Reopening the dialog re-reads the task's configuration, so a literal you typed in for one test isn't there for the next.
### Check the outgoing request
The **Request** panel renders the outgoing call, with a format selector for cURL and a control to copy it. It masks secrets, so a bearer token reads:
```text theme={null}
-H 'Authorization: Bearer ***'
```
The same masking applies to the request recorded against a run, so a key or token doesn't end up sitting in the run's activity either. What isn't masked is the task's own configuration: anyone who can open the task can still read the credential you entered there — see [Authentication](#authentication).
### Read the result
After **Send**, a strip reports how it went: a status word, the HTTP code, and how long the call took — `Success`, `200`, `323 ms`. Beneath it, the full response body in a viewer labelled with the same status, with a control to copy it.
If you've already described the response, an **Outputs** section lists the values HireData pulled out of that body. That's the quickest check that your response tree matches the real reply: a property you described but that comes back missing shows up here, rather than in a run next week.
That body is exactly what the [Response](#describe-the-response) section wants. Testing first and copying the body out is the shortest way to a response tree that matches what the endpoint really returns, rather than what its documentation says it returns.
### Fields you always get
Three fields exist on every HTTP Request task, described response or not:
| Field | What it holds |
| --------------------------------- | -------------------------------------------- |
| `: Response Status` | The HTTP status code, as a number |
| `: Response Body` | The response body, as text |
| `: Response Success` | Whether the call succeeded, as true or false |
Between them they answer "did it work, and what came back", which is enough for a later task that only needs to branch on success or log the raw reply. Describing the response is what saves a later task from reading that text and picking values out of it.
### Use a response value in a later task
A described property becomes a field on the tasks that follow, named after the request and the property's path:
`: `
The first half is the **Description** from the [Advanced](#advanced-settings) tab. The second is the property's position in the tree.
Take a request described as "Get brand context by domain". It returns `canonical_name` inside a `meta` object, and `description` inside an `identity` object. Later tasks get two fields to pick from:
* `Get brand context by domain: meta.canonical_name`
* `Get brand context by domain: identity.description`
Properties on the error tree carry an extra segment, so they can't collide with the success tree's:
`: Error: `
The description isn't cosmetic, then. It's the first half of every field name this task produces, so write a specific one before you describe the response — it's what you'll be reading in a field picker later.
## Test the request
**Test** in the drawer's footer sends the request now, so you find out it's wrong here rather than in a live run.
The dialog says what it does: "Sends the real request with the values below."
This is not a dry run. A `POST` you test is a `POST` the endpoint receives, and a `DELETE` deletes. Aim the test at a sandbox endpoint, or at values the endpoint's owner is happy for you to write, before you click **Send**.
The dialog opens on the method and the resolved URL, so you can read what it's about to call, with **Send** to fire it.
### Fill in the values
Below that, the dialog asks for one value per parameter, grouped into **Path**, **Query**, and **Body**. Only the groups your request actually has appear, so a request with no path or query parameters shows a **Body** group alone. Each input is labelled with the parameter's name, and each is editable on its own.
The inputs start from what the task is already configured to send. Anything you set to a fixed value arrives filled in, so a request built from literals can often be sent as it stands.
Two kinds of input come up blank:
* A parameter with no configured value. Path parameters are usually in this group, since they come from `{placeholder}` segments in the URL rather than from a row you typed a value into.
* A value bound to an automation field, unless that field happens to have a default value. The token is resolved against that default, and most fields carrying run data don't have one.
Type a literal into whatever's blank. The binding itself is unaffected — it still applies when the automation runs.
Reopening the dialog re-reads the task's configuration, so a literal you typed in for one test isn't there for the next.
### Check the outgoing request
The **Request** panel renders the outgoing call, with a format selector for cURL and a control to copy it. It masks secrets, so a bearer token reads:
```text theme={null}
-H 'Authorization: Bearer ***'
```
The same masking applies to the request recorded against a run, so a key or token doesn't end up sitting in the run's activity either. What isn't masked is the task's own configuration: anyone who can open the task can still read the credential you entered there — see [Authentication](#authentication).
### Read the result
After **Send**, a strip reports how it went: a status word, the HTTP code, and how long the call took — `Success`, `200`, `323 ms`. Beneath it, the full response body in a viewer labelled with the same status, with a control to copy it.
If you've already described the response, an **Outputs** section lists the values HireData pulled out of that body. That's the quickest check that your response tree matches the real reply: a property you described but that comes back missing shows up here, rather than in a run next week.
That body is exactly what the [Response](#describe-the-response) section wants. Testing first and copying the body out is the shortest way to a response tree that matches what the endpoint really returns, rather than what its documentation says it returns.
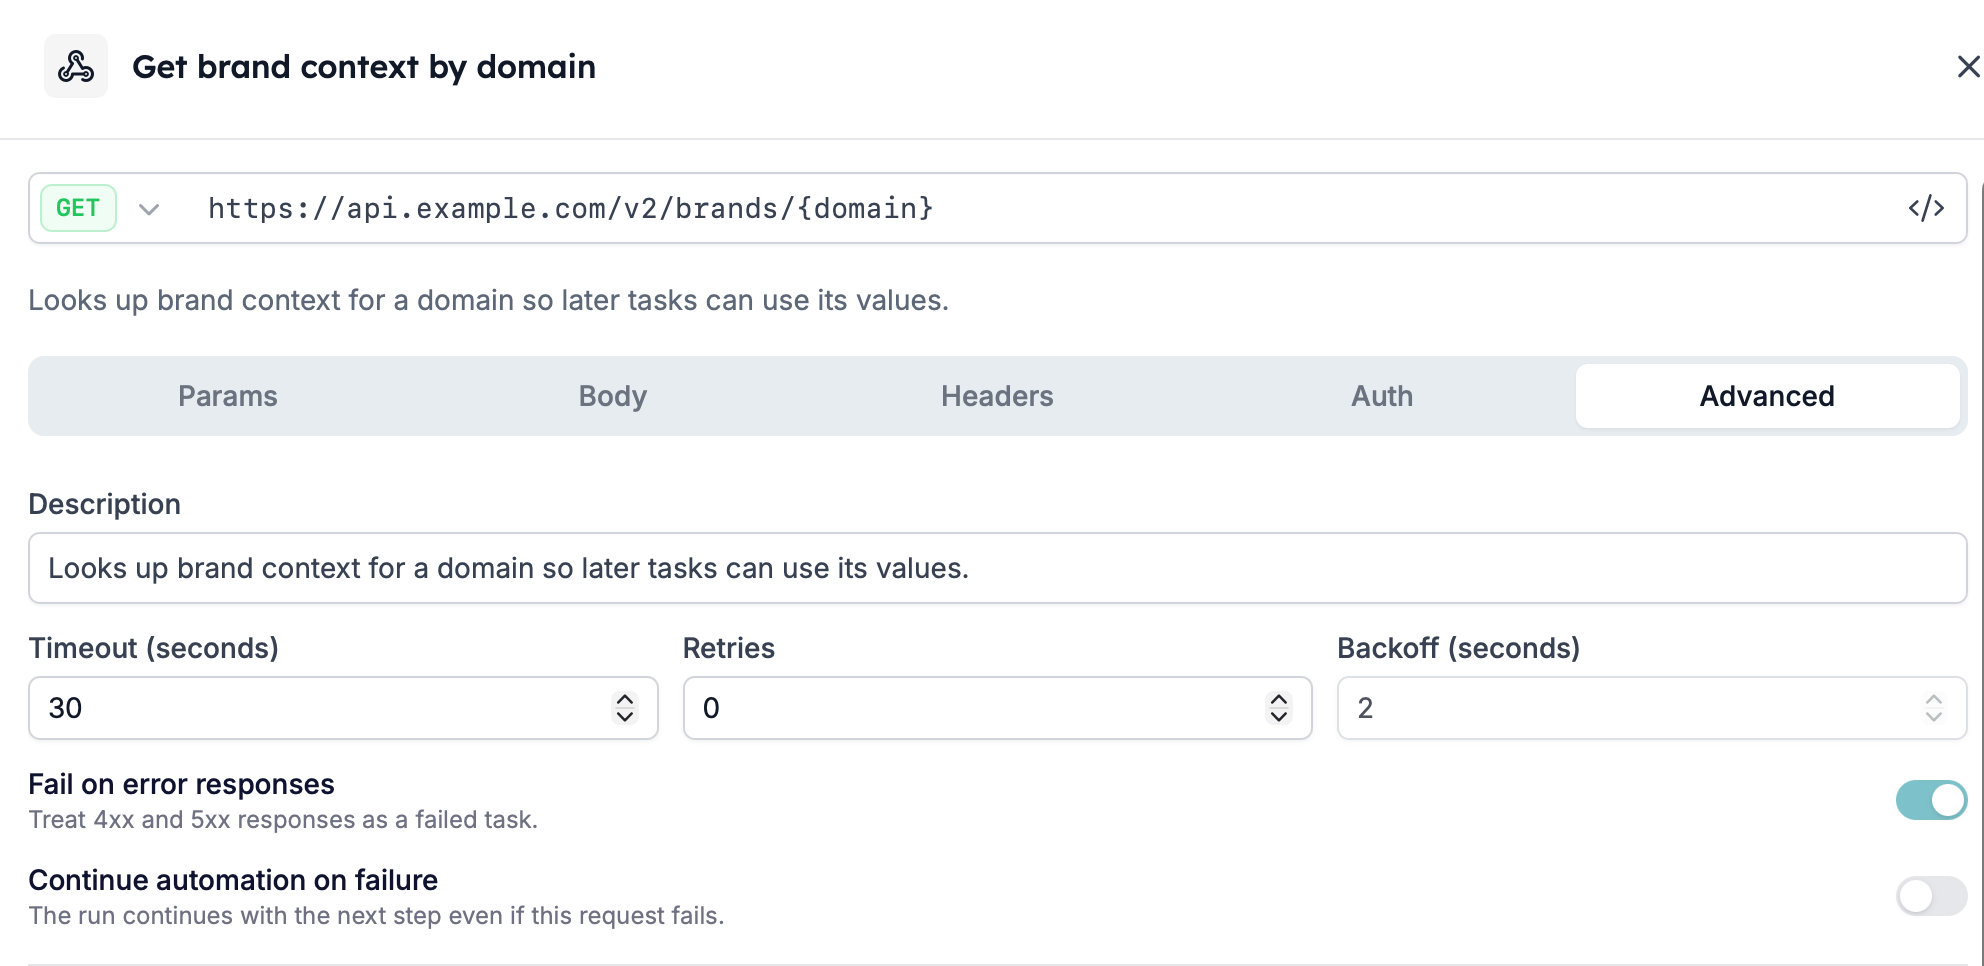
 ## Advanced settings
The **Advanced** tab holds the request's description and what should happen when the endpoint is slow or unavailable.
| Control | What it does | Default |
| --------------------- | ----------------------------------------------------------------------------------------------------------------------------------------------- | ---------------------------------------------------------------- |
| **Description** | Describes what the request does. This is what titles the task everywhere else — in the automation, in a run, and in the field names it produces | Empty, behind the placeholder "Describe what this request does." |
| **Timeout (seconds)** | How long to wait for a response before giving up, so a slow endpoint doesn't stall the run | `30` |
| **Retries** | How many extra attempts to make after a failed request | `0` |
| **Backoff (seconds)** | How long to wait between those attempts | `2` |
**Backoff** is disabled while **Retries** is `0`. There's nothing to wait between yet, so raise **Retries** first and the field becomes editable.
## Decide what counts as a failure
The **Advanced** tab ends with two switches. They answer separate questions, and it's worth reading them that way rather than as one failure setting.
**Fail on error responses** is on by default: "Treat 4xx and 5xx responses as a failed task."
Turn it off when a non-2xx is a normal answer from this endpoint rather than a problem — a `404` from a lookup that simply found nothing, say. The task then completes, and what to do about the code is yours to decide in a later task.
**Continue automation on failure** is off by default: "The run continues with the next step even if this request fails."
Turn it on when the rest of the run is worth doing without this call — the request was a notification, not a prerequisite. Leave it off and a failed request ends the run there.
Between them they decide the fate of that expected `404`. Turn the first switch off and it was never a failure. Leave it on and turn the second on instead, and it's a failure the run survives — the case the [error response](#describe-the-response) tree is for.
## Advanced settings
The **Advanced** tab holds the request's description and what should happen when the endpoint is slow or unavailable.
| Control | What it does | Default |
| --------------------- | ----------------------------------------------------------------------------------------------------------------------------------------------- | ---------------------------------------------------------------- |
| **Description** | Describes what the request does. This is what titles the task everywhere else — in the automation, in a run, and in the field names it produces | Empty, behind the placeholder "Describe what this request does." |
| **Timeout (seconds)** | How long to wait for a response before giving up, so a slow endpoint doesn't stall the run | `30` |
| **Retries** | How many extra attempts to make after a failed request | `0` |
| **Backoff (seconds)** | How long to wait between those attempts | `2` |
**Backoff** is disabled while **Retries** is `0`. There's nothing to wait between yet, so raise **Retries** first and the field becomes editable.
## Decide what counts as a failure
The **Advanced** tab ends with two switches. They answer separate questions, and it's worth reading them that way rather than as one failure setting.
**Fail on error responses** is on by default: "Treat 4xx and 5xx responses as a failed task."
Turn it off when a non-2xx is a normal answer from this endpoint rather than a problem — a `404` from a lookup that simply found nothing, say. The task then completes, and what to do about the code is yours to decide in a later task.
**Continue automation on failure** is off by default: "The run continues with the next step even if this request fails."
Turn it on when the rest of the run is worth doing without this call — the request was a notification, not a prerequisite. Leave it off and a failed request ends the run there.
Between them they decide the fate of that expected `404`. Turn the first switch off and it was never a failure. Leave it on and turn the second on instead, and it's a failure the run survives — the case the [error response](#describe-the-response) tree is for.
 ## What the task looks like in a run
Open a run and a completed HTTP Request shows:
* Its **Description** as the title, the method and host beneath it — `GET api.example.com` — and the path below that
* **What will you provide?** and **What will you get back?**: the request you configured and the response you described
* A row of chips for the settings that shaped the call. The auth type, the timeout, and the retries are always there — `Bearer token`, `30s`, `No retries`. The rest appear only once you've turned them on: a backoff when retries are above `0`, `Ignores error statuses` when **Fail on error responses** is off, and `Continues on failure` when **Continue automation on failure** is on
The run's timeline carries two entries for the task, `HTTP Request: Run Moved` and `HTTP Request: Completed`, with the message "Http request succeeded."
## If a request comes back blocked
A request can come back blocked, with the message "The request was blocked — the destination is a private or internal address."
HireData doesn't call private or internal addresses. Check where the URL actually points, including when an automation field supplies part of it: a host that only resolves inside your own network isn't reachable from HireData.
If the destination is plainly public and you still see this, report it rather than working around it. The [support details](#need-more-help) below cover what to include.
## Existing Post Webhook tasks
**Post Webhook** is the other task for sending data out of HireData, and it's what the HTTP Request task replaces. Automations that already use it keep working exactly as they do now, and nothing about them needs changing by hand.
A one-off migration will convert those steps into HTTP Request tasks. It runs once, on our side, and it isn't something you trigger or prepare for. Build anything new as an HTTP Request task; leave what you already have alone.
## Need more help?
If a request isn't behaving as expected, contact our team at [support@hiredata.com](mailto:support@hiredata.com) and include:
* A link to the automation
* The task's method and URL, with any credentials removed
* What you expected the endpoint to return, and what it returned instead
## Related topics
- [Post an outcome to your own system](/knowledge-base/cookbook/post-an-outcome-to-your-own-system.md)
- [Events: inspect payloads from connected apps](/settings/logs/events.md)
- [Set up a trigger](/apps/custom-apps/set-up-a-trigger.md)
- [How WhatsApp templates work](/apps/messaging/whatsapp/how-whatsapp-templates-work.md)
- [Task history](/pages/task-history.md)
## What the task looks like in a run
Open a run and a completed HTTP Request shows:
* Its **Description** as the title, the method and host beneath it — `GET api.example.com` — and the path below that
* **What will you provide?** and **What will you get back?**: the request you configured and the response you described
* A row of chips for the settings that shaped the call. The auth type, the timeout, and the retries are always there — `Bearer token`, `30s`, `No retries`. The rest appear only once you've turned them on: a backoff when retries are above `0`, `Ignores error statuses` when **Fail on error responses** is off, and `Continues on failure` when **Continue automation on failure** is on
The run's timeline carries two entries for the task, `HTTP Request: Run Moved` and `HTTP Request: Completed`, with the message "Http request succeeded."
## If a request comes back blocked
A request can come back blocked, with the message "The request was blocked — the destination is a private or internal address."
HireData doesn't call private or internal addresses. Check where the URL actually points, including when an automation field supplies part of it: a host that only resolves inside your own network isn't reachable from HireData.
If the destination is plainly public and you still see this, report it rather than working around it. The [support details](#need-more-help) below cover what to include.
## Existing Post Webhook tasks
**Post Webhook** is the other task for sending data out of HireData, and it's what the HTTP Request task replaces. Automations that already use it keep working exactly as they do now, and nothing about them needs changing by hand.
A one-off migration will convert those steps into HTTP Request tasks. It runs once, on our side, and it isn't something you trigger or prepare for. Build anything new as an HTTP Request task; leave what you already have alone.
## Need more help?
If a request isn't behaving as expected, contact our team at [support@hiredata.com](mailto:support@hiredata.com) and include:
* A link to the automation
* The task's method and URL, with any credentials removed
* What you expected the endpoint to return, and what it returned instead
## Related topics
- [Post an outcome to your own system](/knowledge-base/cookbook/post-an-outcome-to-your-own-system.md)
- [Events: inspect payloads from connected apps](/settings/logs/events.md)
- [Set up a trigger](/apps/custom-apps/set-up-a-trigger.md)
- [How WhatsApp templates work](/apps/messaging/whatsapp/how-whatsapp-templates-work.md)
- [Task history](/pages/task-history.md)