> ## Documentation Index
> Fetch the complete documentation index at: https://help.hiredata.com/llms.txt
> Use this file to discover all available pages before exploring further.
# Creating a Form in HireData
> Build custom forms in HireData to collect structured feedback and candidate data, then feed the responses straight into your automations and ATS fields.
*The forms in HireData help you collect structured data during candidate journeys. This guide will walk you through setting up and using forms in HireData for your automations.*
## Creating a form
Firstly, you need to **define the purpose of the form.** Determine what data you need to collect (e.g., candidate's availability, feedback on the recruitment process, etc.).
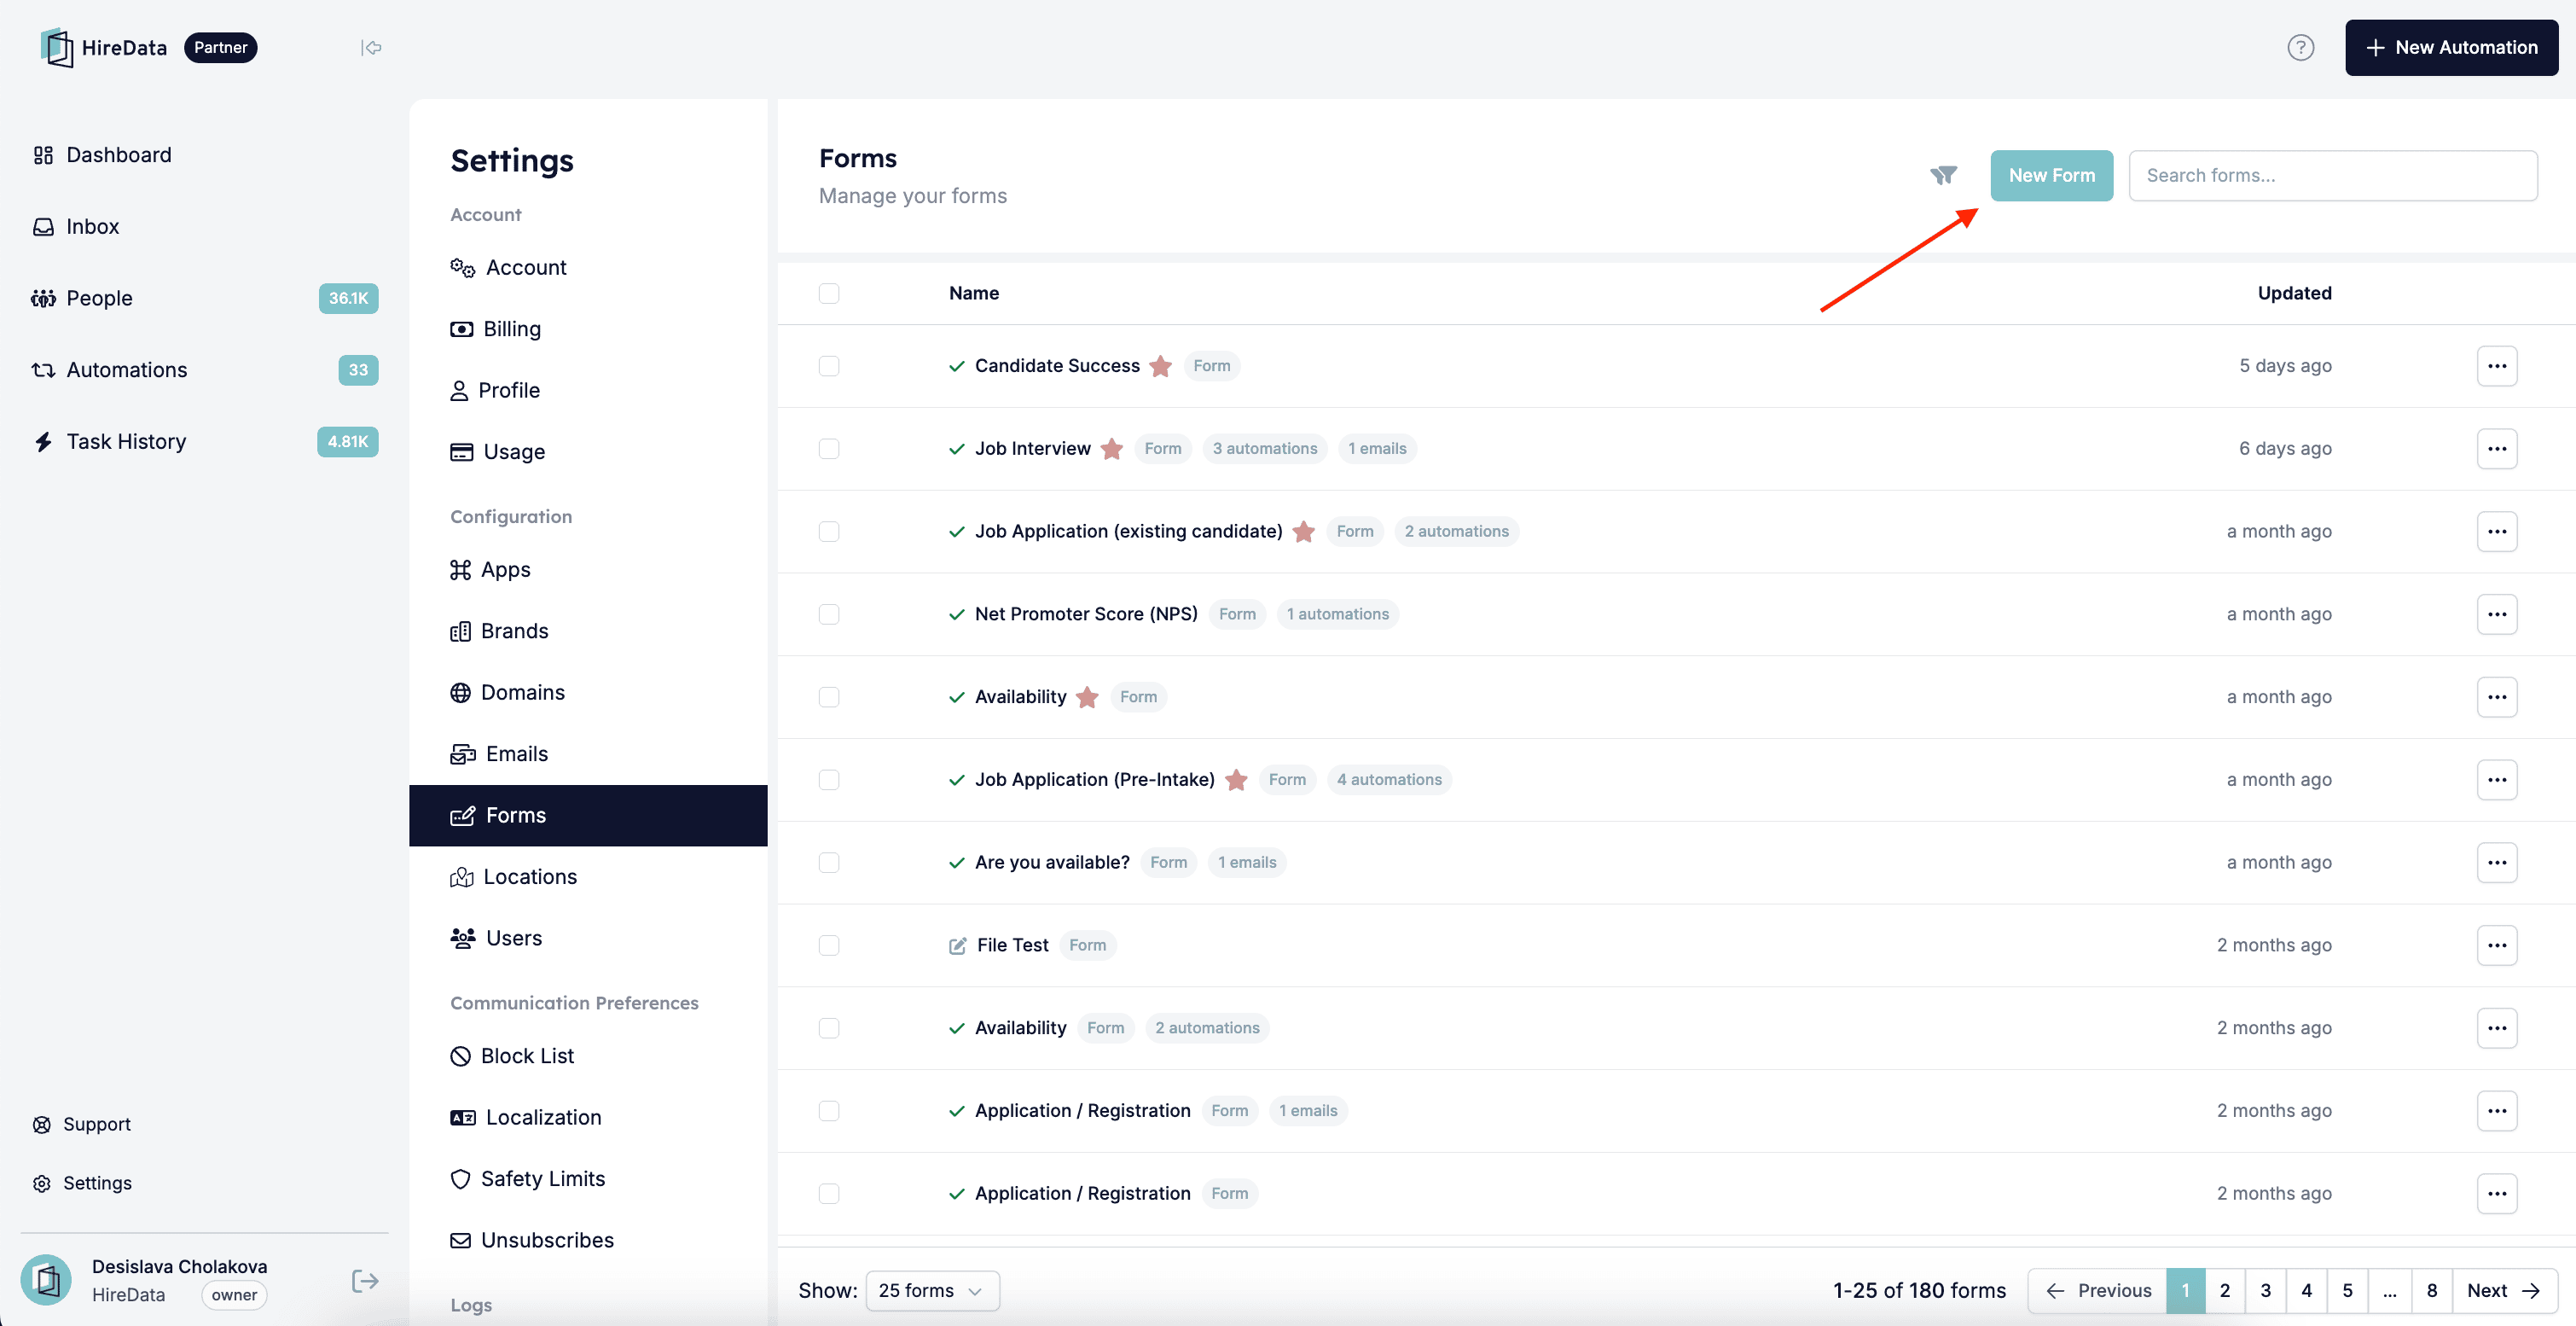
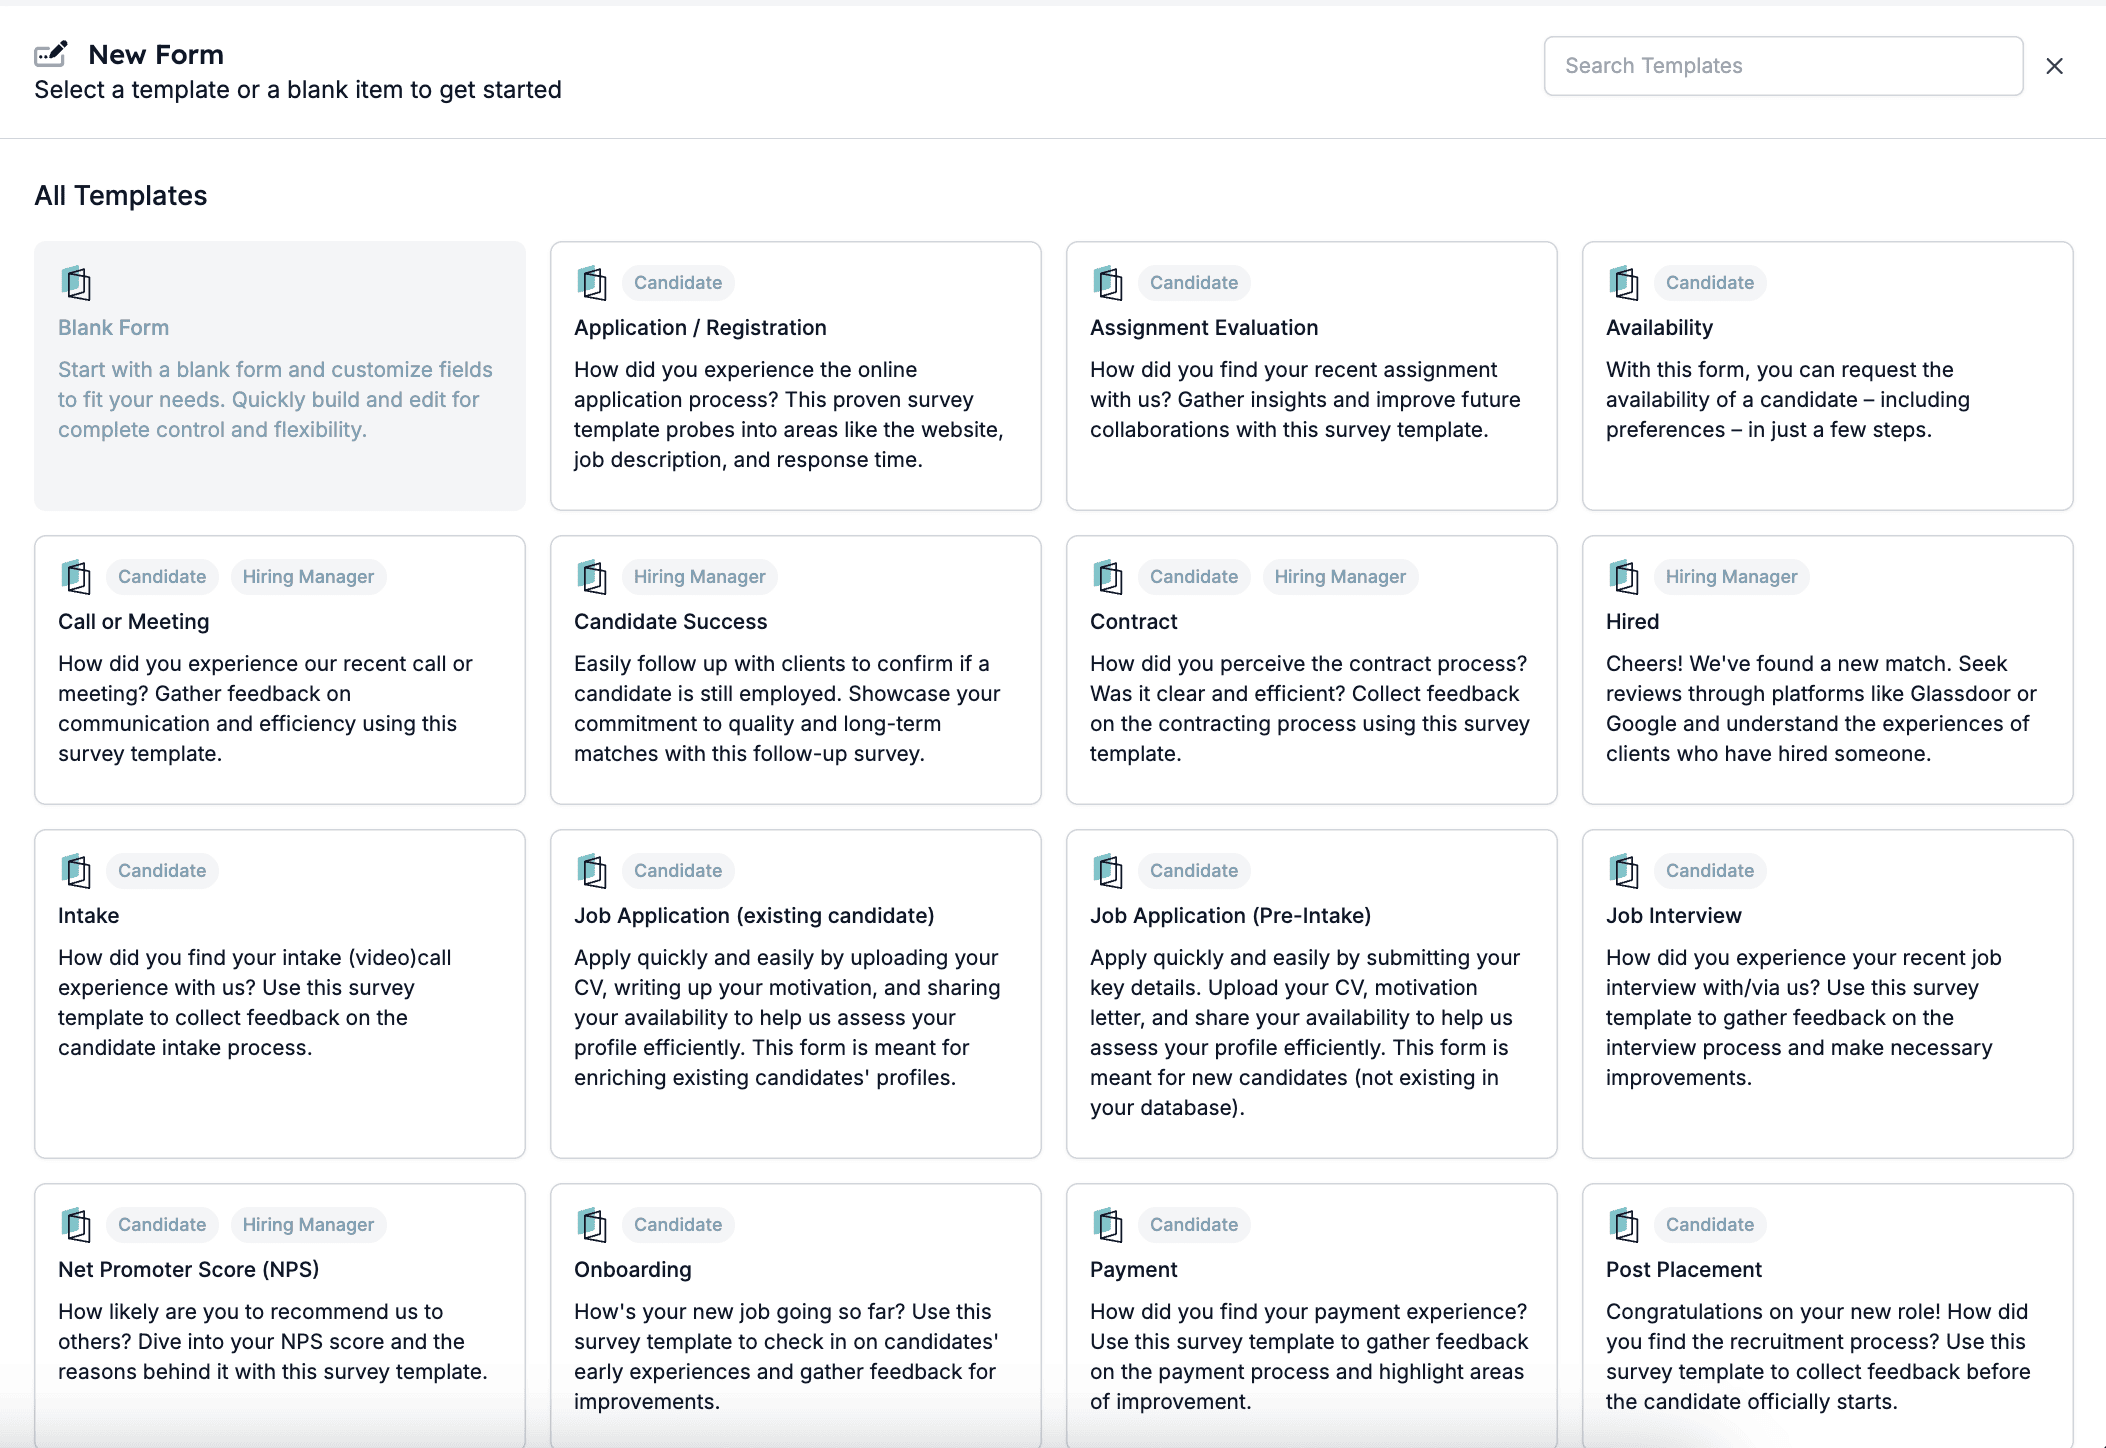
Then, open the **Forms** page via the **Settings** and click on \[New Form]. You can create a blank form or select any of the available templates:
 *Form templates:*
 *If you start from scratch, you should add a name to your form that's only for internal use:*
 ## Adding questions
Forms consist of one or more questions, where each of them can have logic attached to it — for example, show a follow-up question only if a rating is below 8. More on that shortly, now let's see how to add different questions.
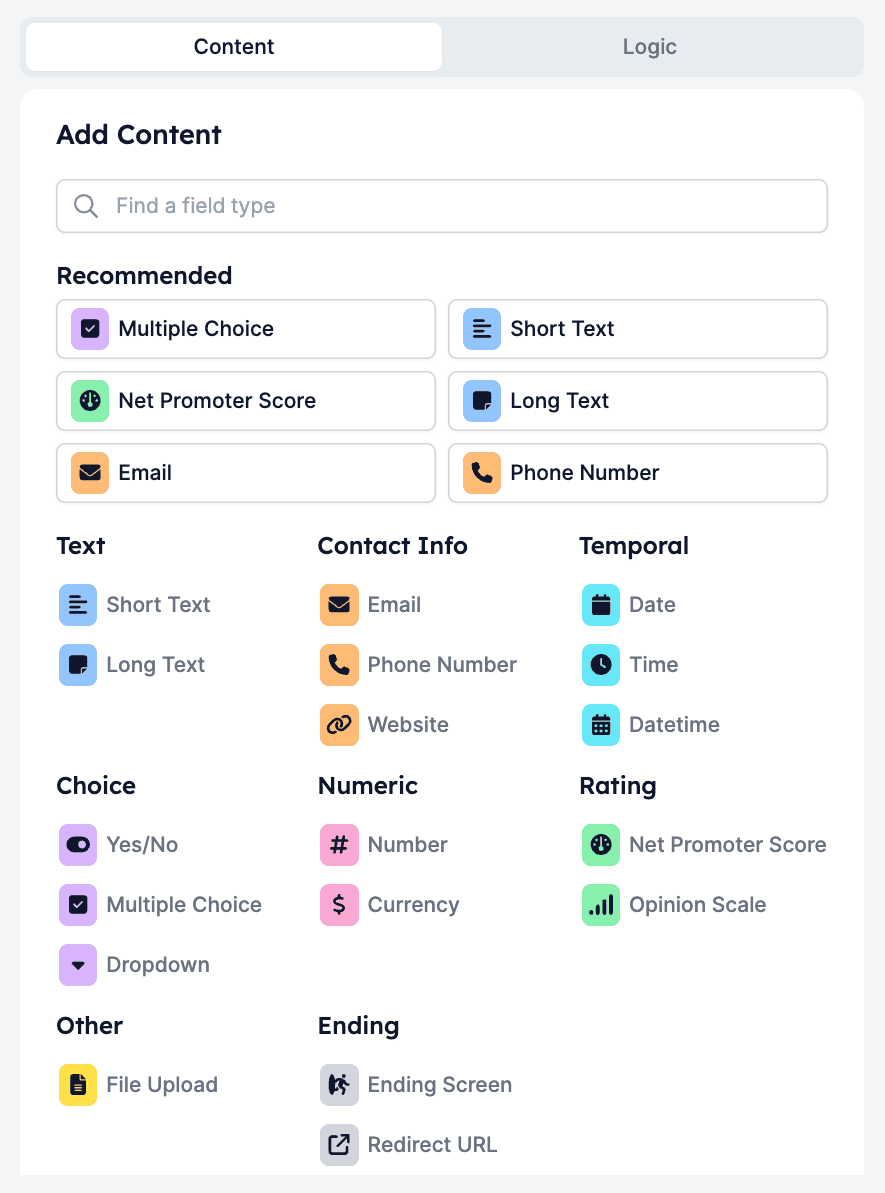
### 1.1. Click on the type of question you want to add or on the \[+] icon to add other questions
Each form can have multiple question types depending on the kind of data you'd like to collect.
Most used by our clients:
* **NPS/Opinion scale:** Ask candidates to rate something from 1 to 10.
* **Multiple choice**: Let users pick from a list of options.
* **Short/Long Text**: Collect open-ended answers.
* **Redirect URL:** Redirect respondents to your website or Google Review URL.
Other:
* **Yes/No questions**
* **Dropdown:** Let users pick from a list of options stored in a drop-down field.
* **Collect contact information:** Collect the candidate's email address, phone number, or website.
* **Date/Time/Datetime:** Ask for the candidate's availability time, birth date, or any other details in this format.
* **Number/Currency:** Collect salary expectations data.
* \*\*File upload: \*\*For collecting documents or photos.
* \*\*Ending screen: \*\*Add a Thank you page at the end of your form.
## Adding questions
Forms consist of one or more questions, where each of them can have logic attached to it — for example, show a follow-up question only if a rating is below 8. More on that shortly, now let's see how to add different questions.
### 1.1. Click on the type of question you want to add or on the \[+] icon to add other questions
Each form can have multiple question types depending on the kind of data you'd like to collect.
Most used by our clients:
* **NPS/Opinion scale:** Ask candidates to rate something from 1 to 10.
* **Multiple choice**: Let users pick from a list of options.
* **Short/Long Text**: Collect open-ended answers.
* **Redirect URL:** Redirect respondents to your website or Google Review URL.
Other:
* **Yes/No questions**
* **Dropdown:** Let users pick from a list of options stored in a drop-down field.
* **Collect contact information:** Collect the candidate's email address, phone number, or website.
* **Date/Time/Datetime:** Ask for the candidate's availability time, birth date, or any other details in this format.
* **Number/Currency:** Collect salary expectations data.
* \*\*File upload: \*\*For collecting documents or photos.
* \*\*Ending screen: \*\*Add a Thank you page at the end of your form.
 ### 2.2. Optional question settings
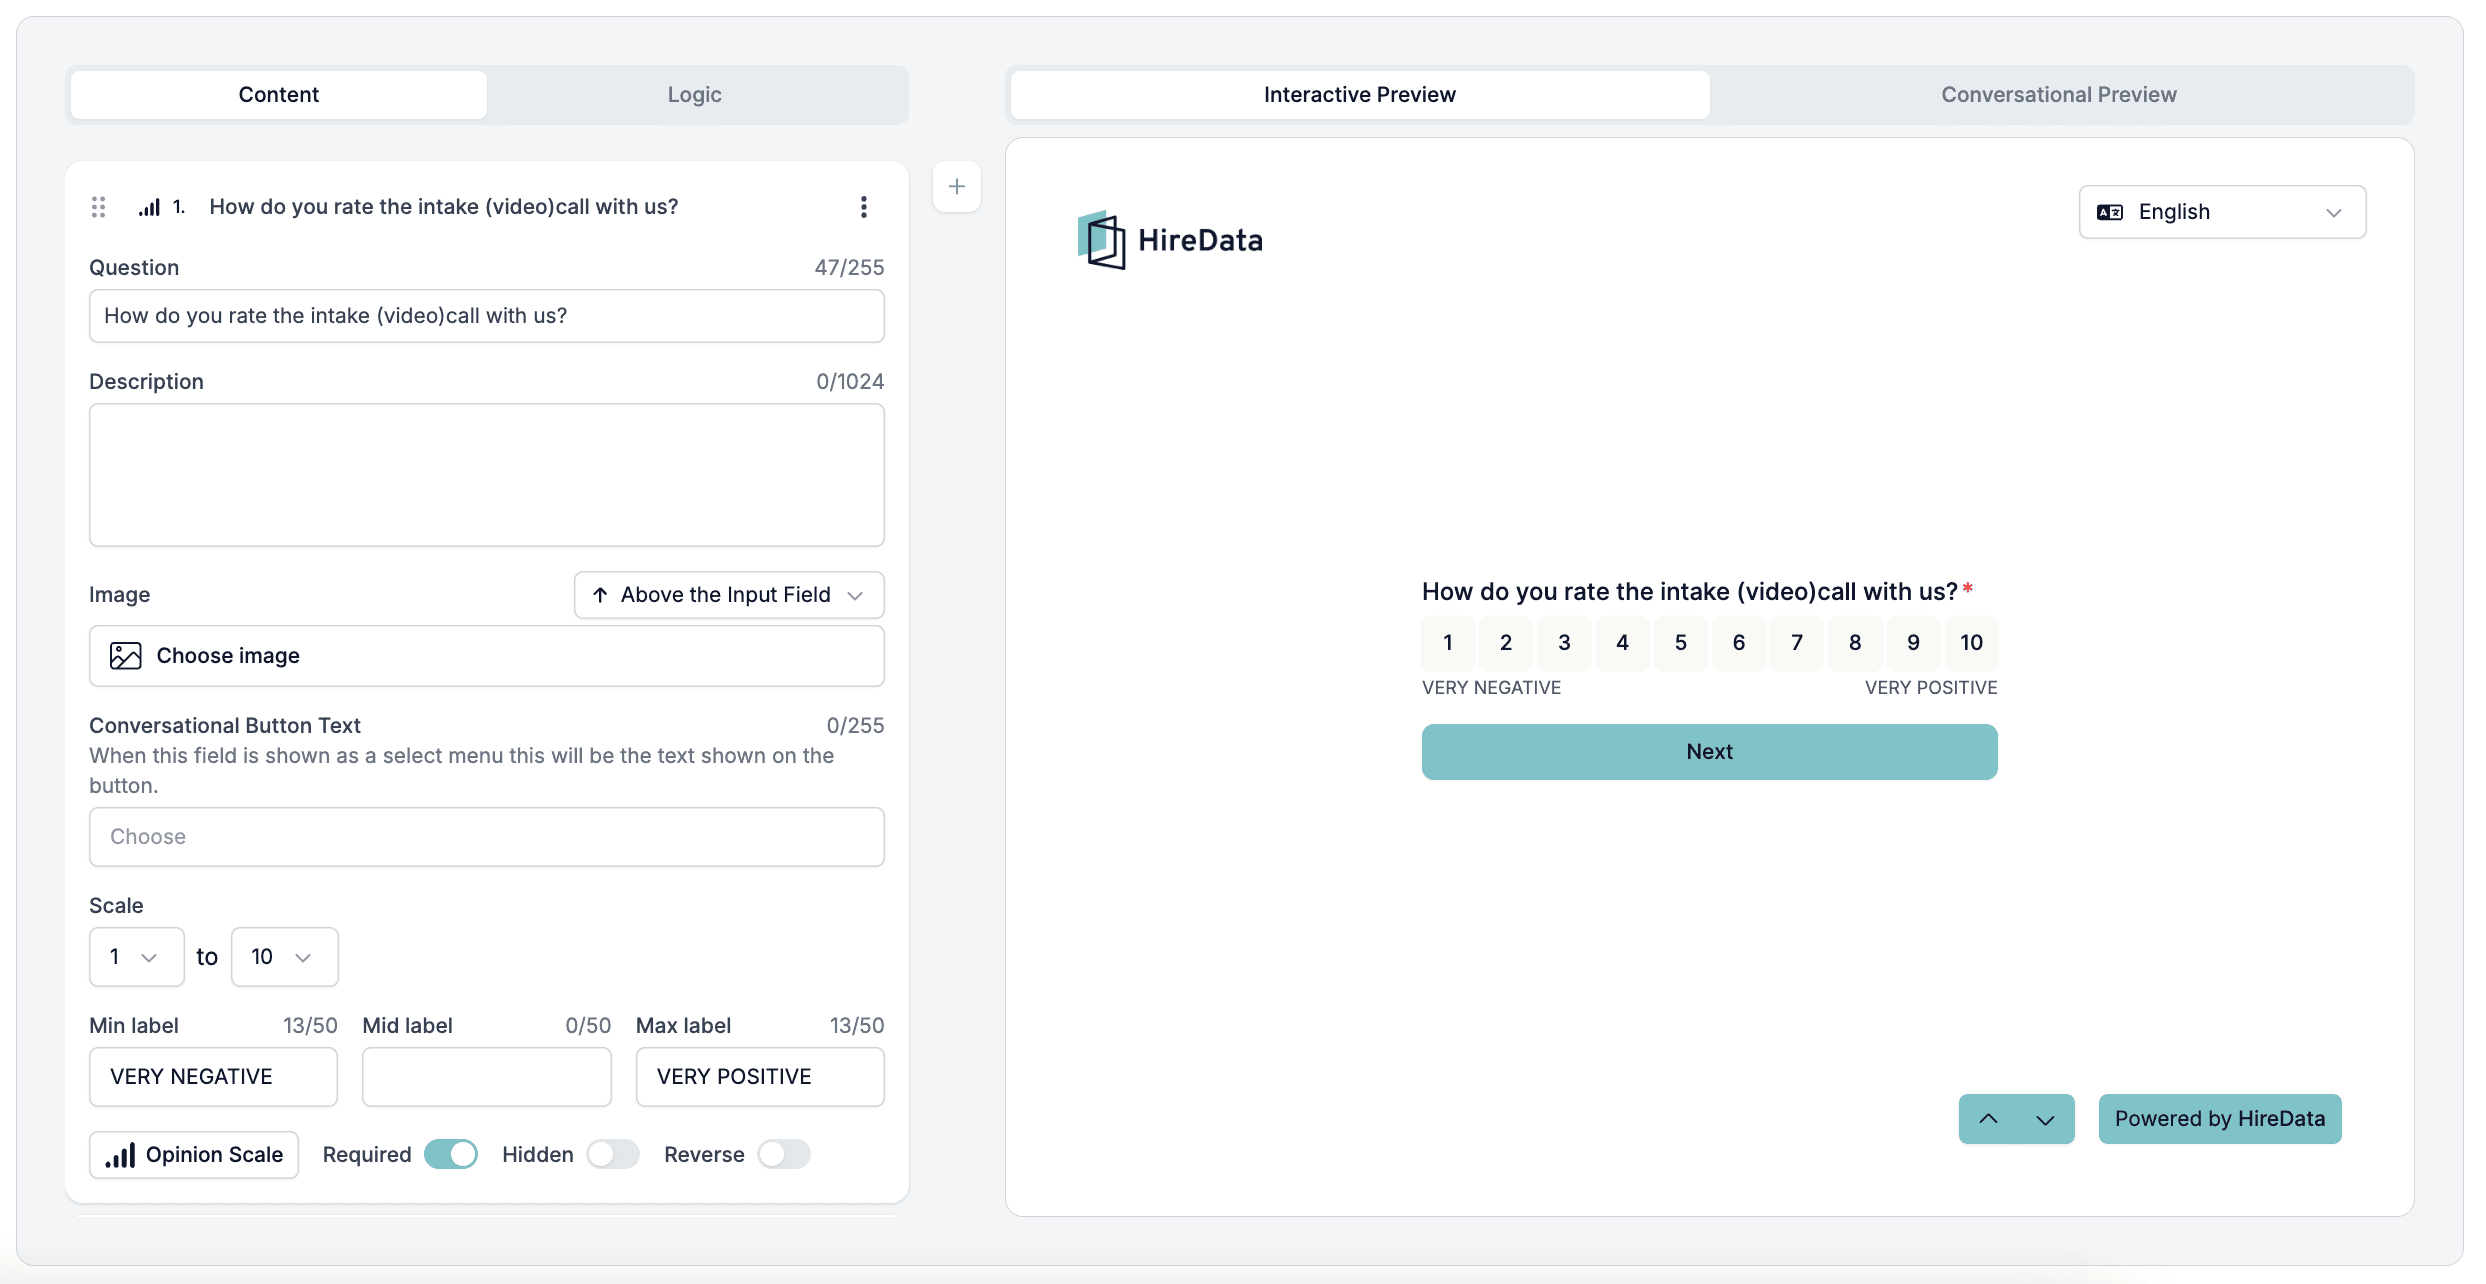
When adding or editing a question in your form, you can customise it using the following options:
* \*\*Description: \*\*Supporting text that appears below the question. Use this to provide more context or clarify the question.
* \*\*Placeholder: \*\*The text that appears inside the input field to guide the user on what kind of answer you're expecting (e.g. *“Type your response here…”*). It disappears once the user starts typing.
* \*\*Image: \*\*A visual above the question to make it more engaging or provide a visual reference.
* \*\*Button text: \*\*A customisable button that the candidate clicks to submit the answer or move to the next step. This can be useful if you want to guide the tone (e.g. "Submit Rating" or "Next").
* \*\*Adjust scale: \*\*For rating questions, you can define the minimum and maximum values (e.g. 1–10, 1–5). This is useful for different feedback formats like NPS (0–10) or satisfaction scores (1–5).
* \*\*Required question: \*\*Enable this to make the question mandatory so candidates won’t be able to skip it.
* \*\*Hidden question: \*\*Use this to hide a question from the candidate while still storing an answer (e.g. a default value or system-generated response).
* \*\*Reverse: \*\*For rating questions, this inverts the scale display (e.g. shows 10 → 1 instead of 1 → 10). It’s helpful when higher numbers represent something negative (like stress or difficulty).
### 2.2. Optional question settings
When adding or editing a question in your form, you can customise it using the following options:
* \*\*Description: \*\*Supporting text that appears below the question. Use this to provide more context or clarify the question.
* \*\*Placeholder: \*\*The text that appears inside the input field to guide the user on what kind of answer you're expecting (e.g. *“Type your response here…”*). It disappears once the user starts typing.
* \*\*Image: \*\*A visual above the question to make it more engaging or provide a visual reference.
* \*\*Button text: \*\*A customisable button that the candidate clicks to submit the answer or move to the next step. This can be useful if you want to guide the tone (e.g. "Submit Rating" or "Next").
* \*\*Adjust scale: \*\*For rating questions, you can define the minimum and maximum values (e.g. 1–10, 1–5). This is useful for different feedback formats like NPS (0–10) or satisfaction scores (1–5).
* \*\*Required question: \*\*Enable this to make the question mandatory so candidates won’t be able to skip it.
* \*\*Hidden question: \*\*Use this to hide a question from the candidate while still storing an answer (e.g. a default value or system-generated response).
* \*\*Reverse: \*\*For rating questions, this inverts the scale display (e.g. shows 10 → 1 instead of 1 → 10). It’s helpful when higher numbers represent something negative (like stress or difficulty).
 💡 **Tip:** You can drag and drop to reorder the questions.
## Adding logic to the questions
Use **rules** to set up smart flows between questions. For example:
* If a candidate rates **7 or below**, show a follow-up asking for improvement suggestions.
* If the rating is **8 or higher**, take them to the next question or ask them to leave a Google review.
To set this up:
### 2.1. Open the **Logic** tab and click \[Add Rule] below a question
💡 **Tip:** You can drag and drop to reorder the questions.
## Adding logic to the questions
Use **rules** to set up smart flows between questions. For example:
* If a candidate rates **7 or below**, show a follow-up asking for improvement suggestions.
* If the rating is **8 or higher**, take them to the next question or ask them to leave a Google review.
To set this up:
### 2.1. Open the **Logic** tab and click \[Add Rule] below a question
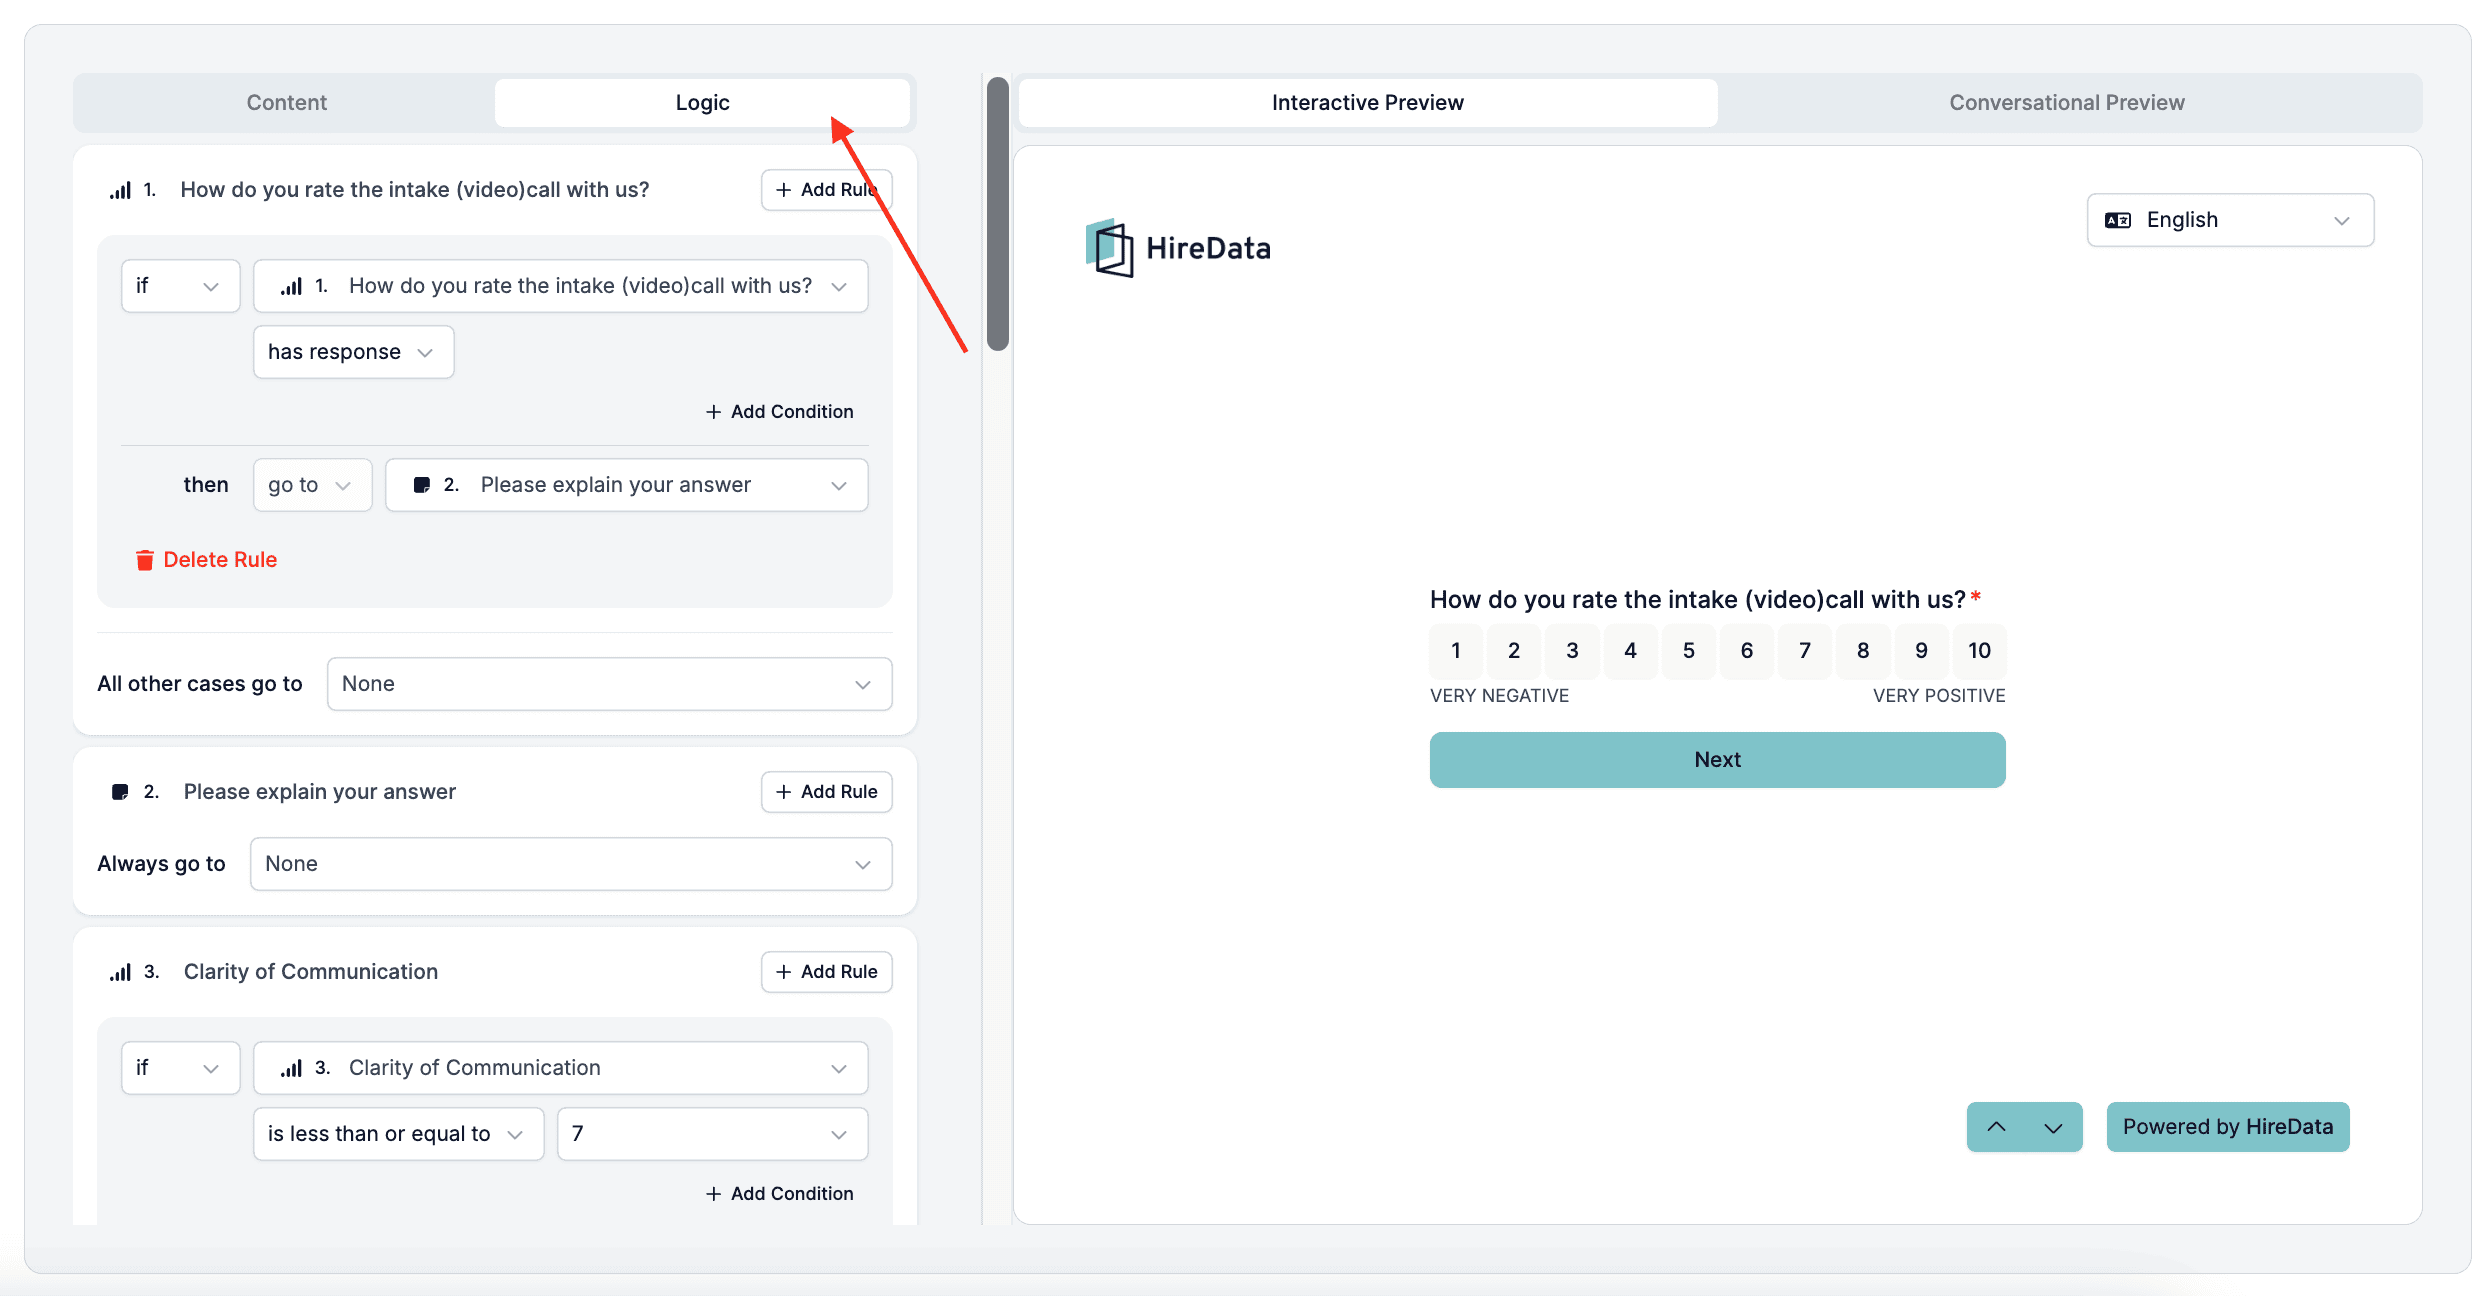
 ### 2.2. Set your condition (e.g. “Rating is less than or equal to 7”)
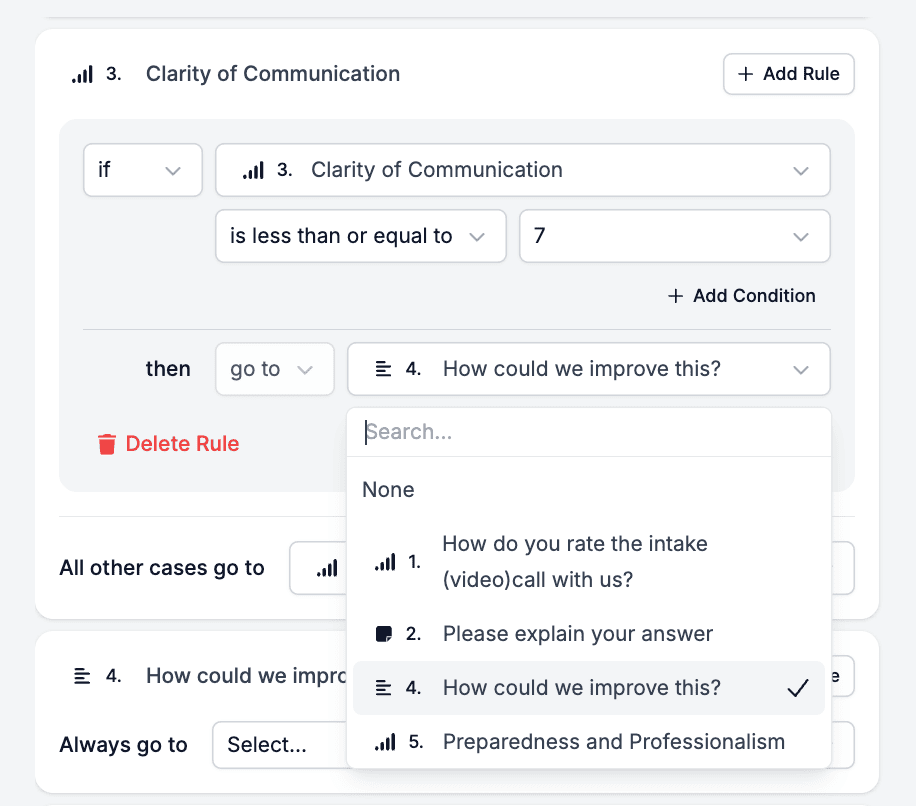
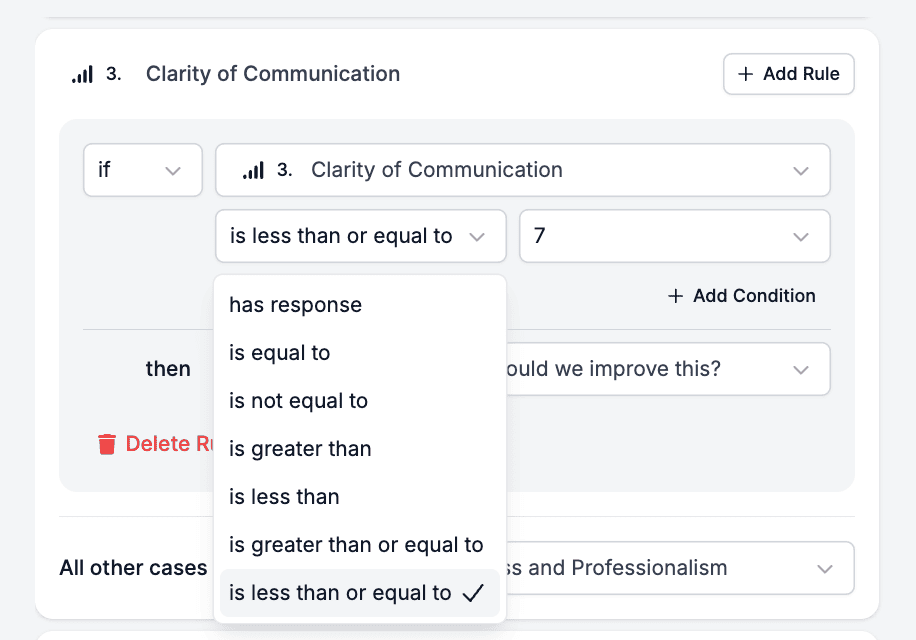 ### 2.3. Choose what should happen next (e.g. go to a specific follow-up question or thank-you screen)
 ## Adding a thank-you screen
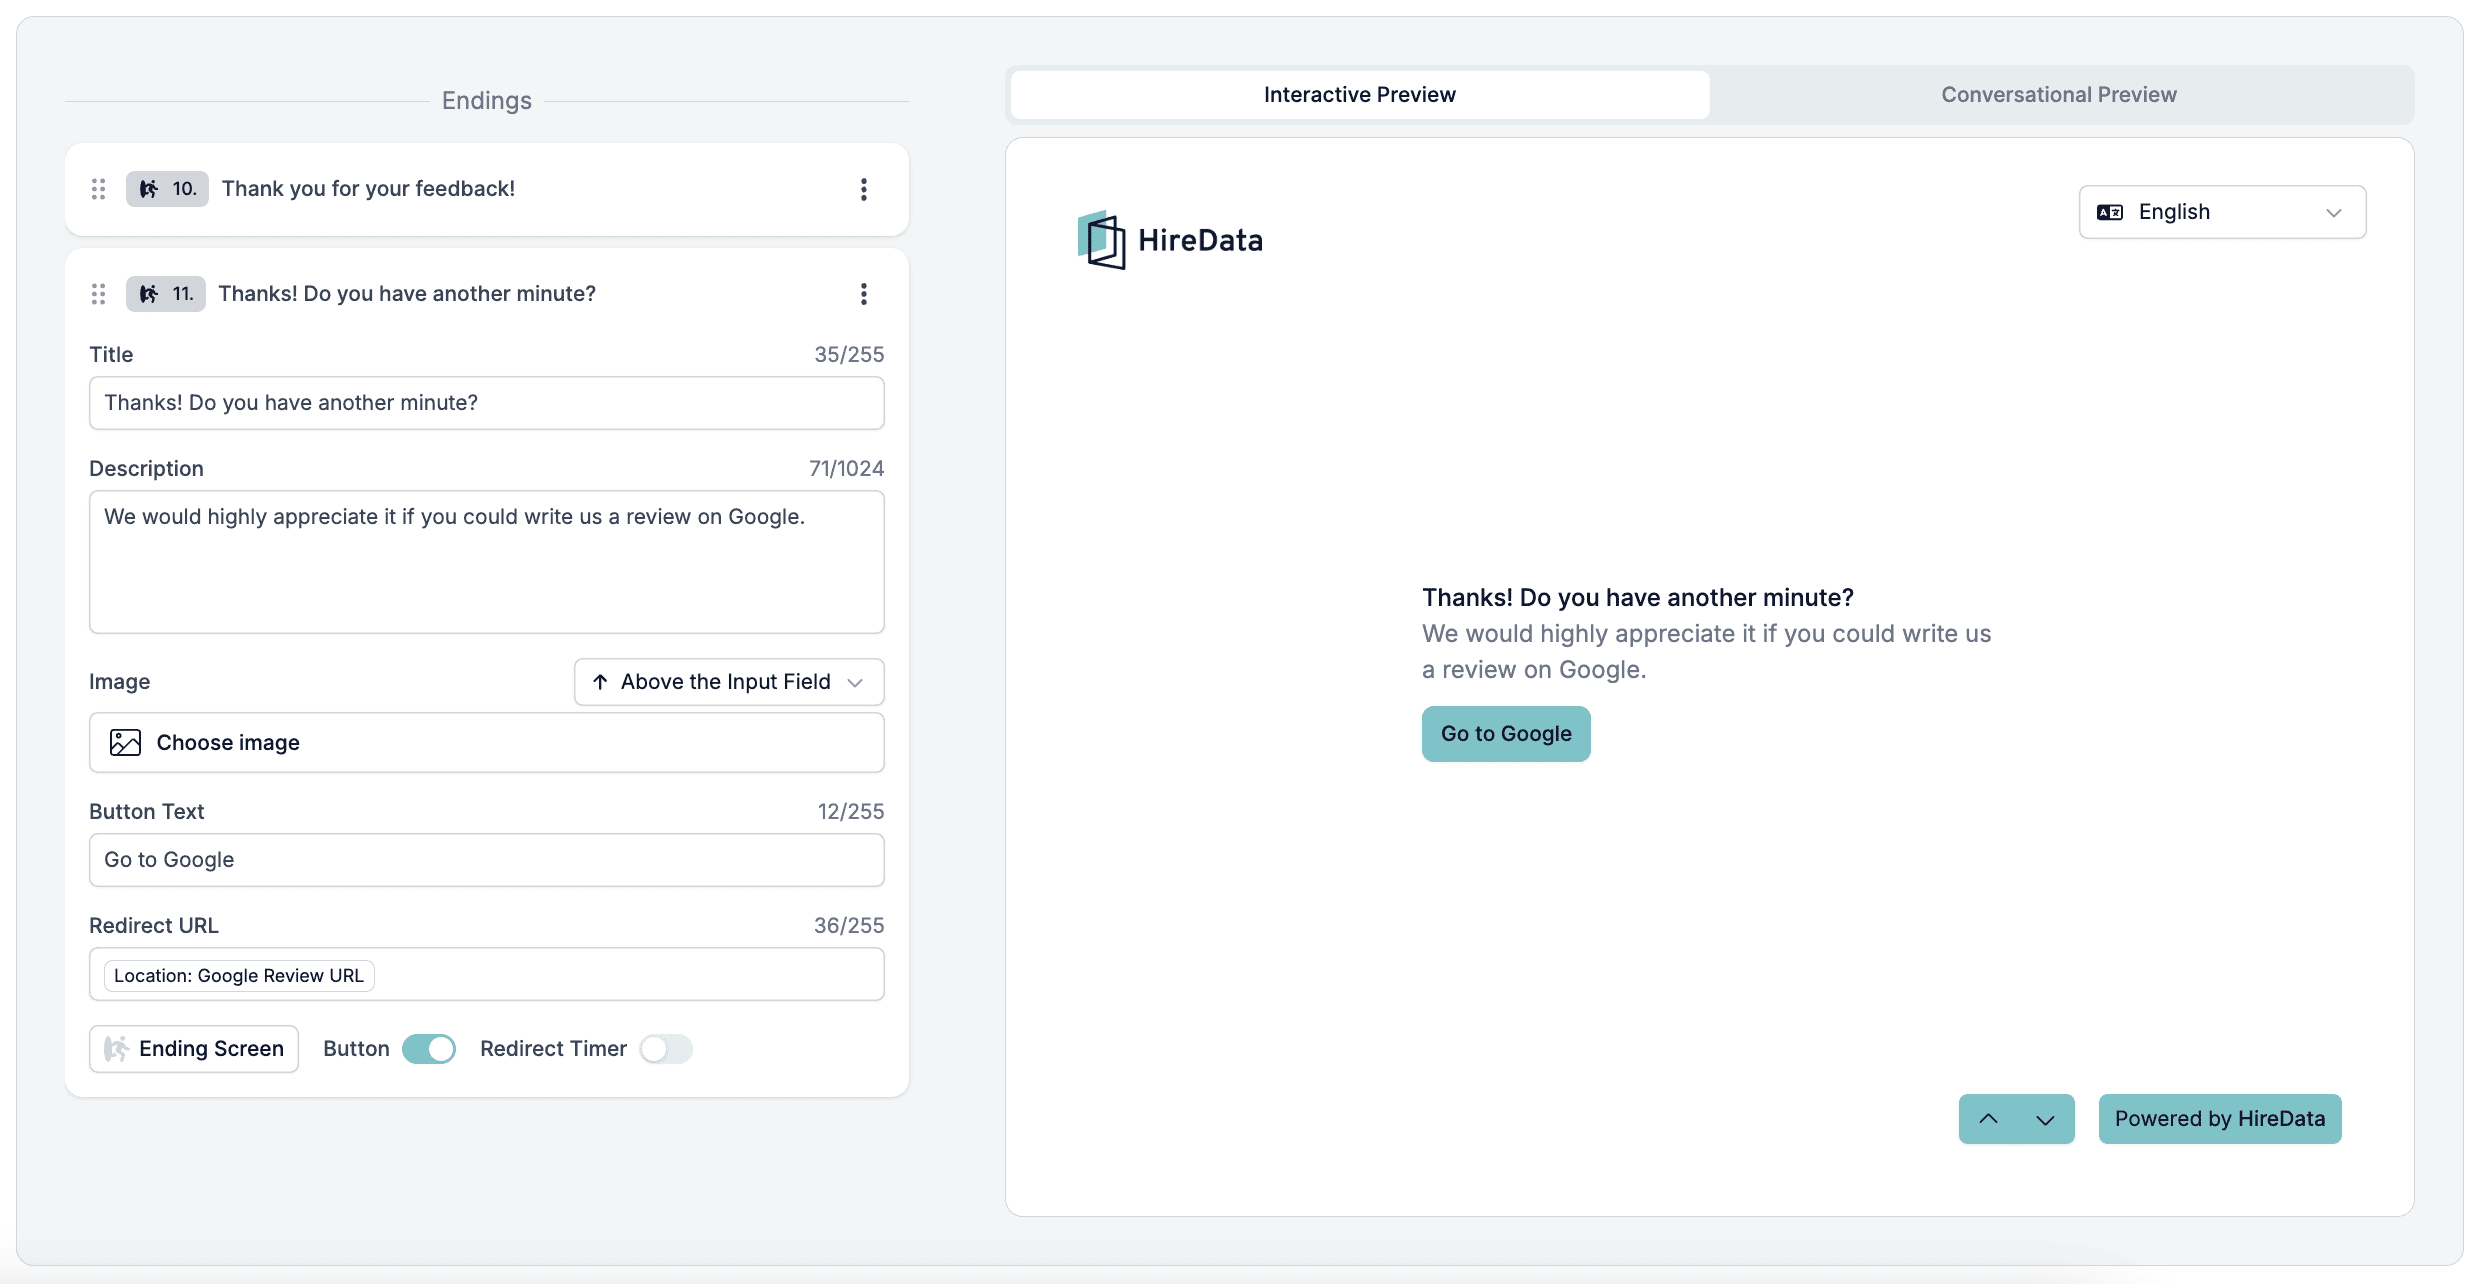
Based on the answers, forms can also end with a thank-you message or redirect candidates to an external page to leave a review.
You can customise the **Thank-you screen** with a:
* Title
* Short message
* Image
* Button with text
* Redirect URL: Use this to direct candidates to leave a review or go to your website.
*Thank you screen with Website Redirect URL:*
## Adding a thank-you screen
Based on the answers, forms can also end with a thank-you message or redirect candidates to an external page to leave a review.
You can customise the **Thank-you screen** with a:
* Title
* Short message
* Image
* Button with text
* Redirect URL: Use this to direct candidates to leave a review or go to your website.
*Thank you screen with Website Redirect URL:*
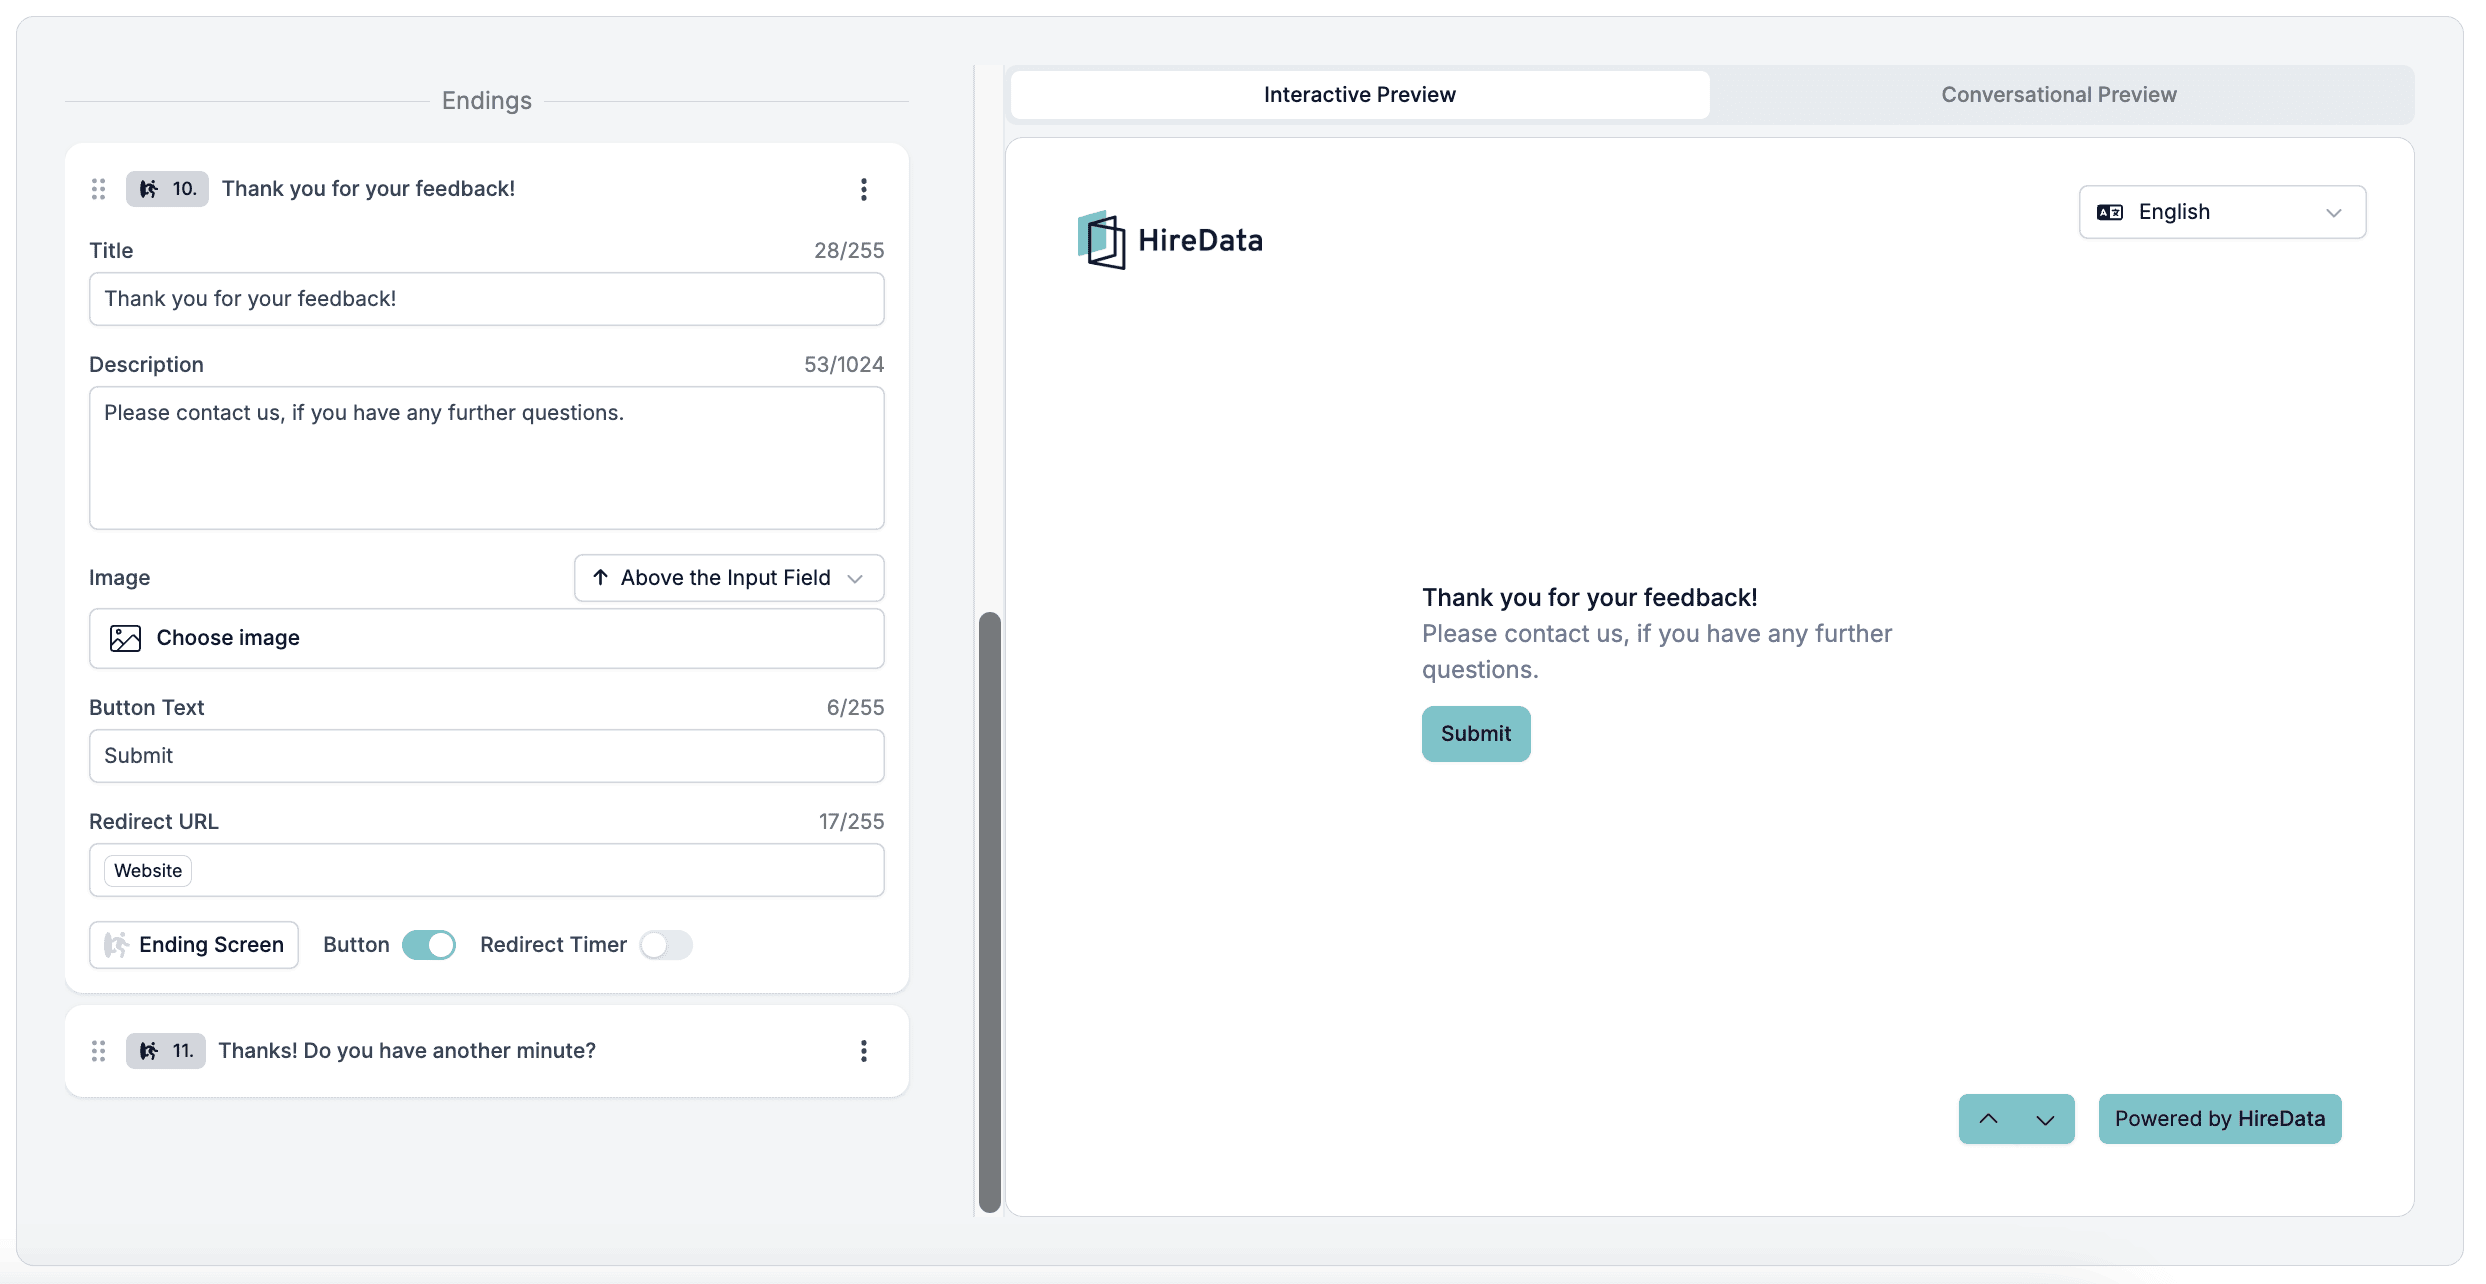 *Thank you screen with Google Review URL:*
 ## Preview and save the form
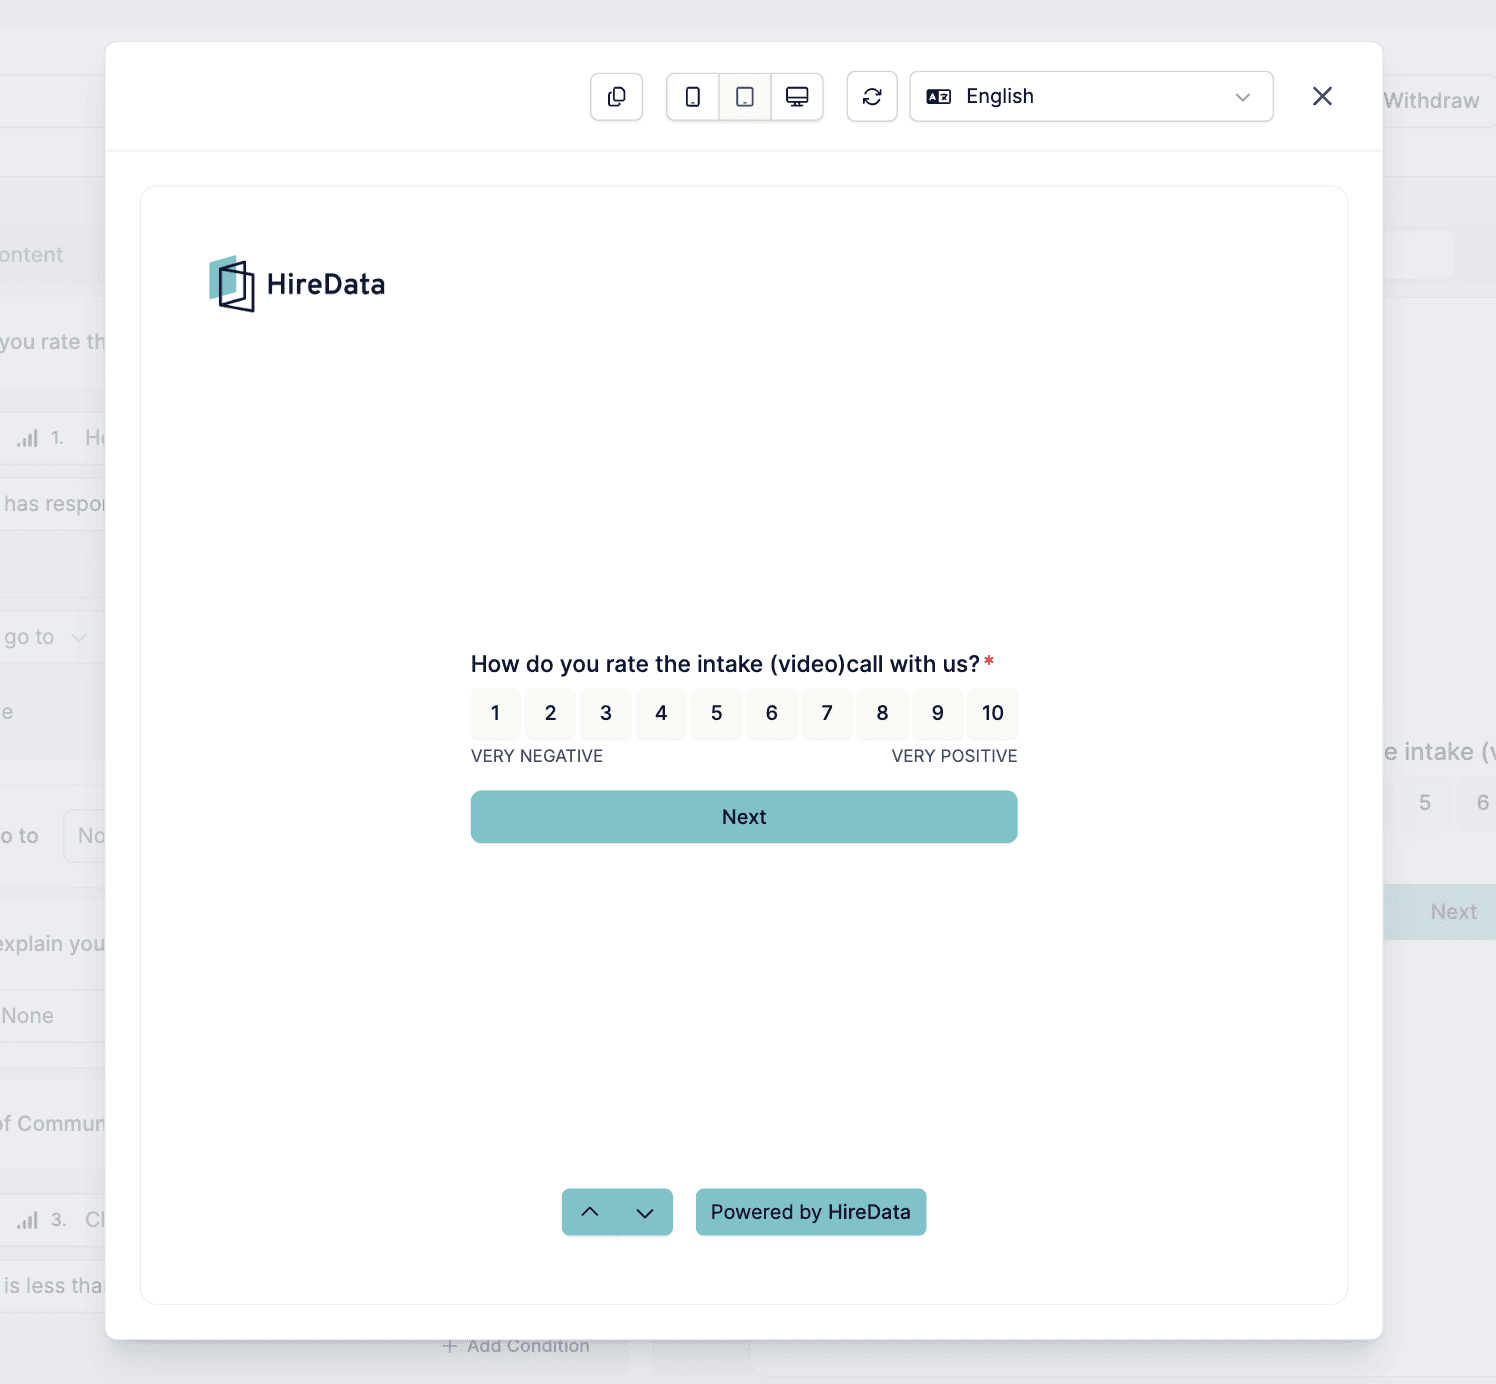
Click on the eye icon to preview the form and on \[Save] to save it.
## Preview and save the form
Click on the eye icon to preview the form and on \[Save] to save it.
 *Form preview on different devices:*
 That’s it! 🎉 Once your form is ready, you can add it to your email templates in HireData and then send it via your automations.
***
## Video guide
## Related topics
- [WhatsApp Template Categories in HireData](/apps/messaging/whatsapp/whatsapp-template-categories-in-hiredata.md)
- [Schedule a task in Carerix with HireData](/apps/carerix/schedule-a-task-in-carerix-with-hiredata.md)
- [Why is my Carerix not syncing with HireData](/apps/carerix/why-is-my-carerix-not-syncing-with-hiredata.md)
- [Setting Up an Email Template in HireData](/apps/messaging/emails/setting-up-an-email-template-in-hiredata.md)
- [Connect with Vincere](/apps/vincere/connect-with-vincere.md)
That’s it! 🎉 Once your form is ready, you can add it to your email templates in HireData and then send it via your automations.
***
## Video guide
## Related topics
- [WhatsApp Template Categories in HireData](/apps/messaging/whatsapp/whatsapp-template-categories-in-hiredata.md)
- [Schedule a task in Carerix with HireData](/apps/carerix/schedule-a-task-in-carerix-with-hiredata.md)
- [Why is my Carerix not syncing with HireData](/apps/carerix/why-is-my-carerix-not-syncing-with-hiredata.md)
- [Setting Up an Email Template in HireData](/apps/messaging/emails/setting-up-an-email-template-in-hiredata.md)
- [Connect with Vincere](/apps/vincere/connect-with-vincere.md)