> ## Documentation Index
> Fetch the complete documentation index at: https://help.hiredata.com/llms.txt
> Use this file to discover all available pages before exploring further.
# Template
> The root of a HireData email. How Template, sections, and blocks nest, how the breadcrumb moves between them, and the settings that apply to the whole email.
Template is the email itself. It sits at the root of everything you build in the email builder, it holds the sections, and its settings apply to every block inside them.
You never add a Template and you cannot delete one. No menu in the builder offers a Template, and no **Blocks** list contains one. Every email has exactly one from the moment you create it, which is why the breadcrumb always starts there.
## How an email nests
Three levels, and one exception.
* **Template** holds sections and nothing else. The **Blocks** list on the Template panel adds a section without opening a menu, because a section is the only thing it takes.
* A **section** is a band across the email. It holds the blocks a recipient reads: paragraph, heading, Two Columns, form, image, socials, button, HTML, and signature.
* A **Two Columns** block is the exception. It sits inside a section, arrives with exactly two columns already in it, and each column holds its own blocks. A column takes fewer kinds of block than a section does: no Two Columns, no Form, no Signature.
[Choosing a block](/reference/email-builder/overview#choosing-a-block) lists every block and where you can put it.
## The breadcrumb
The settings panel is headed by a breadcrumb naming everything that contains the block you selected. Select a line of a signature and you get all four levels.
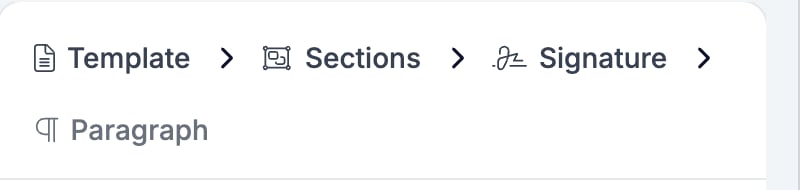 Every level except the one you are on is a button. Click **Sections** for the section holding the block, and **Template** for the email as a whole. The email on the left does not move. Only the panel changes.
Two things about it are worth knowing before they trip you up.
* **A single section is labelled "Sections", plural.** It reads that way in the breadcrumb and on every row of the Template **Blocks** list, so a list of five sections is five rows all reading "Sections". The plural is the label for the block type rather than a count, and it never tells you which section you are on. The email on the left does.
* **There is no column level.** Select a block inside a column and the breadcrumb runs `Template > Sections > Two Columns` and then straight to the block. A column has no settings panel of its own, so nothing is missing from the chain.
## Settings
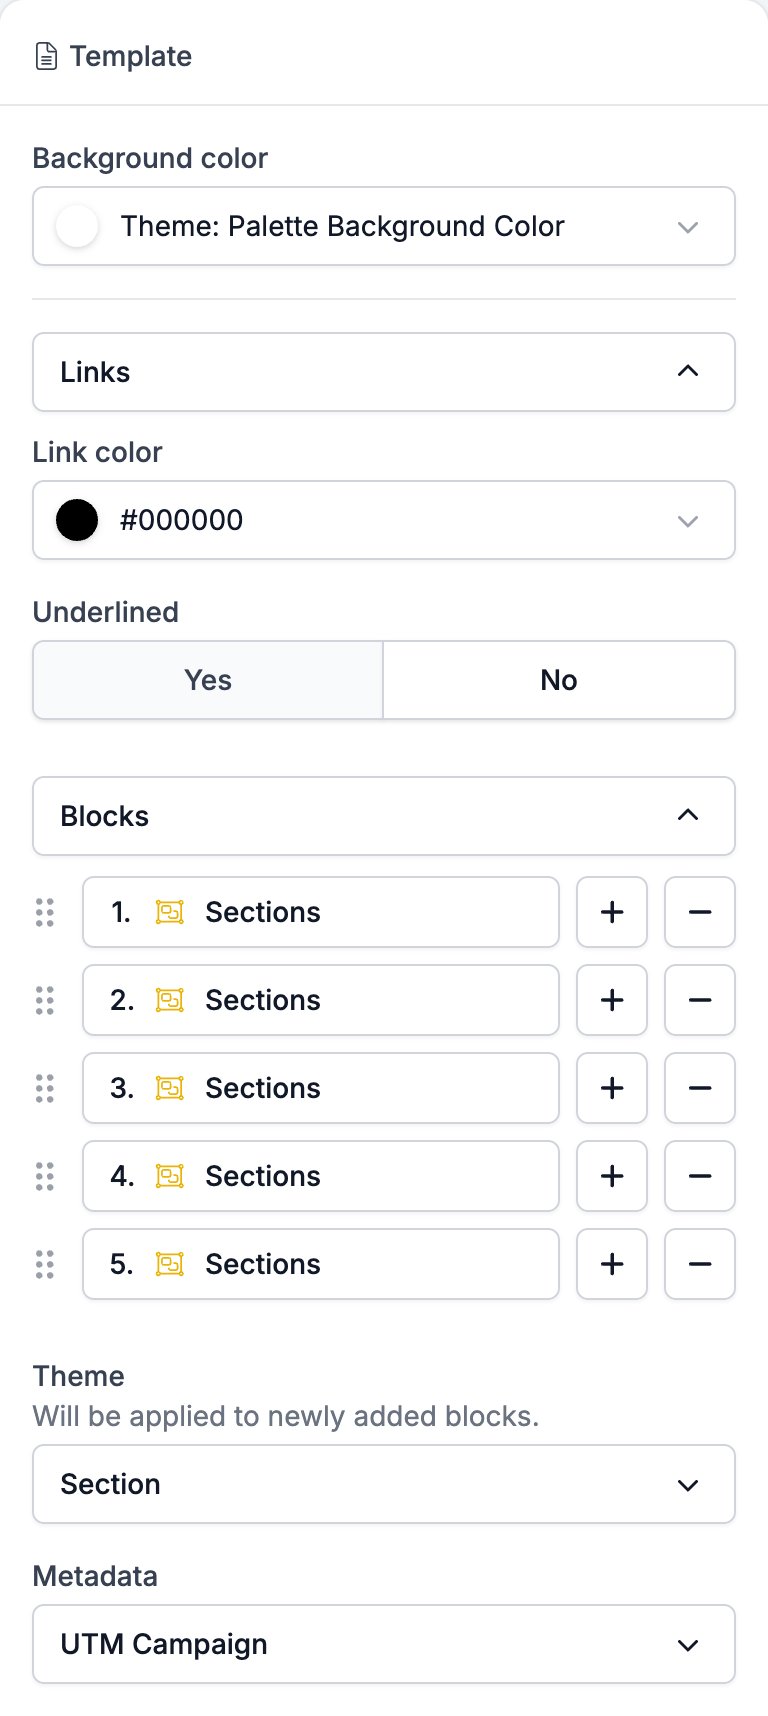
Click **Template** in the breadcrumb and the panel fills with the settings for the whole email. It is the one level you cannot reach by clicking the email itself, because clicking beside a block selects the section rather than the template.
* **Background color** sits behind every section, so it is what a recipient sees around them and in the gaps between them. It starts on the brand's background colour, which the control names rather than showing as a hex code.
* **Links** holds **Link color** and **Underlined**. Both apply to every link in the email. A paragraph can override either one, and its own **Links** group offers **Inherit** as a third choice so it can hand the decision back.
* **Blocks** lists the sections in the order they appear. Drag a row to move a section, **+** adds one below it, and **−** deletes it with everything inside.
* **Theme** is the styling that blocks you add from now on will start with. See [Brand, theme, and metadata](#brand-theme-and-metadata).
* **Metadata** holds **UTM Campaign**. See [Brand, theme, and metadata](#brand-theme-and-metadata).
Every level except the one you are on is a button. Click **Sections** for the section holding the block, and **Template** for the email as a whole. The email on the left does not move. Only the panel changes.
Two things about it are worth knowing before they trip you up.
* **A single section is labelled "Sections", plural.** It reads that way in the breadcrumb and on every row of the Template **Blocks** list, so a list of five sections is five rows all reading "Sections". The plural is the label for the block type rather than a count, and it never tells you which section you are on. The email on the left does.
* **There is no column level.** Select a block inside a column and the breadcrumb runs `Template > Sections > Two Columns` and then straight to the block. A column has no settings panel of its own, so nothing is missing from the chain.
## Settings
Click **Template** in the breadcrumb and the panel fills with the settings for the whole email. It is the one level you cannot reach by clicking the email itself, because clicking beside a block selects the section rather than the template.
* **Background color** sits behind every section, so it is what a recipient sees around them and in the gaps between them. It starts on the brand's background colour, which the control names rather than showing as a hex code.
* **Links** holds **Link color** and **Underlined**. Both apply to every link in the email. A paragraph can override either one, and its own **Links** group offers **Inherit** as a third choice so it can hand the decision back.
* **Blocks** lists the sections in the order they appear. Drag a row to move a section, **+** adds one below it, and **−** deletes it with everything inside.
* **Theme** is the styling that blocks you add from now on will start with. See [Brand, theme, and metadata](#brand-theme-and-metadata).
* **Metadata** holds **UTM Campaign**. See [Brand, theme, and metadata](#brand-theme-and-metadata).
 ## Brand, theme, and metadata
Three settings decide how an email is styled, and they reach different blocks. Getting them the wrong way round is the usual reason a change lands somewhere you did not expect.
* **Brand**, in the toolbar, restyles the **whole email**. Every colour and font still set to a theme value changes at once, in blocks you wrote weeks ago as much as in blocks you add next. Switching a fixture from one brand to another moved its section background, its button colour, and its heading colour together.
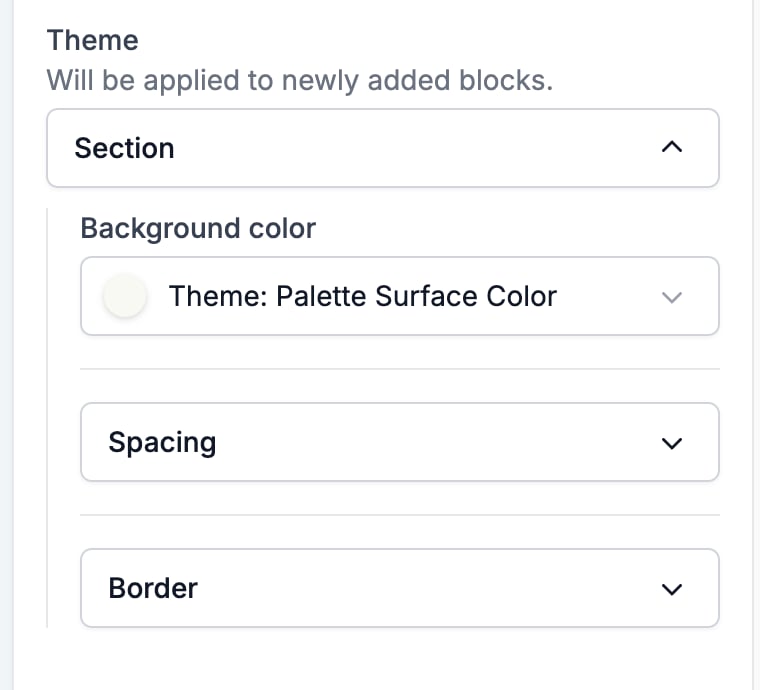
* **Theme**, in the Template settings, reaches **only blocks you add afterwards**. The panel says so itself: "Will be applied to newly added blocks." Set the section background there and every section you add from then on starts with it. Sections already in the email keep what they have.
* **A value you set on a block yourself** reaches **that block alone**, and takes it out of the brand's reach for good. The control stops naming a theme value and shows your colour instead, and a later brand switch leaves it where you put it.
So the panel tells you which is which. A control reading "Theme: Palette Surface Color" is still following the brand. One reading `#ff0000` is not.
## Brand, theme, and metadata
Three settings decide how an email is styled, and they reach different blocks. Getting them the wrong way round is the usual reason a change lands somewhere you did not expect.
* **Brand**, in the toolbar, restyles the **whole email**. Every colour and font still set to a theme value changes at once, in blocks you wrote weeks ago as much as in blocks you add next. Switching a fixture from one brand to another moved its section background, its button colour, and its heading colour together.
* **Theme**, in the Template settings, reaches **only blocks you add afterwards**. The panel says so itself: "Will be applied to newly added blocks." Set the section background there and every section you add from then on starts with it. Sections already in the email keep what they have.
* **A value you set on a block yourself** reaches **that block alone**, and takes it out of the brand's reach for good. The control stops naming a theme value and shows your colour instead, and a later brand switch leaves it where you put it.
So the panel tells you which is which. A control reading "Theme: Palette Surface Color" is still following the brand. One reading `#ff0000` is not.
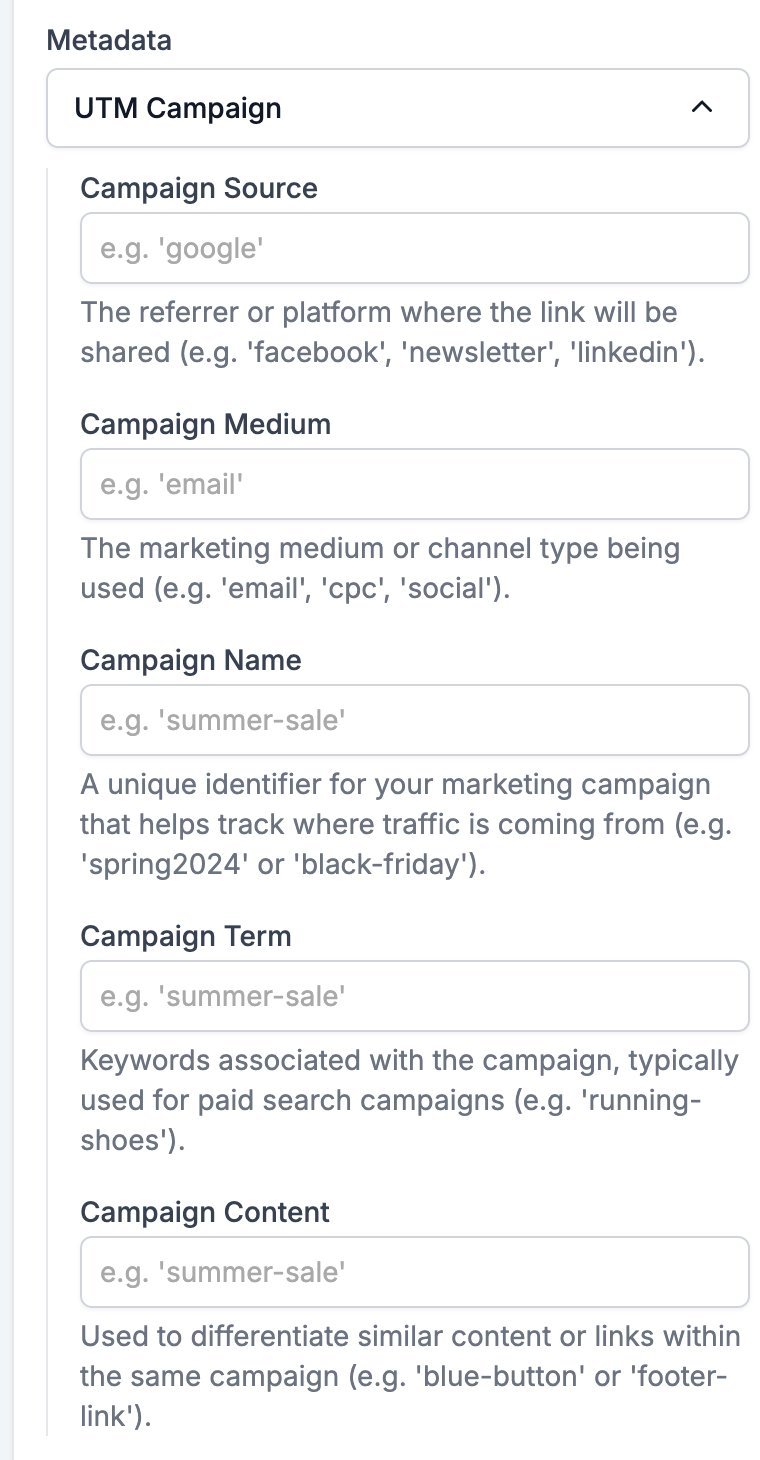
 **Metadata** below it holds **UTM Campaign**, five boxes named **Campaign Source**, **Campaign Medium**, **Campaign Name**, **Campaign Term**, and **Campaign Content**. HireData tags every link in a sent email whether or not you fill them in, so these set the values rather than switching tagging on.
 ## Related
* [Email builder overview](/reference/email-builder/overview) covers the canvas, the toolbar, the theme, and saving.
* [Section](/reference/email-builder/sections) is the band that holds everything a recipient reads.
* [Two Columns](/reference/email-builder/blocks/columns) explains the one block that nests further.
* [Paragraph](/reference/email-builder/blocks/paragraph) covers the per-block link colour that overrides the template.
## Related topics
- [Form builder overview](/reference/forms/overview.md)
- [How WhatsApp templates work](/apps/messaging/whatsapp/how-whatsapp-templates-work.md)
- [WhatsApp template categories in HireData](/apps/messaging/whatsapp/whatsapp-template-categories-in-hiredata.md)
- [Setting up an email template in HireData](/apps/messaging/emails/setting-up-an-email-template-in-hiredata.md)
- [How to edit WhatsApp message templates in HireData](/apps/messaging/whatsapp/how-to-edit-whatsapp-message-templates.md)
## Related
* [Email builder overview](/reference/email-builder/overview) covers the canvas, the toolbar, the theme, and saving.
* [Section](/reference/email-builder/sections) is the band that holds everything a recipient reads.
* [Two Columns](/reference/email-builder/blocks/columns) explains the one block that nests further.
* [Paragraph](/reference/email-builder/blocks/paragraph) covers the per-block link colour that overrides the template.
## Related topics
- [Form builder overview](/reference/forms/overview.md)
- [How WhatsApp templates work](/apps/messaging/whatsapp/how-whatsapp-templates-work.md)
- [WhatsApp template categories in HireData](/apps/messaging/whatsapp/whatsapp-template-categories-in-hiredata.md)
- [Setting up an email template in HireData](/apps/messaging/emails/setting-up-an-email-template-in-hiredata.md)
- [How to edit WhatsApp message templates in HireData](/apps/messaging/whatsapp/how-to-edit-whatsapp-message-templates.md)