> ## Documentation Index
> Fetch the complete documentation index at: https://help.hiredata.com/llms.txt
> Use this file to discover all available pages before exploring further.
# Variables
> Personalise a HireData email with variables: the picker, where they work, adding one of your own, what a recipient sees when a value is missing, and fallbacks.
A variable is a placeholder HireData fills in when the email goes out. Write `{{recipient.first_name}}` once and every recipient reads their own name.
The email builder shows a variable as a chip carrying its label, not its value. `{{recipient.first_name}}` reads **Recipient: First Name** on the canvas, and the chip behaves as one object rather than as the characters it stands for.
## Inserting a variable
Type `{{` and a picker opens under the cursor. Each row gives the variable's label, its `{{key}}`, and the kind of value it holds.
Keep typing to narrow the list. The search is forgiving. Type `frist` and **Recipient: First Name** still comes up.
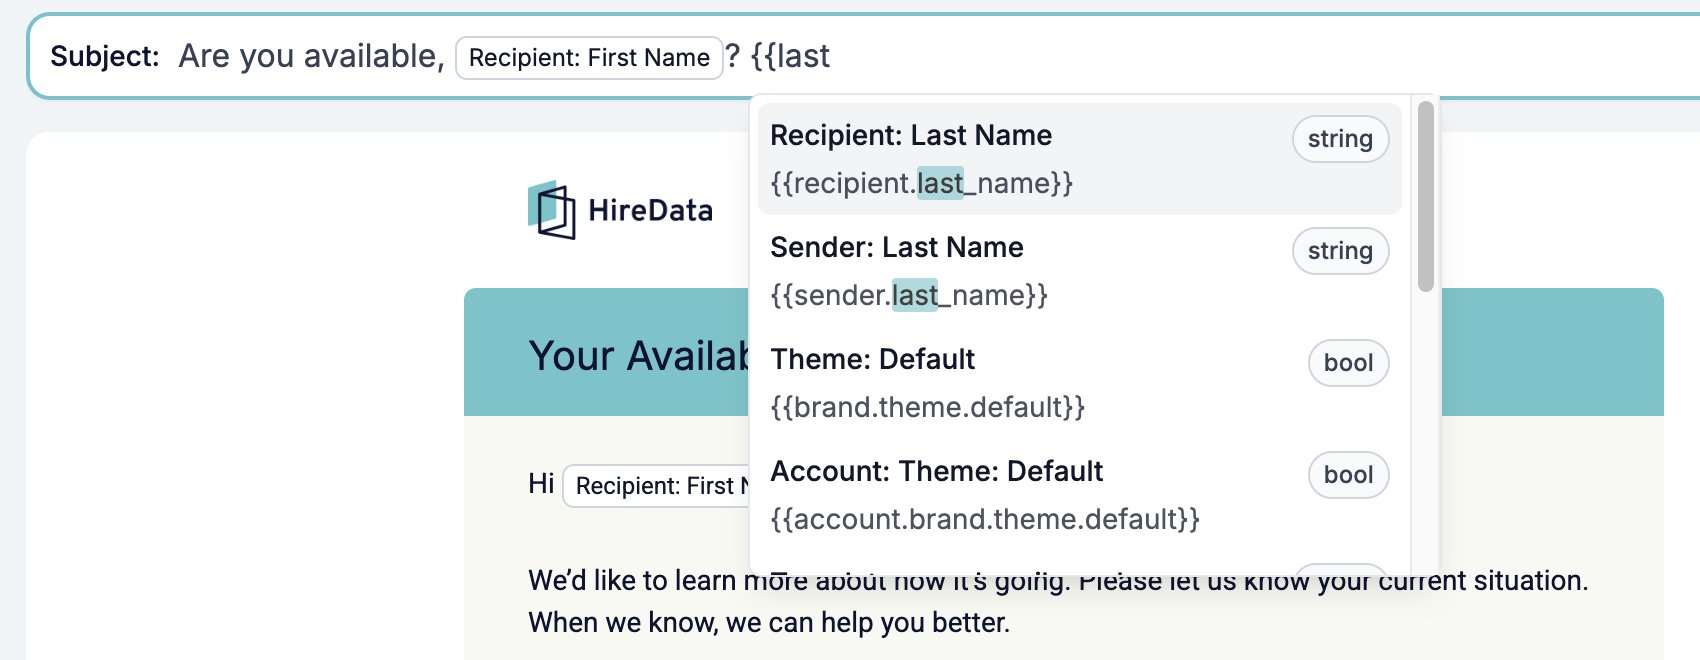 Press Enter or click a row and the token turns into a chip.
## Where variables work
Anywhere you can type into an email, and in several places you cannot.
* The **Subject** box, which is the line a recipient reads in their inbox.
* [Paragraph](/reference/email-builder/blocks/paragraph) and [heading](/reference/email-builder/blocks/heading) text.
* A link's address. Select some text, click the link button in the bubble menu, and the popover offers a dropdown of every variable that holds a URL, including `{{template::unsubscribe_url}}`.
* The **URL** box on a [Button](/reference/email-builder/blocks/button) and on each [Social](/reference/email-builder/blocks/socials) row.
* A picture. The media library's **Fields** tab lists the variables that carry an image, for both the [Image](/reference/email-builder/blocks/image) block and the [Signature](/reference/email-builder/blocks/signature).
* A colour. Colour controls pick from the brand's colour variables by name, which is what "Theme: Palette Primary Color" means. See [Brand, theme, and metadata](/reference/email-builder/template#brand-theme-and-metadata).
## The variable list
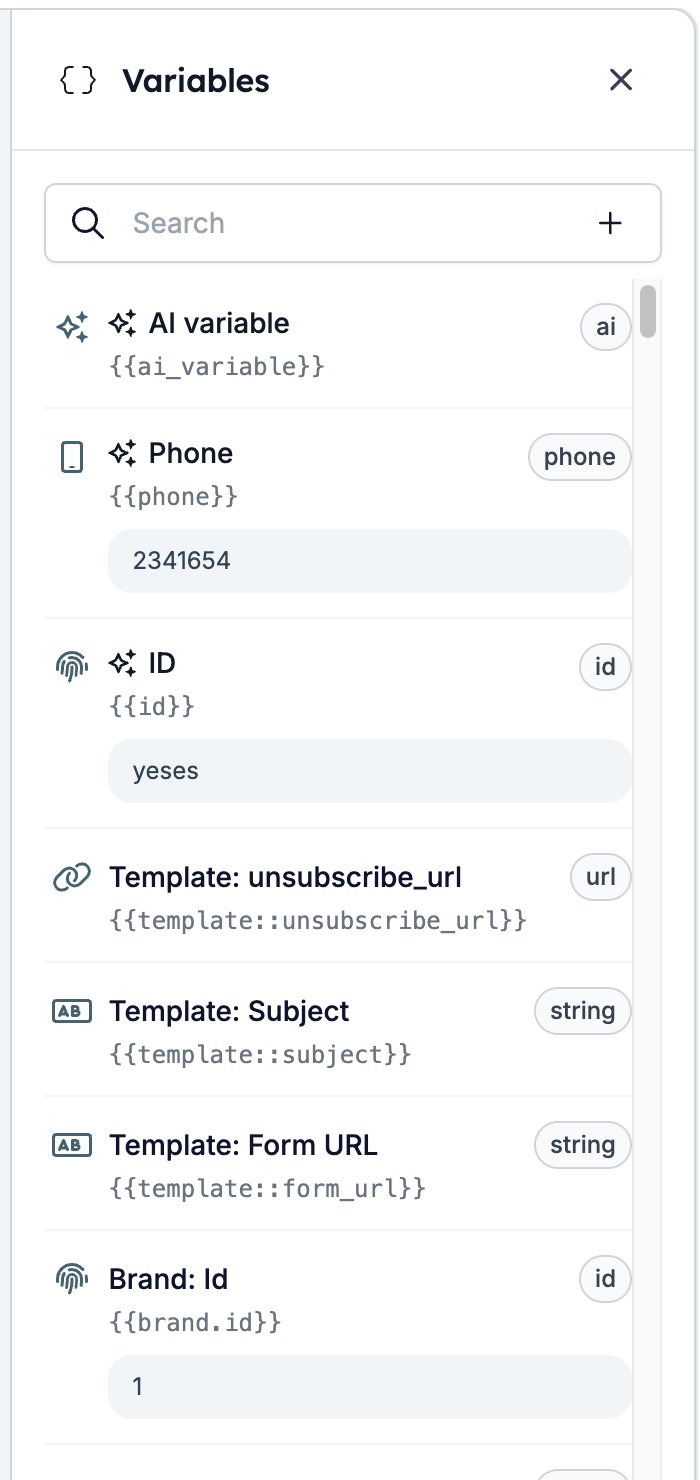
The curly-brackets button in the toolbar opens **Variables**, a drawer listing everything this email can use. Search by label or key. Where HireData already knows a value, the card shows it, so you can tell `{{brand.name}}` from `{{account.name}}` without guessing.
Variables you added yourself sit at the top, each marked with a sparkle, and the `{{` picker puts the same ones first. Click one to reopen its settings.
Press Enter or click a row and the token turns into a chip.
## Where variables work
Anywhere you can type into an email, and in several places you cannot.
* The **Subject** box, which is the line a recipient reads in their inbox.
* [Paragraph](/reference/email-builder/blocks/paragraph) and [heading](/reference/email-builder/blocks/heading) text.
* A link's address. Select some text, click the link button in the bubble menu, and the popover offers a dropdown of every variable that holds a URL, including `{{template::unsubscribe_url}}`.
* The **URL** box on a [Button](/reference/email-builder/blocks/button) and on each [Social](/reference/email-builder/blocks/socials) row.
* A picture. The media library's **Fields** tab lists the variables that carry an image, for both the [Image](/reference/email-builder/blocks/image) block and the [Signature](/reference/email-builder/blocks/signature).
* A colour. Colour controls pick from the brand's colour variables by name, which is what "Theme: Palette Primary Color" means. See [Brand, theme, and metadata](/reference/email-builder/template#brand-theme-and-metadata).
## The variable list
The curly-brackets button in the toolbar opens **Variables**, a drawer listing everything this email can use. Search by label or key. Where HireData already knows a value, the card shows it, so you can tell `{{brand.name}}` from `{{account.name}}` without guessing.
Variables you added yourself sit at the top, each marked with a sparkle, and the `{{` picker puts the same ones first. Click one to reopen its settings.
 ## Adding your own variable
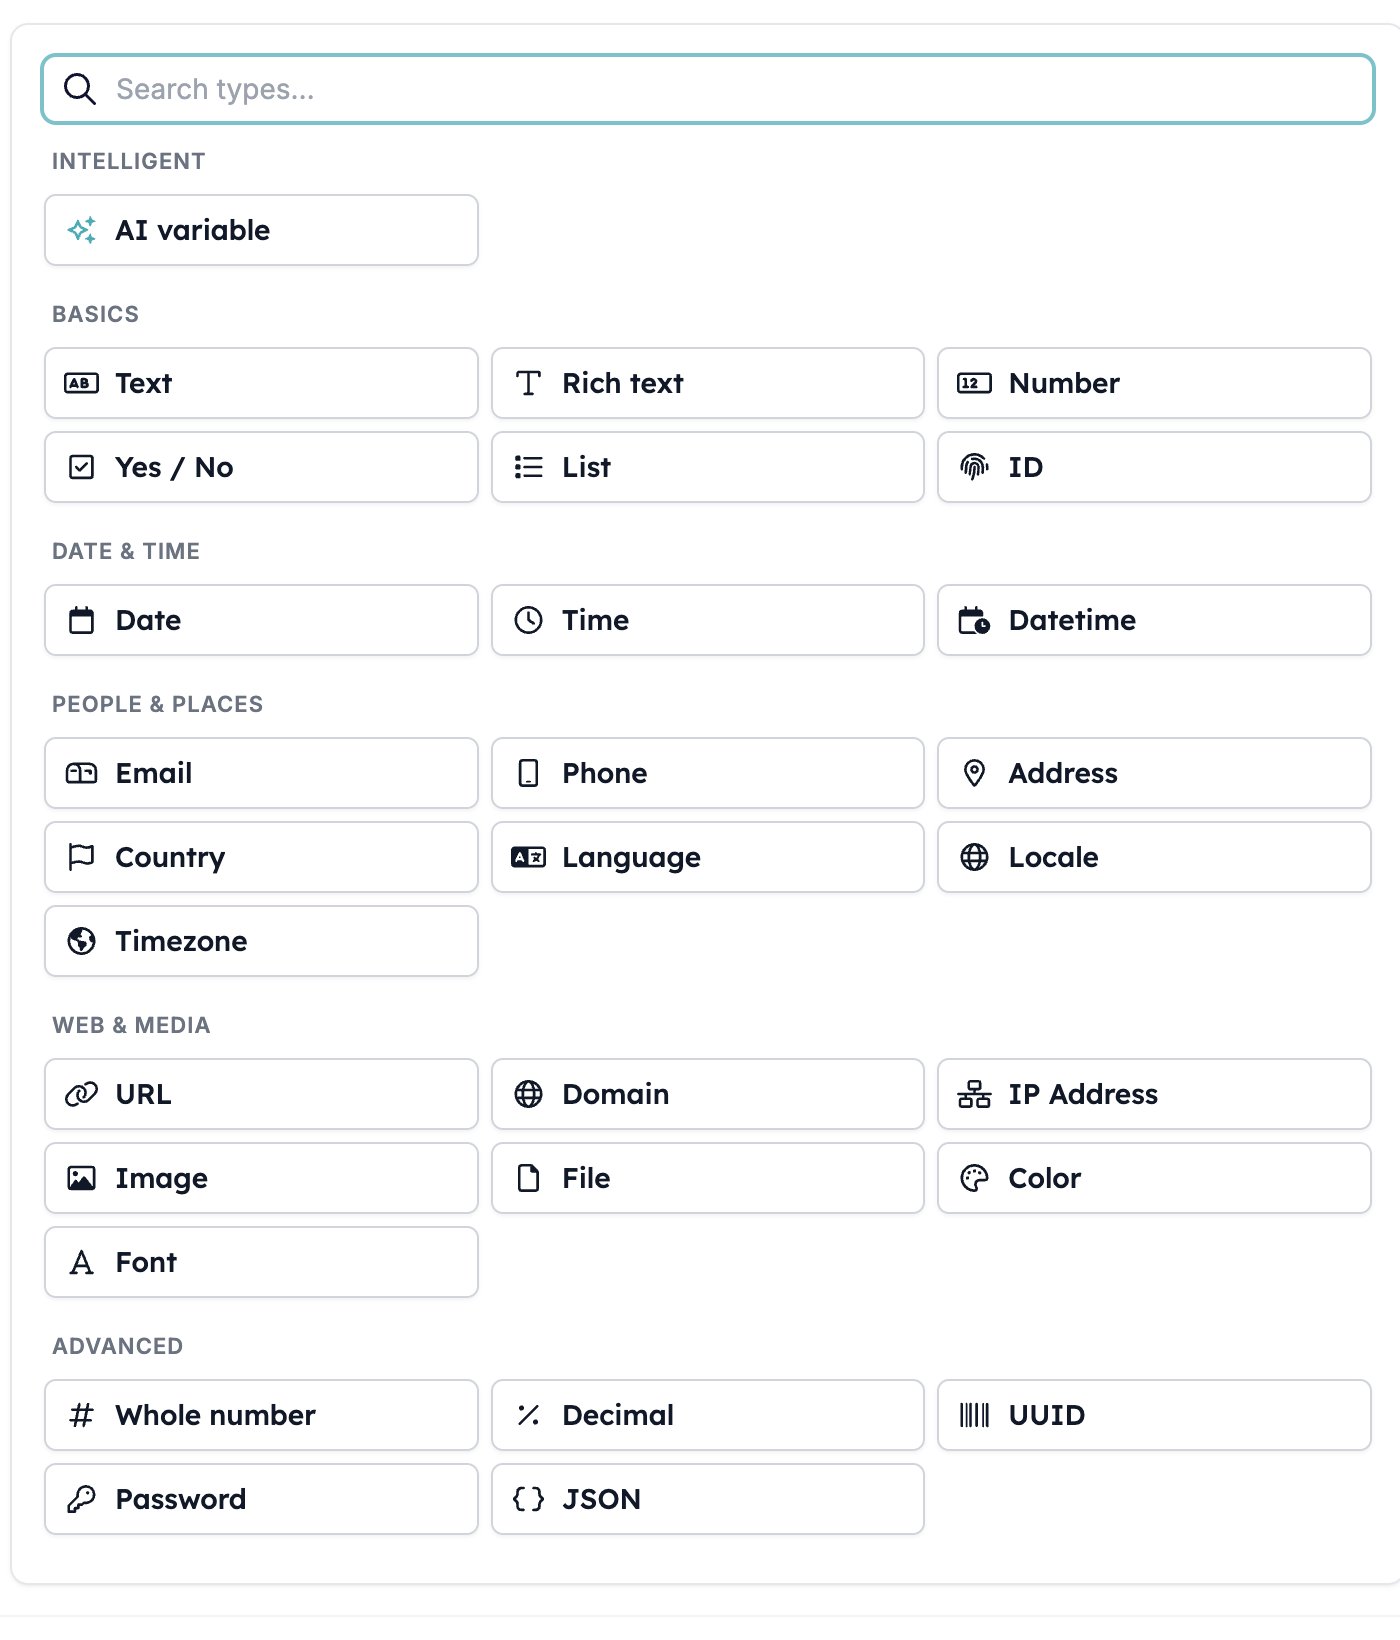
The **+** beside the search box opens a **Variables** dialog: your **Fields** down the left, and on the right the types you can choose from, in six groups. They run from **Text**, **Number**, and **Yes / No** through **Email**, **Phone**, and **Address** to **Color**, **Font**, and **JSON**. **Search types** narrows the list.
## Adding your own variable
The **+** beside the search box opens a **Variables** dialog: your **Fields** down the left, and on the right the types you can choose from, in six groups. They run from **Text**, **Number**, and **Yes / No** through **Email**, **Phone**, and **Address** to **Color**, **Font**, and **JSON**. **Search types** narrows the list.
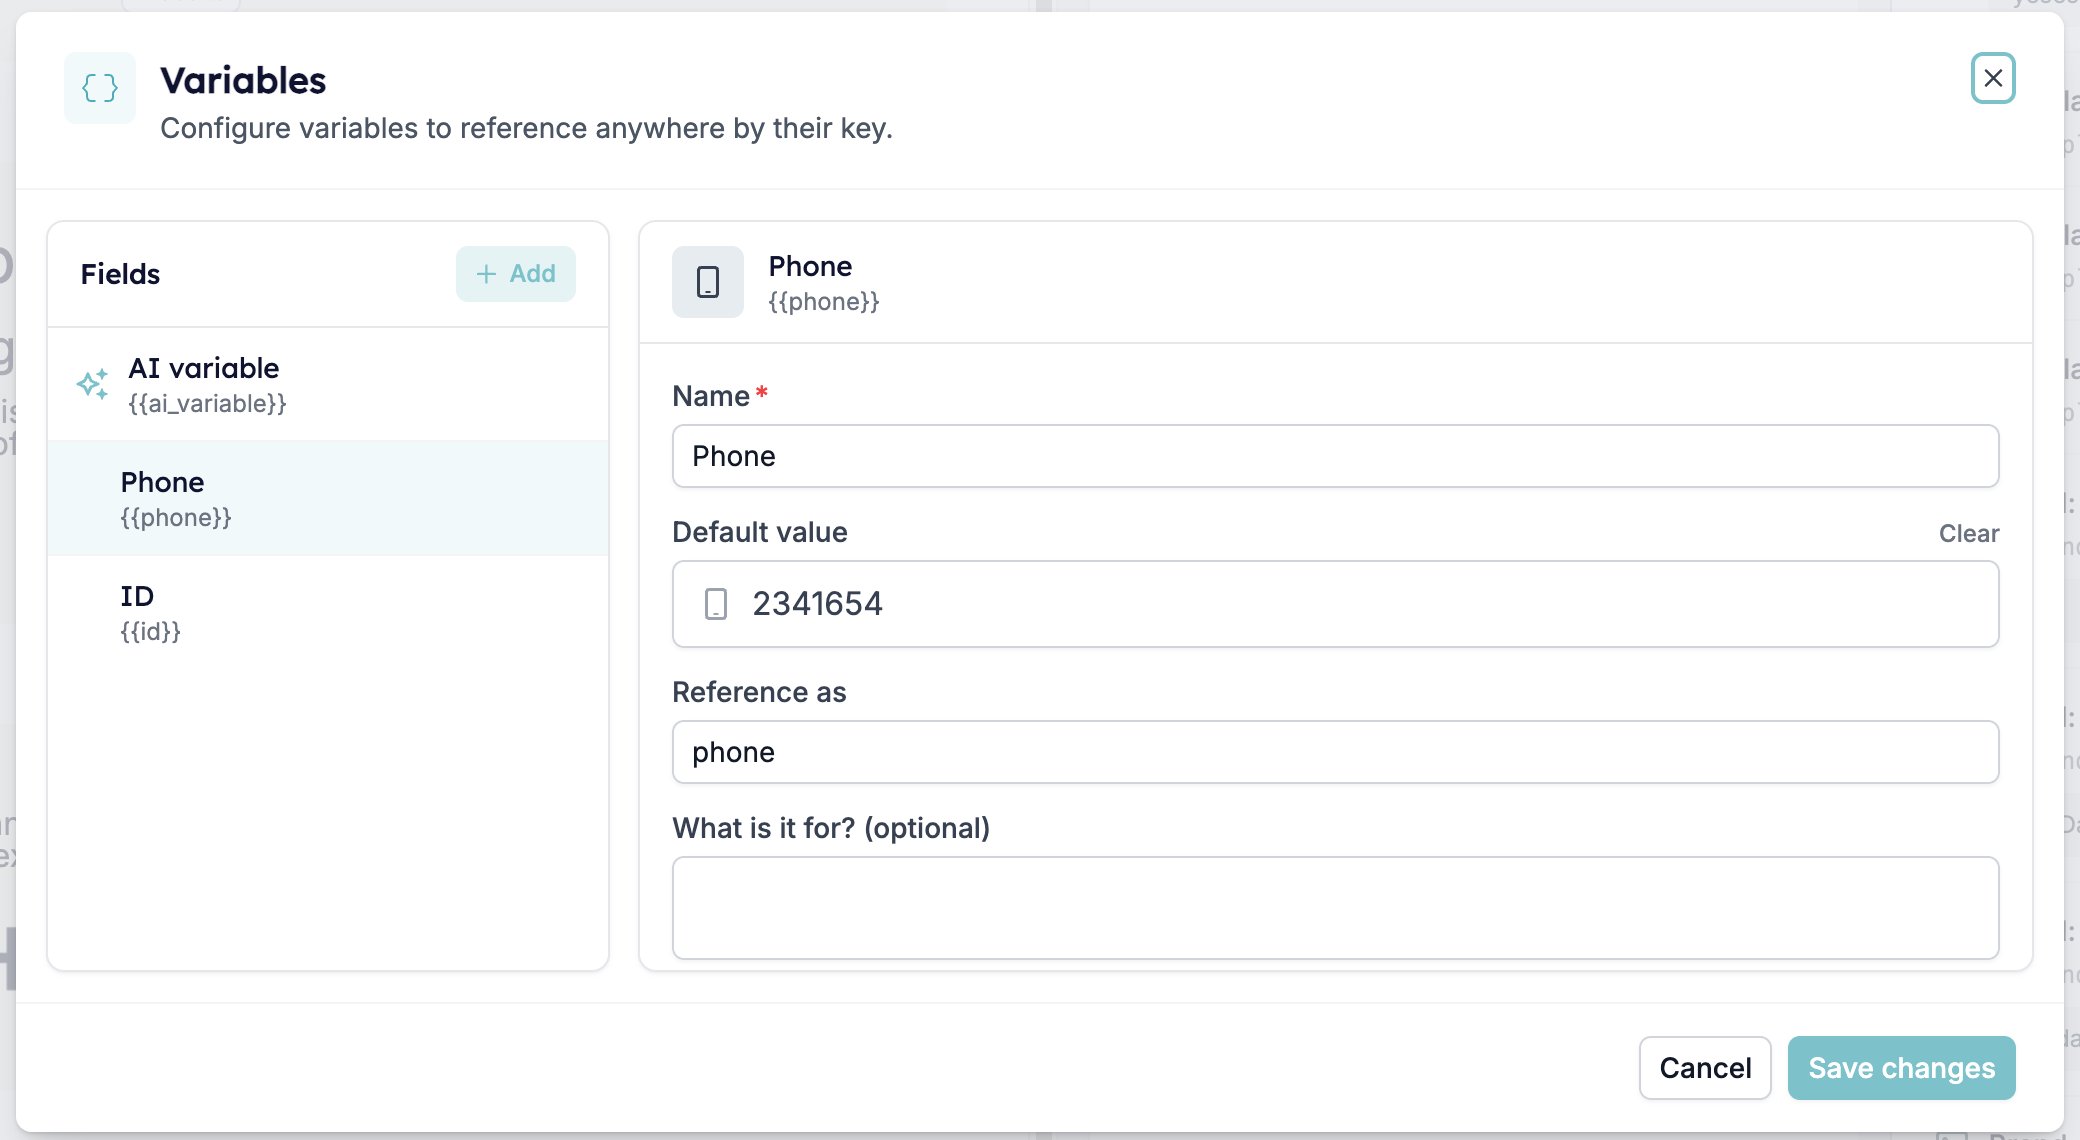
 Pick a type and four settings open beside it.
* **Name** is what the chip reads on the canvas.
* **Default value** is what HireData writes in when nothing else supplies one. The control matches the type you picked.
* **Reference as** is the key you type between the braces. It fills itself in from the name.
* **What is it for?** is an optional note for whoever opens the template next.
**Save changes** keeps them. A variable you add belongs to this email alone, so **Save** the template before you leave.
Pick a type and four settings open beside it.
* **Name** is what the chip reads on the canvas.
* **Default value** is what HireData writes in when nothing else supplies one. The control matches the type you picked.
* **Reference as** is the key you type between the braces. It fills itself in from the name.
* **What is it for?** is an optional note for whoever opens the template next.
**Save changes** keeps them. A variable you add belongs to this email alone, so **Save** the template before you leave.
 A variable of your own earns its keep when one value belongs in several places. Put your phone number in a `{{phone}}` variable and write that into the signature, the footer, and the body, and changing the number afterwards is one edit rather than three.
Deleting a variable does not clear it out of the email. Every chip that used it turns back into plain `{{key}}` text and stays where it is, so the key goes out with its braces showing. Delete the variable, then find each place you used it.
**AI variable** is the first type in the dialog. Rather than look a value up, it works one out for each recipient from an instruction you write. See [AI variables](/variables/ai-variables).
A variable of your own earns its keep when one value belongs in several places. Put your phone number in a `{{phone}}` variable and write that into the signature, the footer, and the body, and changing the number afterwards is one edit rather than three.
Deleting a variable does not clear it out of the email. Every chip that used it turns back into plain `{{key}}` text and stays where it is, so the key goes out with its braces showing. Delete the variable, then find each place you used it.
**AI variable** is the first type in the dialog. Rather than look a value up, it works one out for each recipient from an instruction you write. See [AI variables](/variables/ai-variables).
Bringing in a record's fields
The database button in the toolbar opens **Objects**, which links a record type to the email: a candidate, a vacancy, a match. Link one and every field on that record joins the variable list, addressed by the object's key, as in `{{candidate.first_name}}`.
[Objects](/reference/forms/objects) explains what an object is and what linking one does. It is written for the form builder, which offers more settings per object, but the records and their keys are the same.
## What a recipient actually sees
Three things can happen to a token, and only one of them is what you meant.
* **The variable resolves.** HireData has a value and writes it in.
* **The variable resolves to nothing.** The recipient has no phone number on file, so `{{recipient.phone_number}}` comes out as an empty space. "Call us on ." is the classic way this shows up.
* **There is no such variable.** HireData leaves a key it does not recognise exactly as you typed it. The recipient reads `{{recipient.favourite_biscuit}}`, braces and all.
The builder tells you which of the three you are heading for. A key it recognises becomes a chip. A key it does not stays as plain text, braces showing, and reaches the inbox that way.
The one exception is a token carrying a [modifier](#giving-a-variable-a-fallback). That stays plain text however good the key is, because the picker only ever inserts a bare key. So braces on the canvas mean one of two things: a variable you got wrong, or a modifier working as intended.
A token you paste in from somewhere else is the usual source of the third case. Paste it, then check it turned into a chip.
## Giving a variable a fallback
Add the `default` modifier and HireData uses your words instead of leaving a gap.
```text theme={null}
Hi {{ recipient.first_name | default: "there" }},
```
It fires in both of the failure cases above: when the value is blank, and when the key does not exist at all. The email above reads "Hi Sofia," for Sofia and "Hi there," for everyone whose first name is missing.
A chip cannot be edited. It is one object on the canvas rather than the characters it stands for, so there is nowhere to put a modifier. Type the whole token by hand instead, braces and all, and let the picker open and close around you. What you typed stays plain text rather than becoming a chip, which is what a modifier looks like when it is right. Read it back in the preview.
`default` is one of a long list. See [Modifiers](/variables/modifiers) for the rest, and for chaining several together.
## Related
* [Testing](/reference/email-builder/testing) is where you find out what your variables resolve to.
* [Variables](/variables/introduction) covers the `{{ }}` syntax across forms, messages, and automations as well as email.
* [Modifiers](/variables/modifiers) lists everything you can do to a value on its way into the email.
* [AI variables](/variables/ai-variables) work out a value per recipient instead of looking one up.
* [Objects](/reference/forms/objects) covers the records whose fields become variables.
* [Translations](/reference/email-builder/translations) keeps your variables intact in every language.
## Related topics
- [Variables](/variables/introduction.md)
- [AI variables](/variables/ai-variables.md)
- [How WhatsApp templates work](/apps/messaging/whatsapp/how-whatsapp-templates-work.md)
- [Test & Evaluate](/reference/forms/testing/test-and-evaluate.md)
- [WhatsApp error codes explained](/apps/messaging/whatsapp/whatsapp-error-codes-explained.md)